Did the cleaning, made a custom baffle gasket, shes cooking now.

  • Active since 1995, Hearth.com is THE place on the internet for free information and advice about wood stoves, pellet stoves and other energy saving equipment.

    We strive to provide opinions, articles, discussions and history related to Hearth Products and in a more general sense, energy issues.

    We promote the EFFICIENT, RESPONSIBLE, CLEAN and SAFE use of all fuels, whether renewable or fossil.
Status
Not open for further replies.

Hogwildz

Minister of Fire
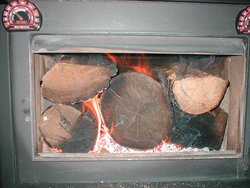
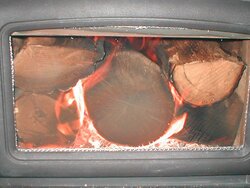
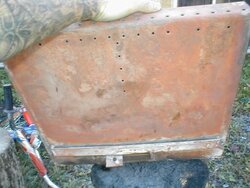
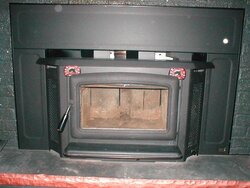
Did my cleaning this past Sunday. Even took off the surround, side grilles, top shelf & ash shelf.
Painted the air fins on top black and the front inner corners of the casing black. Spent some time on her, now its humming along and I am enjoying.
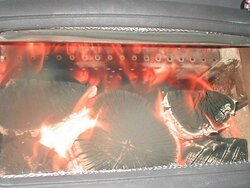
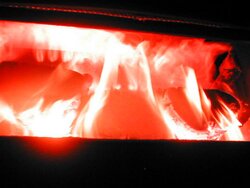
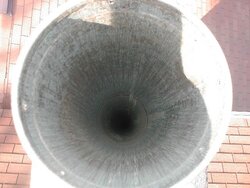
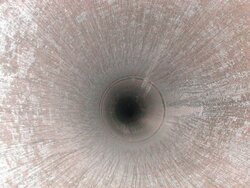
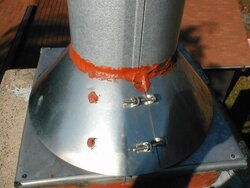
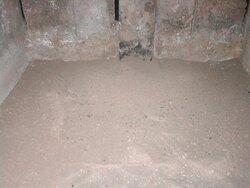
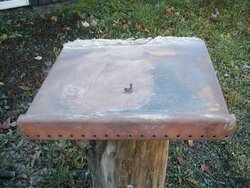
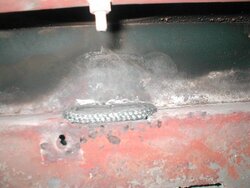
First off, about screened chimney caps. Here are photos of mine last cleaned New Years last year, burned until almost up to May last year and started up evening fires last week. Burning most of today & yesterday as it has been chilly here. So much for the build up theories. I say it comes down to the wood you burn, how dry and how it is burnt!
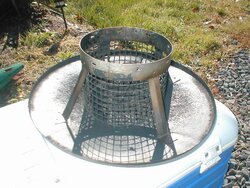
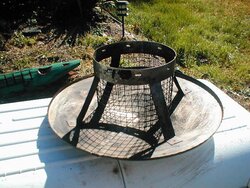
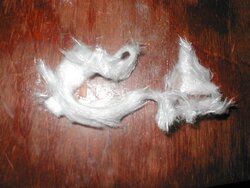
Cap before & after. NANANANA
 

Attachments

  • P1010058.JPG
    P1010058.JPG
    88.4 KB · Views: 2,541
  • P1010060.JPG
    P1010060.JPG
    88.9 KB · Views: 2,539
The chimney fires kept that screen really clean. :lol:
 
Now on to the brushing.
I use a metal brush, oh myyyy look at all those scratches!!!!!!!!!! "It will never last 20 or 30 years"...................
I'll run right out and grab a "poly" brush,,,,,,,,,,,,,, uhuh right.
A shot of my cleaning weapon of choice & how low can it go?
 

Attachments

  • P1010068.JPG
    P1010068.JPG
    50.6 KB · Views: 2,638
  • P1010069.JPG
    P1010069.JPG
    81 KB · Views: 2,641
  • P1010067.JPG
    P1010067.JPG
    62 KB · Views: 2,671
  • P1010065.JPG
    P1010065.JPG
    40.1 KB · Views: 2,611
BrotherBart said:
The chimney fires kept that screen really clean. :lol:
Makes for good weanie roasting too ;)
 
Oh yeah, while your up cleaning, make sure the storm collar is sealed well.
And hers a few shots of my ladder set up. I do have it made for cleaning I must say.
 

Attachments

  • P1010070.JPG
    P1010070.JPG
    51.6 KB · Views: 2,510
  • P1010076.JPG
    P1010076.JPG
    71.6 KB · Views: 2,608
  • P1010061.JPG
    P1010061.JPG
    39 KB · Views: 2,525
Here is the massive amount of soot I gathered from sweeping.
I just spread it in the bottom of the firebox with. No fuss no muss.
 

Attachments

  • P1010066.JPG
    P1010066.JPG
    41.1 KB · Views: 2,642
Lookin good big'un.
 
On to the baffle.
All you PE Summit & Aldera owners here is what your baffle is comprised of:
S.S. shell, insulation blanket on top, s.s. heat shield on top of blanket. Another S.S. heat shield on underside of stove top also.
Last shot if it comes in right order, is the secondary air opening in the bottom rear underside of the baffle. THis sits over the vertical channel at back of the stove. And rests on the gasket.
 

Attachments

  • P1010079.JPG
    P1010079.JPG
    80.4 KB · Views: 3,214
  • P1010080.JPG
    P1010080.JPG
    79.9 KB · Views: 3,226
  • P1010081.JPG
    P1010081.JPG
    57.7 KB · Views: 3,268
  • P1010082.JPG
    P1010082.JPG
    52.2 KB · Views: 3,210
BrotherBart said:
Lookin good big'un.
UMMM, UGGA UGGA whatum be thatum red word above your name?????????????????
;)
 
And now the piece de resistance.............
The Neanderthal style Summit baffle gasket.
Hand semi braided/ semi tied and itchy fingers afterwards.
Secondary channel naked..................
Secondary channel newly clothed with the Custom Caveman gasket..................
And a shot of the pc of crap gasket PE sells.
 

Attachments

  • P1010002.JPG
    P1010002.JPG
    31.1 KB · Views: 3,448
  • P1010003.JPG
    P1010003.JPG
    44.2 KB · Views: 3,531
  • P1010004.JPG
    P1010004.JPG
    41.7 KB · Views: 3,544
  • P1010008.JPG
    P1010008.JPG
    56.4 KB · Views: 3,280
  • Like
Reactions: PA Fire Bug
Re-install baffle on new improved gasket,
sets down nicely no gap in back, confirming its seated and not raised any more than the normal gasket. And don't forget to RE-INSERT THE BAFFLE PIN!!!!!!!!!!
And a shot of PE's replacement gasket. You be the judge.
 

Attachments

  • P1010005.JPG
    P1010005.JPG
    54.8 KB · Views: 3,395
  • P1010006.JPG
    P1010006.JPG
    56.6 KB · Views: 3,214
  • P1010001.JPG
    P1010001.JPG
    75.3 KB · Views: 3,115
And a shot of the painted top casing air deflectors & the corners also painted. I should have painted all the visible casing inside when the surround was off, but oh well next time.
 

Attachments

  • P1010007.JPG
    P1010007.JPG
    68.3 KB · Views: 2,730
north of 60 said:
SCI here! (stove scene investigations) I see a few scratches from cleaning that cap RHS pict. :coolsmirk:
You sure do. Have to leave something for all that creosote to grab onto
;)
I did slide the screen out a tad to get the wire brush where the screen sets. Knowing the whole time the end of the screen was going to puncture a finger.
Welp, my left thumb took one for the team. Maybe I should have gotten updated on my Tetnus shot??? Oh well, I guess I'll know if things start locking up.
;)
 
And lastly for all you speds out there...........
While I was sitting on the peak of the roof, looking around and reflecting on all the zen and sheet up there.
I took a few fall shots around the cave. Fall really is a great time for a few hits of windowpane.
;)
 

Attachments

  • P1010072.JPG
    P1010072.JPG
    71.3 KB · Views: 2,517
  • P1010073.JPG
    P1010073.JPG
    113.8 KB · Views: 2,513
  • P1010074.JPG
    P1010074.JPG
    99.3 KB · Views: 2,461
  • P1010077.JPG
    P1010077.JPG
    93.6 KB · Views: 2,459
  • Like
Reactions: turbopsi
Nice spread there Hogz. If there was anything on that cap just blame it on that piece of pine you burnt last December. ;-)
N of 60
 
That pile in the driveway is pine the neighbor brought over. I have no problem burning pine mixed in and shoulder burning.
In the dead of winter, Its mostly Oak for me though. I got a nice load of about 2 cord of red oak I just split for next year.
This year I have about 4 cords or so of mostly white oak, some soft maple, and one was the gnarliest maple I ever split. Its all being burnt, heat is heat.
 
Great pics Hog. I haven't pulled my secondary baffle yet. The baffle shots were really instructive. Now I want to see a night shot with the nuclear glow on the horizon.
 
Hogwildz said:
And lastly for all you speds out there...........
While I was sitting on the peak of the roof, looking around and reflecting on all the zen and sheet up there.
I took a few fall shots around the cave. Fall really is a great time for a few hits of windowpane.
;)

Just finished sweeping my Chimney this past Monday from the inside. My roof is way too high and pitchy for me to go up there again, unless its an extreme emergency. I had to nail down support for a small ladder to reach the top of the chimney, similiar to what you did when I installed my full liner.

It was kinda weird sweeping a chimney under a Wind Advisory.... :)


Keep us PE Summit folks posted on how the gasket performs..
 
Looking good Hogz. Nice job on the new gasket (have you been practicing braiding the cave womans hair again?)

Now...if we could just get that unbiased test of the mighty Summit versus the heat belching 30.... :cheese:

Hmm...now that you point it out, something does seem different about BroB's name, just can't quite put my finger on it. :coolsmirk:
 
BeGreen said:
Great pics Hog. I haven't pulled my secondary baffle yet. The baffle shots were really instructive. Now I want to see a night shot with the nuclear glow on the horizon.
When a few more leaves come off the trees, I'll get ya some shots of the cloud makers just over the way. Can see it from my home.
Till then, heres some glow action for ya. For those this year about to ask how to get a good, long, hot, overnight burn here is how I do it.
Damn I could only fit 5 splits in the stove. What am I doing wrong??? UGG UGG
;)
 

Attachments

  • P1010001.JPG
    P1010001.JPG
    70 KB · Views: 2,653
  • P1010003.JPG
    P1010003.JPG
    58 KB · Views: 2,606
  • P1010004.JPG
    P1010004.JPG
    31.3 KB · Views: 2,627
  • P1010005.JPG
    P1010005.JPG
    57.2 KB · Views: 2,580
Secondary burn
 

Attachments

  • P1010006.JPG
    P1010006.JPG
    30 KB · Views: 2,421
  • P1010002_01.JPG
    P1010002_01.JPG
    32.1 KB · Views: 2,401
  • P1010005.JPG
    P1010005.JPG
    57.2 KB · Views: 2,388
  • P1010003_01.JPG
    P1010003_01.JPG
    33 KB · Views: 2,321
The fires of Hell!

Lookin good. Methinks the gasket be workin just fine.
 
Thank you BB
the way the vertical channel runs through the back channel, at the front there is a small step down where the two meet, it still lets some out there, which I don't mind the secondary back there either.
Just wondering why its designed that way. Unless they want a secondary going on back there also.
I have a feeling I won't have to replace the custom gasket for a long time. That was my main goal.
 
Hogwildz:

Great post . . . shows the noobs and born-again woodburners what we need to do to properly clean the stove.

Also, loved the pics of the secondary fire . . . and now I realize why I'm not getting overnight fires . . . I'm not using the biggest splits and rounds that I have . . . just loading it up with small/medium splits.
 
Status
Not open for further replies.