Double Door Warner Wood Stove Air Regulator Problem - Help

  • Active since 1995, Hearth.com is THE place on the internet for free information and advice about wood stoves, pellet stoves and other energy saving equipment.

    We strive to provide opinions, articles, discussions and history related to Hearth Products and in a more general sense, energy issues.

    We promote the EFFICIENT, RESPONSIBLE, CLEAN and SAFE use of all fuels, whether renewable or fossil.

If I can't free up the air regulator knobs, what should I do with the stove?

  • Get a new stove.

    Votes: 0 0.0%
  • Try it with a controlled amount of wood and see if the settingits stuck at works.

    Votes: 0 0.0%
  • Load it up and melt it. Its worth more as scrap iron.

    Votes: 0 0.0%

  • Total voters
    0
  • Poll closed .
Status
Not open for further replies.

rapidtrent

New Member
Jan 29, 2014
5
Danbury CT
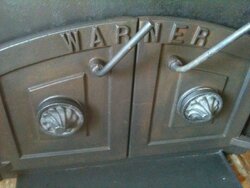
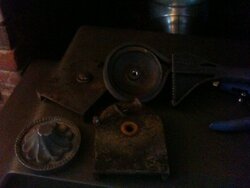
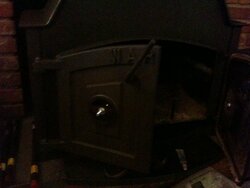
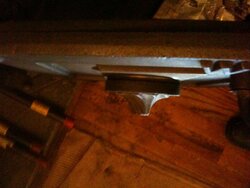
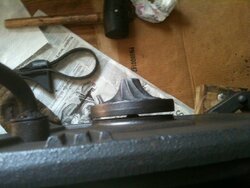
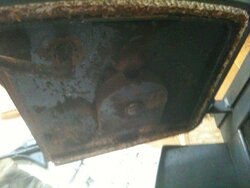
I'm having a problem with a Warner Wood Stove. There's two knobs, one on each door that serve to regulate the air feed. The knobs are mounted on threaded posts so that when turned they can close against the doors and pinch off the airflow vents that reside behind them (through the doors). The problem is the knobs are nearly frozen on the threaded posts and before I can turn them far enough the posts turn with them defeating any progress closing or opening the vent. I tried PB Blaster to free them up with minimal results. I can get a vicegrip on the washer that's under the carriage bolt (?) head but that doesn't stop the bolt from turning much. I find it odd that there is a washer under the carriage bolt head. How would the carriage bolt stay fixed? Maybe its not a carriage bolt?! The attached pictures are a top down view showing the knob and the open air gap behind it and an inside view of the door and the vent box with the carriage bolt head as well as a recent cleaned up picture of the front of the stove. Does anyone have a suggestion to free up the regulator caps? Could they work in some other manner than what I described? Right now I can turn them with a strap wrench but it doesn't adjust the opening much. Any advice will be appreciated.
February 2014 Import 093.JPG February 2014 Import 094.JPG February 2014 Import 095.JPG
 
The post should not turn. No such thing as "you can't fix it". PB soak for a few days, and heat. Is there a half nut on the outside of door to tighten the bolt to door to prevent from moving? If all else fails, cut it off with sawzall or hacksaw, drill out bolt, thread cap with bottoming tap. Once you get a hole in center of bolt, it will probably give up and screw off the bolt. You can even make new draft caps with malleable iron pipe caps. They were used by Bob Fisher before the draft cap was invented by his father. Search the Fisher Forum (draft cap or air damper) using the search box at top of page for details.

Keep coated with silver anti-seize when repaired which is higher temp than most greases.
 
Last edited:
  • Like
Reactions: rapidtrent
Is it possible to pull the doors and take them to a welder and have a tack weld put on the bolt head? I say a tack just so you can test it and see if they will screw down like they should.
 
  • Like
Reactions: rapidtrent
Thank you for the suggestions Coaly and Rwhite,

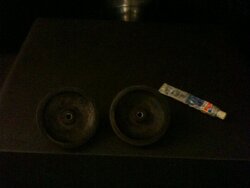
Rwhite - I considered tack welding the carriage bolts, I have my own welder but getting power (220v) to it upstairs is a challenge. The door-off suggestion was great but before I pursued it I gave a few other tactics a try. I ended up getting one off with a compound tool (vice grips and channel locks) holding the carriage bolt under the vent shield and a big assist from my friend Doug. The other had to be cut which I accomplished assembling a hacksaw through the other fresh air vent shield. The cap separated with my bench vice, some help and elbow grease. The Caps are aluminum and I suspect they haven't moved much in a while - evidence of galvanic action in the deeper threads of the cap. I tapped them as suggested, replaced all of the hardware and assembled with anti-seize and came upon an interesting discovery.

Coaly - you're too smart! You should be investigated lol! So I couldn't close the caps as much as I'd like with the new nuts I purchased no matter how many washers I put under the hex head.....hehe ;ex Then I remembered what you posted mentioning half-nuts. Fortunately I was able the salvage the half-nuts from the carriage bolts and that did the trick :p I read another post about aligning the cap posts and with a tweek with my rubber mallet achieved a very nice and square "cap seat". So all is well and we're toasty in time for another storm. Thanks for the encouragement and advice :)

Here's some pics.


Warner Woodstove Vent Repair 003.JPG Warner Woodstove Vent Repair 001.JPG Warner Woodstove Vent Repair 002.JPG Warner Woodstove Vent Repair 004.JPG Warner Woodstove Vent Repair 006.JPG Warner Woodstove Vent Repair 007.JPG Warner Woodstove Vent Repair 010.JPG Warner Woodstove Vent Repair 012.JPG
 
If you ever need to make a half nut or cut something precise, position it in the vise with the cut line right at the edge of the jaws. Oil the hacksaw blade and use the jaw edge as a guide. It will cut the nut in half without wandering or making a crooked cut.

I thought the caps were cast iron. Had I known they were aluminum which expands at a much faster rate, I would have suggested pouring boiling water on them. I have steam available, so a flex hose or copper line with a little steam on it is even better.

Here's how I remove air damper nuts that sometimes have a hard baked on soot coating on the threads. (They are usually half nuts due to shallow recess on back of draft cap)
The key is to not allow the heat to penetrate to the male thread inside. Heating a nut on a bolt or threaded rod with a flame transmits so much heat to the inner part it counteracts heating the outer piece. A socket (deep in this case) on an extension can be submersed into hot water (doesn't need to be boiling) and the hot socket put on the nut. The heat soaks from the outside of nut towards threads, and with steady pressure they usually break loose easily when the right temperature is reached. The rotating pressure also presses the hot socket walls against nut to transmit the heat just right. It doesn't take much when you only apply the heat to the nut where it's needed. That's the most even way to heat it all around the perimeter at the same time, expanding the most. Many times hot water from the tap is enough. Once it starts moving, don't stop and the friction will keep it hot. Try it on a stuck lug nut. Soak the lug wrench end in hot water long enough to heat and use it to heat the nut. That's a good safe way around fuel tanks and fuel lines when you can't heat a fitting with a flame too. Heat the wrench in boiling water or steam if available. That was the nut buster from the 1800's when everything was steam driven and it was readily available.
 
Status
Not open for further replies.