Down-Drafting Stove Design

  • Active since 1995, Hearth.com is THE place on the internet for free information and advice about wood stoves, pellet stoves and other energy saving equipment.

    We strive to provide opinions, articles, discussions and history related to Hearth Products and in a more general sense, energy issues.

    We promote the EFFICIENT, RESPONSIBLE, CLEAN and SAFE use of all fuels, whether renewable or fossil.
Status
Not open for further replies.
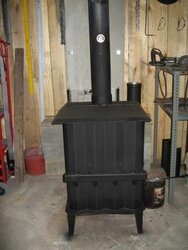
I've been burning this stove for three years now. I recently recieved the opportunity to be a little more involved in this stove company and now have a Model 3000. All of the stoves use the same technology but the 3000 has a larger chamber, 12.5 x 20 so it takes larger logs than the Md: 2000 I've been using. This is certianly one beast of a stove easily heating my 28" x 40 Shop and still holds a fire all night. The best thing about this stove is that I built it myself. What a major undertaking this was as all I have are prints and no assembly instructions. It took me and a friend (30 years of metal and welding experiance) two weeks to build this stove. Needless to say there were a few problems along the way, (besides us almost killing each other). After building this stove I realized how everything worked and how sturdy and simple this design really is. Not a living room bueaty but for raw brute heating it does the job well. I would like to compare it with other stoves using down draft technology and see how it fares?

This stove has two chambers, ones the firebox and the other is an open chamber leading to the stack. Between the chambers there is a devider where a 1/2" cast baffle is mounted. Its a top loader and the intake air is pulled in through the manifold and comes in at the bottom of the firebox, burning only at the bottom circulating smoke and gasses around the front chamber conditioning the load so when the fuel gets to the bottom its dry. This also prevents exaust gasses from excaping until they pass through the intense heat reburning them until they are light enough to be sucked belos the cast baffle into the secondary chamber and out the stack. This stove operates optimumlly at 200 degrees F. with the temp on the side and front between 500 and 100 degrees F.. Still not sure exactly how it works, but I do now the end results. The stove is easy to light as you put your larger wood on the bottom and kindling on top so if it doesn't light the first time you don't have to dig out the fuel. There's a hopper that goes into the chamber which allows the burning of granular fuels, corn, pellets, sawdust, and 10 or so other fuels. The last two Winters the stove ran constantly for 6 months without being shut down. I would be interested in any comments.
 

Attachments

  • IMG_1157com.JPG
    IMG_1157com.JPG
    23.6 KB · Views: 944
Cool,
I bet Corie will be along soon since he is building a stove also. Can you send more pics like the firebox?
 
This technology has been used by the Sedore Stove formerly marketed only in Canada. It is now being manufactured in the US. and is available to all. The smoke and gases are contentiously recirculated in the front chamber pulling them through the fire until it burns out all the pollutant's. It then becomes light enough to be sucked under the rear cast baffle and out the stack. This is done with no catalyst and works very well. Its a very simple stove that burns clean and you don't have to worry about burning a green piece of wood and ruining a $100.00 plus catalyst. This stove will literally burn anything, produces a massive amount of heat, and is environmentally friendly. ULC Approved for 15 different fuels is an added plus. I've tried corn, wood pellets, sawdust, wood chips, and all types of wood including pine and have had good results. Some of the other fuels its approved for I don't have access to or have never heard of? Here is the ULC listed fuels for the stoves.

(1.) Hardwood (2.) Softwood (3.) Woodchips (4.) Sawdust (5.) Wood shavings
(6.) Cob corn (7.) Kernel corn (8.) Sunflower seeds (9.) Sunflower tops
(10.) Recycled hardwood cubes (11.) Barley (12.) Oats (13.) wood pellets
(14.) Recycled cardboard cubes (15.) Tree saver firewood.

I think some of these fuels are only in Canada? Does anyone have any info on Recycled hardwood cubes, Recycled cardboard cubes, or Tree saver firewood?
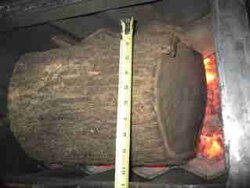
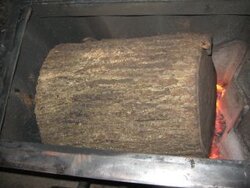
The attached pic is of the stove chamber burning a large piece of green Oak. It burned it for 16 hours. Next we cut a piece of green Oak 20" wide by 12" deep by 20" long that filled the entire chamber and it burned for over 24 hours. We couldn't believe it so we tried it again with the same results. Just one piece of wood the chamber size dropped in on a bed of coals. There is no damper on the stove. The only adjustment is the intake air. The ideal stack temp is 200 F, and I get side and front temps of 500 to the thermometer falling off? The creasote collects on the underside of the lid not in the chimney. I clean my chimney once a year but there is nothing there. How such a simple stove could work so well and the only problems I've seen are restrictions on the draft. The stove needs a good draft preferably straight up with no chimney cap.
 

Attachments

  • IMG_1244.jpg
    IMG_1244.jpg
    6.7 KB · Views: 980
  • IMG_1241.jpg
    IMG_1241.jpg
    14.8 KB · Views: 841
Put the wrong wood (read unseasoned) in any stove and you can line the bird cage with the specs on how clean it burns.
 
Bruce W. said:
The best thing about this stove is that I built it myself. What a major undertaking this was as all I have are prints and no assembly instructions. It took me and a friend (30 years of metal and welding experiance) two weeks to build this stove. Needless to say there were a few problems along the way, (besides us almost killing each other). After building this stove I realized how everything worked and how sturdy and simple this design really is.

I would be interested in any comments.

When you state that you built this stove, do you mean that you assembled it, or do you have a set of plans available for people to actually build with their own materials? If you assembled it, is that how the stove would be shipped to the buyer?

I love the concept of this stove, having looked at it over the internet, but I don't see many others on this forum using this stove, anyone out there to chime in? I would like to hear from users of this stove.
 
Dads got a similar setup to the riteway. It was built by the local amish. I used to think it was the best, until I helped him clean his chimney and his flue. They were plugged solid. The problem with his is you can bank all of the coals you want to the side and flip that lever to allow the smoke to travel through the coals, problem is it does no good. I have Never seen his chimney not smoke with the thing. It doesn't allow any secondary air in the chamber on the side. He considered drilling a series of 1/8 holes in the side of the chamber, but the steel is only 1/16 inch thick and I'm afraid the heat would melt the side of the stove. If we did that we would have to line the side chamber with some sort of fire insulation, or firebrick. He can get 12 to 14 hour burns, but the thing will not burn clean at all. After seeing all of this, I will stick to what I have because I know it will heat well and burn clean. He would have to open his full bore to produce a clean burn. I don't think his efficiency is more than 40 to 50 percent, probably lower. We found buildup close to 2 inches thick in the flue and chimney after a few weeks of operation.
 
laynes69 said:
Dads got a similar setup to the riteway. It was built by the local amish. I used to think it was the best, until I helped him clean his chimney and his flue. They were plugged solid. The problem with his is you can bank all of the coals you want to the side and flip that lever to allow the smoke to travel through the coals, problem is it does no good. I have Never seen his chimney not smoke with the thing. It doesn't allow any secondary air in the chamber on the side. He considered drilling a series of 1/8 holes in the side of the chamber, but the steel is only 1/16 inch thick and I'm afraid the heat would melt the side of the stove. If we did that we would have to line the side chamber with some sort of fire insulation, or firebrick. He can get 12 to 14 hour burns, but the thing will not burn clean at all. After seeing all of this, I will stick to what I have because I know it will heat well and burn clean. He would have to open his full bore to produce a clean burn. I don't think his efficiency is more than 40 to 50 percent, probably lower. We found buildup close to 2 inches thick in the flue and chimney after a few weeks of operation.

Sounds to me like the problem is more with the design of the stove not having a secondary combustion chamber than a problem with the idea of downdrafting through the coals... I think to make this work you MUST have secondary air coming in after the downdraft. If there isn't oxygen present, you aren't going to combust those flue gasses no matter how hot you get them, and if you have oxygen present going through the coals you'll burn the coals to fast. Thus you need to have secondary air added after the combustion gasses have been super heated going through the coal bed, but the quantity needs to be tightly controlled, as to much will cool and dilute the gasses so they don't burn, and not enough won't be clean.

IOW, a modern tech stove will likely do it better.

Gooserider
 
Status
Not open for further replies.