DuraPlus Basic Kit through a cathedral ceiling

  • Active since 1995, Hearth.com is THE place on the internet for free information and advice about wood stoves, pellet stoves and other energy saving equipment.

    We strive to provide opinions, articles, discussions and history related to Hearth Products and in a more general sense, energy issues.

    We promote the EFFICIENT, RESPONSIBLE, CLEAN and SAFE use of all fuels, whether renewable or fossil.
Status
Not open for further replies.

vpuleo

New Member
Jul 20, 2010
9
Exeter, NH
Hi,

Been reading a lot in the forum for several months and am getting ready to put in an DuraPlus engineered chimney.

Some background:

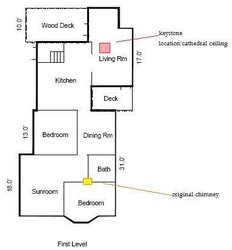
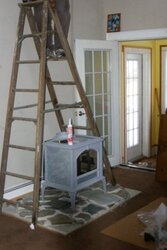
We have an unlined brick chimney, but unfortunately the layout of rooms has changed over the last 110 years and it's not in a good place for us to set up a woodstove. So we decided to put it in a room that was an addition (cathedral ceiling), since this room stayes quite a bit colder during the winter months and is near our kitchen. The idea is that this would supplement our primary heating system. The layout (not drawn to exact scale) is attached.

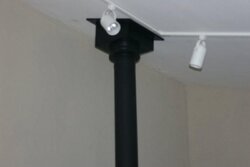
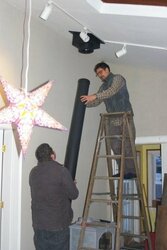
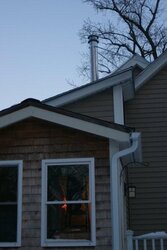
I was lucky to pick up one of the refurbished Keystones over the summer. I guess my main question is if the Basic DuraPlus Ceiling kit will work OK on a Cathedral ceiling. According to the manual (http://www.northerntool.com/downloads/manuals/36625.pdf) it should be OK. I'm going with this one since I can get everything locally/affordably from HD (http://www.homedepot.com/h_d1/N-5yc...splay?langId=-1&storeId=10051&catalogId=10053) this weekend. Has anyone tried this type of installation? I'm going to do single wall pipe up to the ceiling (about 12 feet) and have about 8' of chimney outside to meet the appropriate 10-2-3 guideline. The roof is shallow, but right next to where it will exit, the pitch changes which requires a longer stack.

Goal is to have fires before the snow flies in NH. We'll see...
 

Attachments

  • first floor.jpg
    first floor.jpg
    16.1 KB · Views: 447
A couple things to be sure of:

1) What is the thickness of the ceiling/roof? Make sure of this and find out what the kit's support box depth is. The support box needs to project into the room at least 2" below the ceiling on the low edge. For example, if this is 9" thick ceiling (2x8 + roof deck + drywall), then an 11" box will not work due to the greater penetration needed on the upper slope of the ceiling.
2) With 8' of class A outside, it will require a roof brace attached at the 5 ft. point.
 
Great point about roof thickness, hadn't thought of that. Thank you.

I'm guessing the roof brace I may need to pick up at a stove shop, probably it won't be carried a the local big box...
 
The roof brace is a pretty standard part. This is one item that may fit, even if not a Simpson part, as long as the clamp is adjustable. Check before you buy.
 
That was what I was concerned about. They should make an 18" box, but don't. I would just get the individual parts if you can't get the 24" box with the kit. Call dynamite buys. They are pretty helpful and know what you are looking for.
 
I ended up getting the parts from a friend who has been doing hearth and chimneys professionally for over 25 years. It was cheaper than going through a shop and got good advice on the installation. As was recommended (thanks again) we got the 24" support box and Duravent stove/chimney pipe. We got the chimney setup in about 6 hours with 3 of us and started curing the stove that night. The chimney install got delayed quite a bit from November, but we're new in the house and will have plenty of future winters of full use with the stove. Besides, we still have half the winter left... or more!

The wood I have is seasoned really well, so we've been having good luck doing all night burns and figuring out how to correctly engage the combustor.

(I'm posting some pics, please excuse the unfinished hearth pad, still need to add some trim and grout and we'll be officially done! Better late than never, that's the mantra around here...)
 

Attachments

  • IMGP3254.jpg
    IMGP3254.jpg
    15.2 KB · Views: 356
  • IMGP3233.jpg
    IMGP3233.jpg
    29.5 KB · Views: 334
  • IMGP3249.jpg
    IMGP3249.jpg
    29.1 KB · Views: 347
  • IMGP3250.jpg
    IMGP3250.jpg
    31.9 KB · Views: 342
There ya go, looks good. Only one thing missing from these pics - FIRE! :lol:
 
Another thing to think about...

With a 11" box and single wall pipe, the clearances increase to combustibles (ceiling in the house). You will have to use double wall stovepipe inside and even with that, there is a 6" distance requirement.
 
With a 24" long cathedral ceiling support box, it can be dropped down enough into the room so that the 18" rule applies as long as side clearances are ok. However, it's not recommended to use single-wall connector for runs over 8 ft and quite often the connector run is greater than 8' with cathedral ceilings. So the recommendation for using double-wall is a good one if the run is long. In vin's case it appears to be under 8'.

I am skeptical about the air movement scheme. My suspicion is that the heat losses will outweigh the gains. There are other solutions, starting with a ceiling fan. With a regular 12" table or box fan located on the floor at the bedroom end of the diningroom, blowing toward the stove room, you may find that you get adequate heat circulation. Certainly try this first, it will cost a whole lot less. This has worked well for many people. You can run the fan on low speed so that it is almost silent.
 
Status
Not open for further replies.