EKO Secondary Air Adjustment

  • Active since 1995, Hearth.com is THE place on the internet for free information and advice about wood stoves, pellet stoves and other energy saving equipment.

    We strive to provide opinions, articles, discussions and history related to Hearth Products and in a more general sense, energy issues.

    We promote the EFFICIENT, RESPONSIBLE, CLEAN and SAFE use of all fuels, whether renewable or fossil.
Status
Not open for further replies.

Donl

Feeling the Heat
Nov 23, 2007
315
Ontario
Received our EKO 40 boiler last week. Managed to get it safely positioned in the outside boiler house and remove the steel shipping pallet . It's amazing what one motivated person and a good pry bar can do!

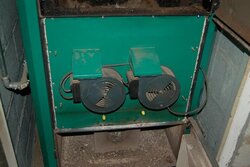
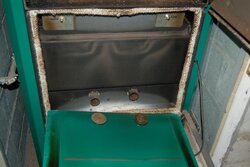
I have had a good chance to look the boiler over and somehow I cannot find the secondary air adjustment. The diagram I have indicates that it is behind the fan casing just below the fan. Is there something else that I must remove before I can get to it?
 
It took me awhile to figure that out, too, Don. I think nofossil finally explained where it was.

On the 40, I think it's one threaded rod located between the fan cover and the bottom door. It's got a retaining nut and a slot at the end for adjustment. It should be 3.5 full turns out to start, then fine tune it from there. Here's a picture of mine, which has two of those adjustment shafts. I glued wire nuts (yes nofossil, with EPOXY glue) onto the ends for easier adjustment.

Incidentially, I'll post a pic of what's behind that panel so that you can understand how it works. One of my tubes broke loose and walked forward until it jammed the air adjustment plate. I have to get a portable welder over here to tack it back into place. You can see in the pic, it's the tube on the left. I asked the dealer if I should have the guy put a bead around the pipes instead of tacking it, but he explained that they only tack it because if you ever have to replace the refractory (and I didn't know you could do that), it's a lot easier to grind the tubes loose if they're tacked in. Mine only have one weld, however, so I'm going to have the guy put three on each one.

Anyway, I digress. Here's the pics.
 

Attachments

  • underhood1.jpg
    underhood1.jpg
    40.3 KB · Views: 377
  • underhood2.jpg
    underhood2.jpg
    50.6 KB · Views: 367
  • underhood3.jpg
    underhood3.jpg
    48.4 KB · Views: 356
Thanks Eric! I found them. I can see why you epoxied the wire nuts on.
 
Do you have two on the 40? If so, how many nozzles do you have?
 
Eric Johnson said:
Do you have two on the 40? If so, how many nozzles do you have?

There are two secondary air adjustment screws and one nozzle. The nozzle has what appears to be four (4) approx. 3/4 inch plastic pipes protruding into the nozzle. two on the right and two on the left. If they are indeed plastic I don't see how they can be there for very long. You can see them in the photo. I would assume that the right air adjuster controls the air flow on the two right ports and the left adjuster the ports on the left.
 

Attachments

  • CIMG0982.jpg
    CIMG0982.jpg
    12.4 KB · Views: 350
I'm not sure what the plastic is for either, but as you said, it doesn't last long. The 60 has two of those nozzles. I thought the secondary air adjustments were each dedicated to a nozzle, but I guess I was wrong on that. You only have one blower though, right?
 
The plastic is there for putting the bricks in and will burn out after you get a real good fire. That is one reason you will have more smoke right at first until you have broke in the nozzels. The 60 and 80 have two nozzels but they are the same as yours. The 60 and 80 also have two fans as they need more air for two nozzels.
leaddog
 
Eric Johnson said:
I'm not sure what the plastic is for either, but as you said, it doesn't last long. The 60 has two of those nozzles. I thought the secondary air adjustments were each dedicated to a nozzle, but I guess I was wrong on that. You only have one blower though, right?


Yep, just one blower.
 
Hey leaddog--I had a guy come over and retack my secondary air tubes. I figured might as well do them both while he was here. $40.

I guess now I can get my air adjustment nailed down.

BTW, like you, I don't think it would be hard to improve on the existing design. It works fine, but I'd like to see some sort of calibration on those adjustments. Wingnuts instead of those regular hex nuts would make better retainers, especially with the knobs on there, but I don't have any metric wingnuts handy.
 
Status
Not open for further replies.