Englander 12NC, my Frankenstien with secondary air. Pictures and details!!!

  • Active since 1995, Hearth.com is THE place on the internet for free information and advice about wood stoves, pellet stoves and other energy saving equipment.

    We strive to provide opinions, articles, discussions and history related to Hearth Products and in a more general sense, energy issues.

    We promote the EFFICIENT, RESPONSIBLE, CLEAN and SAFE use of all fuels, whether renewable or fossil.
Status
Not open for further replies.

Big Al

New Member
Jan 15, 2010
323
Rhode Island
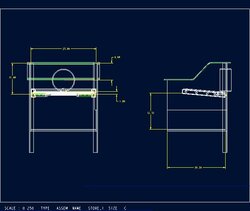
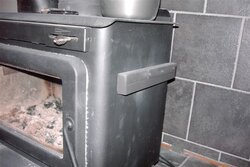
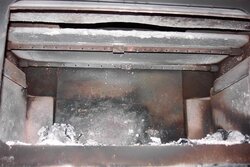
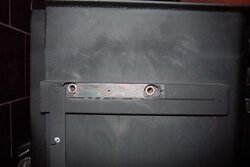
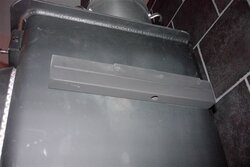
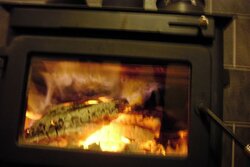
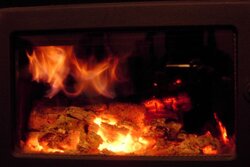
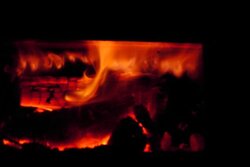
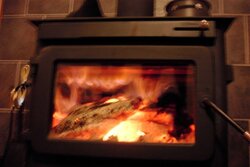
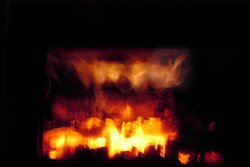
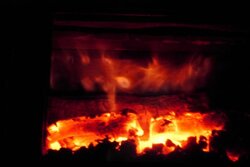
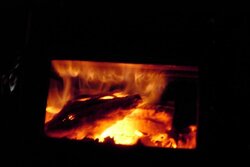
Happy New Year Hearth Members. Here's the official debut of my stove modifications. I got my Englander 12 two years ago and with some time and knowledge from this site I learned to burn it better, mostly over coming the air control sloppiness issues with this "35 t0 1" non EPA model, basically operating it with the efficiency of a smoke dragon. That was all well and good but I yearned for more from it, and being a true caveman, I wanted the ultimate light show that only secondary combustion provides. So, inspired by the Youtube Elm stove guy I got to work hot rodding the ol' 12. Since I didn't know how well it would respond to modification I didn't want to do a lot of permanent damage to the stove, so looking back there are a few things I could have done easier and cheaper but I can't ague with the results. I got most supplies from McMaster/Carr (www.mcmaster.com). Due to the inside architecture of the 12, I was limited to where I could put the burn tubes and baffle. There's a steel plate 3 inches wide just inside the door so I drilled the holes for the tubes so the baffle, when mounted on top, would be level with that plate. I used a baffle from a 13NC cut and trummed to fit the contours of the 12, leaving about and inch between the baffle and steel plate for the smoke to escape. For burn tubes I used 1/4" stainless pipes (actually measures 1/2 OD) held together in the middle with couplers as they didn't have a single pipe that was just the right length. A 10" section mated to an 11"' section. I also put couplers on the ends.(see pics) I drilled 3/16 holes in the tubes and angled the tubes as described in the 13nc manual. I used 1/8 to 1/4" reducers ( again, not actual size but rather just the strange "pipe lingo") to secure the pipes through the sides of the stove. I tried running it this way with the pipes just drawing room temp air through the sides of the stove and got some secondary action but they weren't sustainable. So, due to limited space inside the 12, I had to fab up some external manifolds. (see pics) I wanted to make it look as unobtrusive as possible so I fabbed them to mimic the air control unit on the front. I used 2 peices of 1" square tubing per side. Drilled a hole near both ends of on one side of each suare tube and then stacked the tubes so the holes lined up. I then capped the ends with steel bar stock and welded the tubes together.I then drilled holes to line up with the holes in the stove for the stainless pipe and access holes on the opposite side to get my ratchet in there (see pics). I used the reducer to secure the manifolds and pipes (see pics) There's a hole drilled in the bottom center of each manifold where air is drawn in, runs to the ends of the lower section and then travels to the uppersection, through the reducers and into the pipes inside the stove. The results are pretty wild. Max stove top temps before the mods, with the stove packed to the cieling with seasoned wood and running wide open was 550*. Max now with not quite fully seasoned wood loaded just above fire bricks is 660* with air control 3/4 closed. I even achieved a max temp of 550* with air closed as far as it could go with only a half load of VERY VERY dry wood. I'd say the experiment was a success. It's taken quite a bit of trial and error to achieve results and as you all know there's a different prcedure to be used with different variables: outside temps, wood type, size and loading arrangement. Just out of curiosity, I'm considering provisions for "Zipper air" and perhaps one more burn tube mounted below the steel plate in front and facing rearward. It's been a blast playing with this thing and I've lingered by the stove many a night past my bedtime watching "Caveman TV" in all it's secondary burning splendor. Speaking of secondary splendor, check out the pictures. I'll include as many as I can in this post and then post some more.
 

Attachments

  • stove mods 3.jpg
    stove mods 3.jpg
    44.3 KB · Views: 1,713
  • stove mods 1.jpg
    stove mods 1.jpg
    54.4 KB · Views: 1,730
  • stove mods 2.jpg
    stove mods 2.jpg
    24.4 KB · Views: 1,733
  • stove mods 4.jpg
    stove mods 4.jpg
    29.1 KB · Views: 1,734
  • sec burn 4.jpg
    sec burn 4.jpg
    29.5 KB · Views: 1,670
  • northern lights.jpg
    northern lights.jpg
    30 KB · Views: 1,680
  • sec burn 5.jpg
    sec burn 5.jpg
    15.6 KB · Views: 1,681
  • sec burn 7.jpg
    sec burn 7.jpg
    30.7 KB · Views: 1,555
More seconday pics
 

Attachments

  • sec burn 6.jpg
    sec burn 6.jpg
    18.4 KB · Views: 1,187
  • sec burn 1.jpg
    sec burn 1.jpg
    22.3 KB · Views: 1,163
  • sec burn 2.jpg
    sec burn 2.jpg
    16.7 KB · Views: 1,183
sweet! simple, functional, a big improvement over stock. I like it.

pen
 
cmonSTART said:
I'm actually pretty impressed. Nice work. Have you provided any way for the secondary air to pre-heat before the burn tubes?

Yeah, the externally mounted manifolds on the side of the stove. Surface temps of the mainfolds run around 500* to 600*.
 
Nice mod! That looks like a big improvement.
 
Great job upgrading your stove to a new Frankenstove! Your hard work and imagination will pay dividends in reduced wood consumption and greater heat yield..

Ray
 
Now really impress us and put a cat inside!
Nice job!
 
Franken-frickin-tastic! :wow:

It's great to see someone trying something creative, and doing it well.

Some nice engineering and craftsmanship there! I don't see any duct tape! :coolgrin:

Now you're being better to your neighbors and the environment, saving wood, and a sense of real satisfaction.

Have you tried throttling your secondary air? (silly question)

Thanks for sharing this, and happy burning!
 
Very cool indeed. I agree with adding another re-burn tube. Looks like you have the room, but a bit more pre-heat may be a good thing. Try messing with some 2x1 rec. tube, maybe run it verticle to your intake hole. OR- plug the intake hole and re-drill at the back of the stove, tie in the extra tube to the back of your secondary intake tube, and a simple slide control for air flow.( I think TX-L did this.) Keep it up, this looks really cool and functional- I likeee!! :)
 
thats pretty entertaining! wonder what the PM reading would be. could have saved some work and just went with the 13 though.

all in all though looks like a reasonably well done mod, though one i wouldnt suggest just anyone doing.
 
stoveguy2esw said:
thats pretty entertaining! wonder what the PM reading would be. could have saved some work and just went with the 13 though.

all in all though looks like a reasonably well done mod, though one i wouldnt suggest just anyone doing.

You know, I saw that you had posted and was nervous to scroll down ! : ) But yeah, when I purchased this stove I had no idea about EPA, 35 to 1, secondary burn etc. It was only after coming here that I saw the light and realized the error of my ways. At that point I had a decision to make. I could lay out the bread for a 13 then go through the hassle of selling the 12, borrowing a pickup truck to get the 13, enlisting a freind to help install etc.etc. But since I'm the type who likes to tinker with stuff, and one who goes against the grain of traditional thinking (there's a classic Mopar and an AMC in my garage, no small block Chevies, and there are BC Rich and Spector guitars on my wall, no Fenders to be found) I decided to keep the 12 and see what I could do. I didn't view it as work but rather a challenge. I see what you mean though and thanks for the compliment.
 
HotCoals said:
Now really impress us and put a cat inside!
Nice job!

My wife freaked when she read that!!! She doesn't know what "cat" is short for. But, yeah, I thought about the possibilty of going with a cat the other day. The inside architecture would actually lend itself well to that idea as theres a 6" x 9"ish opening in the upper structure. It was a pasing thought though. I'm happy with the burn tube technology and like I said, I REALLY dig the light show.
 
Beetle-Kill said:
Very cool indeed. I agree with adding another re-burn tube. Looks like you have the room, but a bit more pre-heat may be a good thing. Try messing with some 2x1 rec. tube, maybe run it verticle to your intake hole. OR- plug the intake hole and re-drill at the back of the stove, tie in the extra tube to the back of your secondary intake tube, and a simple slide control for air flow.( I think TX-L did this.) Keep it up, this looks really cool and functional- I likeee!! :)

Thanks. I'm definitely not done here. Not really any room for mods at the back of this model, the factory heat shield uses all available real estate. I agree, I could extend the manifolds and make the air travel futher and thus get even more pre heated. Now educate me here. You're the second to suggest controlling secondary air. What would be the benefit to doing this? Also I think I can fit another half fire brick against the back wall on either side for some added firebox insulation.(see pics)

Thanks to all others for your support too!!!
 
great job. I thought about making a front plate for the ash tray underneath that fed some tubes that would run into the firebox and straight back on the floor. This would require some brickwork, but would sure do a good job of preheating the tubes. then you could have it "T" before the back wall and run up that and then the tubes would be N/S instead of EW like yours. Your method seems wayyy less intrusive. except now you have some holes in the side of your stove.

I'm just glad to see it could be done. I might consider it some day. Probably not before the next stove, though.
 
Danno77 said:
great job. I thought about making a front plate for the ash tray underneath that fed some tubes that would run into the firebox and straight back on the floor. This would require some brickwork, but would sure do a good job of preheating the tubes. then you could have it "T" before the back wall and run up that and then the tubes would be N/S instead of EW like yours. Your method seems wayyy less intrusive. except now you have some holes in the side of your stove.

I'm just glad to see it could be done. I might consider it some day. Probably not before the next stove, though.

Thanks Danno. I was JUST looking for the last post we "spoke" in so I could contact you about this posting. I did think something similar to your idea at first until I priced out all the t's and elbows, it really adds up and like you mentioned, more obtrusive. The holes really present no problem if I ever wanted to undo the mods, which I won't since they work. Hold a piece of 1/8 steel against the backside of the hole and weld from the outside of the stove,filling the hole. Grind flat and paint. Done. One of my initial holes was a little off and I had to do just that. From the outside it was invisible and from the inside all you see a piece of steel about the size of a postage stamp where the hole used to be.
 
I had two more questions for you.

1. What is the baffle material that the 13 uses? could something cheaper be substituted. that seems like the most expensive piece of the project.

2. What sort of chimney setup do you have? I ask because I have no problem getting the stove well above 700 degrees if i run wide open with my only "kinda" seasoned wood. I really have to be careful not to overfire the thing. If I have a nice load of really dry wood I can run at 1/4 open and still hit temps of around 500. Generally my wood this season isn't the best, so 1/4 open gets me 300-400 degrees, which isn't bad IMO.
 
Danno77 said:
I had two more questions for you.

1. What is the baffle material that the 13 uses? could something cheaper be substituted. that seems like the most expensive piece of the project.

2. What sort of chimney setup do you have? I ask because I have no problem getting the stove well above 700 degrees if i run wide open with my only "kinda" seasoned wood. I really have to be careful not to overfire the thing. If I have a nice load of really dry wood I can run at 1/4 open and still hit temps of around 500. Generally my wood this season isn't the best, so 1/4 open gets me 300-400 degrees, which isn't bad IMO.

It's some weird almost dense stryrafoam like material. I would have thought it'd be much more solid but it's kind of delicate. It cuts pretty easy with a utility knife. There likely is a cheaper alternative if you wanted to do some research.

I have 6 feet of single wall to the cieling then 4 feet double wall insulated through the attic with another 5 feet outside. Many times when running wide open with low outside temps, both before and after mods, the draft would really take off and the pipe would get well over 800*, and the smoke alarm would go off, but man the heat would come off that pipe and fill the room. Before the mods the stove top would be in the 550* range when this happened and when I dialed down the air it would hold 550 til perhaps almost half closed but then it would drop significantly after that. I was never able to see much over the 550 though at any time. Don't get me wrong, the output was fine for my very small home but I just couldn't leave well enough alone. Sounds like you're having better luck with yours, those are some impressive numbers. I know there have been others here who haven't even been able to achieve the levels of performance I had before the mods. It seems to be a fickle model stove for some folks. So, is your chimney longer? Are you able to load N/S? I imagine a load of 10" to 12" wood N/S would really take off.
 
Nice work. Interesting idea putting the manifolds on the outside.
I don't know if you guys saw my post on how I added secondary air to my Fisher stove.
See post # 8 & 12, it may be of interest.

https://www.hearth.com/econtent/index.php/forums/viewthread/66178/

Could you put 1.50 sq tubing on the inside? It looks like there may be room to fit them.
It would give better preheating. You could also use stainless steel tubing instead of pipe, it may be easier to work with.

For secondary air I think you need plenty of volume to work correctly, you may be a bit on the low side.

I put kaowool insulation behind / under the fire brick for better insulation.
 
Warm in RI said:
So, is your chimney longer? Are you able to load N/S? I imagine a load of 10" to 12" wood N/S would really take off.
My chimney is very short in comparison to many. I have the stove installed inside the fireplace and then single wall chimney pipe inside of a perfectly good clay lined chimney. Total length to the top of the masonry chimney is about 10 feet from stove top, then there is another 3ft of class A. I think the manual says minimum of 12 ft. so i'm probably just over minimum.
 
WES999 said:
Nice work. Interesting idea putting the manifolds on the outside.
I don't know if you guys saw my post on how I added secondary air to my Fisher stove.
See post # 8 & 12, it may be of interest.

https://www.hearth.com/econtent/index.php/forums/viewthread/66178/

Could you put 1.50 sq tubing on the inside? It looks like there may be room to fit them.
It would give better preheating. You could also use stainless steel tubing instead of pipe, it may be easier to work with.

For secondary air I think you need plenty of volume to work correctly, you may be a bit on the low side.

I put kaowool insulation behind / under the fire brick for better insulation.

I saw that thread last week before you posted. Nice work to your stove. Looks factory. Where would I find this kaowool?

More volume eh? Based on the size of my pipes or the opening in the manifold or both?

The stainless tubing is way cheaper too. I started with the piping because it 's threaded which offers a means of attatchment. I thought of squeaking an inside manifold in there, but at first I was leary of welding anything inside: A) how would I clean the surface sufficiently for welding with all that stuff in the way and B) if it didn't work how would I grind the welds off easily.I know from the pictures it looks like a lot of room but it's pretty tight and the positions you need to get into to do any work at all in there would keep a chiropractor in the black for months ; ) I'm thinking I'll add another burn tube for now and perhaps tweak some more when the weather warms. I don't really want the stove down for any extended length of time. Do you tink I should add another hole in my manifolds when I add the 3rd tube?
 
Nice job, warm, this looks like a fun project. I agree with others that you need a bigger air opening to your manifolds. Also, you might fashion a simple hinged cover so you can shut them off after flaming ends. You only need secondary air for the flames - after that, they just cool the stove down quicker.
 
I purchased kaowool from here: http://stores.ebay.com/HIGH-TEMP-REFRACTORY-STORE
I bought a 25' long role of 1/4" thick for about $35. It was enough to line my Fisher with 2 layers and my Regency with one layer, and cover the baffle on the Fisher with 2 layers. Use a dust mask when handling.

I measured the secondary air inlet vs. fire box size on my Regency and scaled it up for the Fisher.
I used 3 1.25 dia holes.

The 1.50 rectangular tubing is not welded on the inside of my stove, they are just screwed on.
It looks like it is welded but the tubing has a peice of 1/4 plate welded to it for a spacer.
Same with the back manifold, the whole assembly is removable.

I added a pic of the OLD version so you can get a better idea.
 

Attachments

  • stove_1.jpg
    stove_1.jpg
    24.2 KB · Views: 477
precaud said:
Nice job, warm, this looks like a fun project. I agree with others that you need a bigger air opening to your manifolds. Also, you might fashion a simple hinged cover so you can shut them off after flaming ends. You only need secondary air for the flames - after that, they just cool the stove down quicker.

Well, bigger holes and an air shut off are no problem to do at all. I never thought about the secondary tubes cooling the stove quicker. Makes sense. How do the factory stoves compensate for this?
 
Status
Not open for further replies.