Englander 30-NC / (Installed w/Pics and FIRE!!!) Completed!

  • Active since 1995, Hearth.com is THE place on the internet for free information and advice about wood stoves, pellet stoves and other energy saving equipment.

    We strive to provide opinions, articles, discussions and history related to Hearth Products and in a more general sense, energy issues.

    We promote the EFFICIENT, RESPONSIBLE, CLEAN and SAFE use of all fuels, whether renewable or fossil.
Status
Not open for further replies.
D

DexterDay

Guest
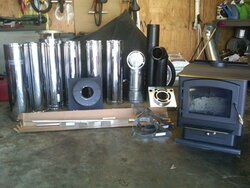
I have decided that I will be installing my Englander myself. I have installed over a half dozen pellet stoves. The sheer heat the a Woodstove gives off, along with the "Complex" DVL Close Clearance Connector (What a sloppy design), had me looking for a local installer. The Hearth Shops only want to install there products. The Chimney sweep WAY Overpriced ($1,300/Just for Flue install). So here it goes. I picked everything up from Forum member lethaldose. Nice guy, sold me everything for $800 (Stove, Thimble, Double wall inside, Class A (18 ft) outside), brackets, etc)

Its going in the basement. There is 3 rows of exposed Cinder Blocks....

The 1st question is
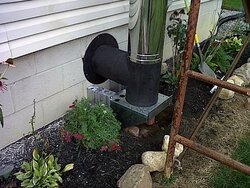
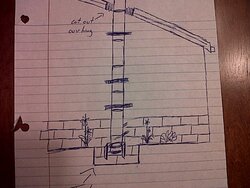
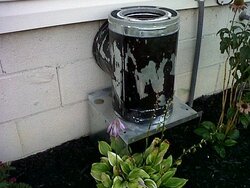
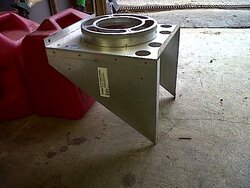
1.) The Tee-Support Bracket is too big to allow me to install the Thimble where it needs to be, so that the Double wall on the inside is at least 8" from ceiling. My simple fix is to Dig a Hole 1 ft Deep. By Hole I mean like a "Cubby Hole". I would make it about 2 ft wide, by 1-1.5 ft deep. And lay brick or pavers up the sides and on the bottom. Would allow for my clearance on the bottom of Tee, so I can still remove Cap to Clean and also put the thimble through the wall where it needs to be. The Blocks are 8" Tall (standard block). So the Thimble has to go in the wall at least at the bottom of the top Block. Would this Hole I speak of be O.K.?? Has anyone else ran into this. I Imagine I am not the 1st person that has had this on a Basement install. You can see in the Pics that with the Tee support on, the Tee is right up against the siding which puts the Double wall 2" below my joists (Not Cool/Not Code)

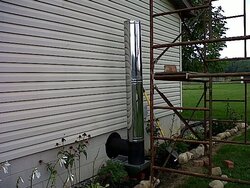
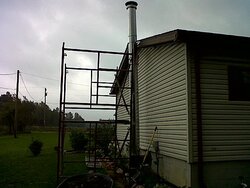
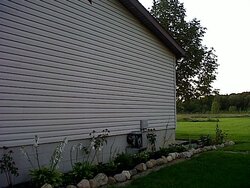
2.) The Overhang on the Top of my house is only 10 1/2". My Class A is 10 1/8th. I cant make a hole to run it through. So, is it Ok to just cut a section of the overhang out? If I cut.. Say a 16" wide "Slot" in the overhang thats flush with the house. That would leave 3" on either side of the Flue for Clearances and that would allow me to run the Flue up the side of the house, without doing an off-set install. I do not wish to put more angles in the Flue system. The 2 90's is enough.

3.) The DVL Close Clearance connector???? Thats a question in itself. Many threads recently about them. But the main question I have about it, is the sealing... What is the "Best" Sealant?? What will withstand the High Temps of the Flue Gases/High Temp of Steel? I mainly use 500* on the Pellet stove. Stays pliable and works well. But the Vent on it will never hit over 120-220* (Outside of Pipe) Depending on Heat level.

There are a million other questions that will follow. Have to take my son to Football practice. Thanks in advance for the help over the next couple days/weeks/months (Hope it does not take that long) Here are some Pics.. The one photo is of a Drawing.. (Im Not good with Windows Paint or Photo shop) It kinda shows the Sqaured hole I want to dig and the Cut-out of the Overhang.
 

Attachments

  • Install Pic 1.jpg
    Install Pic 1.jpg
    58.9 KB · Views: 1,464
  • Install Pic 2.jpg
    Install Pic 2.jpg
    72.3 KB · Views: 1,597
  • Install Pic 3.jpg
    Install Pic 3.jpg
    80.3 KB · Views: 1,455
  • Install Pic 4.jpg
    Install Pic 4.jpg
    71.5 KB · Views: 1,415
  • The Kit!.jpg
    The Kit!.jpg
    60.3 KB · Views: 1,468
I seem to recall reading somewhere that the cut-out would be a no-no here in Pennsylvania. Ohio might have other ideas. If you have to put an offset in to clear the roofline, the height of your flue should still give you a nice draft.

I'll be interested to see what the real experts say.

Nancy
 
I don't see anything wrong with the "hole" to lower the T. However, I think I would use a 2 foot or 3 foot corrugated window well enclosure, and make sure there is good drainage in the bottom. The window well will be more substantial when the ground freezes and give you more room to work and you sure don't want water standing in it during wet periods. Just a thought.

As for the overhang, that is what I would do.....cut out a section with clearances for the chimney to go through. It all depends on how it was constructed as to what you will have to do to cut a section out and it still support itself on both sides. If built properly, you will only have to header it off. Sometimes contractors skimp on the overhangs and it may get real flimsy when you cut the section out. You will just have to figure that out as you go.

As for sealing, I think most will suggest stove cement that comes in 2000 °F rating.
 
  • Like
Reactions: stoveguy2esw
This is not a pressurized system like a pellet stove. Sealant is not necessary, but it won't hurt to seal it if that gives you peace of mind. Use Rutland furnace cement or equivalent as a sealant there. Don't forget the DVL chimney adapter #8674. It's a stainless coupling ring that mates the DVL to the class A.
 
BeGreen said:
This is not a pressurized system like a pellet stove. Sealant is not necessary, but it won't hurt to seal it if that gives you peace of mind. Use Rutland furnace cement or equivalent as a sealant there. Don't forget the DVL chimney adapter #8674. It's a stainless coupling ring that mates the DVL to the class A.

I know its not a Pressurized system. But the DVL Close Clearance Connector is a Sloppy and Loose fitting part at Best. I want to seal at the stove top where the Double Wall Stove adapter, DVL Connector, and the Clean-out on the T (I am going to use my 500* Pliable there. Its below the rising heat and outside the house also. (the T should not be over 500*/Unless it gets away from me... Hope never happens)

I just dont want it to suck in air from all of these places.. I have read on here, that if you have a Leaky Stove Pipe, that it will draw in the Cooler air and further reduce the flue temp. I want to try and keep them as warm as possible.

tfdchief... I was thinking that the cut-out would be o.k. I still have to call my zoning inspector (My friend's mother) and see what she says. But she knows we keep a Tidy Place and she has never gave me a problem doing anything. As long as its code compliant and does not take away from our township (Anything Gawky and un-sightly). As for the Basement window well is a good idea. From the pics it does not look like much of a slope. But I was going to try and dig the trench out and keep the floor level all the way out. The wife wants to do more landscaping on that side of the house. we just did all that this year. The Rocks were put in not to long ago (Still sore!!) and all the plants (Hosta, Cone-flowers, Etc all yearlings). So to extend the Landscaping out there and do a little island (I have to move the Hosta and the cone-flower that are on the sides of the Clean-out T anyways) wouldnt take much.

Please keep with the replies. I know a Basement install is not exciting... (Well.... To me it is! I cant wait)
 
tfdchief said:
DexterDay said:
Please keep with the replies. I know a Basement install is not exciting... (Well.... To me it is! I cant wait)
They are all exciting to me. Post more pics as you go.

I plan on doing the most of it this weekend. As long as it all is "Code". The only thing that scares me is the Cut-Out of the Over-Hang..

I have Sun, Mon, and Tues off. Hope to get the Stove hooked into Double wall, The Double Wall to the Thimble and then, most of the Flue (up to where Cut-Out would be). Thats where it will stop unless I have definite answer on whether its Code or Not. Hopefully get time to ask Zoning Inspector (Peggy) tomorrow.

I will def takes many pics along the way. Half of the basement is finished (My Man Cave/Pool Table, Foose ball table, Dart board, Card table, Radio, Bar, etc) The other half, where the stove is going, I plan on finishing this Winter. During the Summer I am outside A LOT. Thw Winter brings a lot of indoor projects. Wife has wanted it finished for yrs. So now that there is a Woodstove that I will be standing in front of and staring at, down there. I might as well dom something constructive.... That and I will also see the difference in heat upstairs. From Block walls and floor, to insulated and Carpeted (She wants Carpet, I want sub-floor and Tile/Insulated in sub-floor)... To being insulated and keepin g heat from being soaked into the block/concrete.

Hoping an installer has seen/done something like this. There are 2 houses both right down the road. Both did not cut out the over-hang. They just added a foot to the Clean-out T and ran the stove pipe straightup. Looks like they have modified there brackets and T-Support (1 ft of something has to be added). I would rather it be tucked in tight by the house. Rather than have a ft of airspace.

If someone has it hooked up the latter way (Over a ft away from siding?? What type of brackets did you use? Only one of the brackets would work as normal, the one that you would install on the overhang to keep clearance there. The others would have to have a 4x4 or metal bracket fabbed up.
 
I wouldn't worry to much about the overhang. It looks to be only 12 inches. Those on a gable end, as this appears to be, are usually built like a ladder, out of 2x4's and then nailed onto the last roof rafter. The most you might have to do is screw the end of the inside 2x4 where you cut it, to the roof rafter. If it is built right it will have a cantilever 2x4 every so often that goes back to the 2nd roof rafter so it cannot sag. Is the soffit on the overhang Aluminum?
 
DexterDay said:
tfdchief said:
Is the soffit on the overhang Aluminum?

Nope, its a plastc soffit.
That makes it easy. You can take out several panels so you can see what's going on, cut out and header off the overhang and then put the vinyl soffit pieces back. You should have enough J channel and facia from where you cut it out, to trim the ends of the cut out soffit. May need a piece of Aluminum to cover the inside of the cut out. Don't forget to re-flash the shingles that you cut out.
 
O.K. I got my Scaffolding uo today, after I pulled my truck around the house, I see some Yellow Jackets going into the corner of the house. I Spray with Bee Spray and go downstairs to do some measuring. Upon walking down stairs I see a couple bee's.... Not thinking much of it, I make some measurement's and when going back upstairs, I see one fly out from under our storage room... I open the door (This is the corner room in the basement, Thats below where I seen the Bee's).. Holy $hit BatMan... There had to be a few hundred on the corner of the wall.

Orkin Man is coming tomorrow. Said because they have prob been there for awhile and there are none upstairs, that its Not an Emergency!!!..

O.K.. Now on to another question. I have drove by 3 Basement installs in my township today. I noticed that 2 of them have the Clean-out T on the ground, the flue goes up 1ft away from house, and there is only 1 Bracket attached where the overhang is (The only place the flue is 2" away from house/over 1 ft away everywhere else)

I still want to dig my hole and line with brick or use the corrugated basement window guard that tdfchief suggested. But seeing so many people around that have done the 1 ft away from siding, it seems possible and does not look that bad. 2 of these houses, I just seen today. I went and grabbed the Scaffolding from my buddy and took the "Back-Roads" home..

My only problem with this is the 1 Bracket to hold the Flue (Other than T-support, which I will install). What can I fabricate or buy to make a 1 ft bracket? It would be much easier to do this, than make the cut-out of the over-hang.. I called and left a message with my Zoning inspector. I doubt she has seen or approved the 2 installs I seen today. I dont care what other people do.. My family means to much to put there/my life at risk. Fire extinguisher's, CO Detectors, and Soke/Fire alarms galore in our home... Oh, and along with obeying all Manuf instructions and local Codes.

Again, ANY Help, is appreciated.

Thanks, Dexter
 
Well, its been a day and no response. I measured a little more and found I need not dig a Hole. I cut 2" off the bottom of the T-support. as for the Overhang cut-out, I talked to the Zoning Lady. Nothing wrong with my Flue being 10.5" away from siding as long as a Bracket is connected to the Chimney every 4' as required. She also said that there are MANY Code violaters in our area. I am glad I know her. There is a a Millright at work who will make me up some brackets out of 2"x2"x10.5" angle iron, with tabs to mount to the siding and then mount to the Simpson Brackets. He prob wont have them till Wed or Thurs. But She (Inspector) said so long as I have them by next weekend when she stops out. I am in the clear.

I am keeping my double wall at 11" from ceiling / Clearence to Combustibles. Which is 3 Inches over for Simpsons Dura-Plus Double Wall. I will post more pics tomorrow night. We had 1,000 bee's down there last night..... Exterminator came today... Wow... I should have been killed while down ther last night. The nest/hive was huge. Almost 2 ft wide by 1 ft tall by 2 " deep.

Again.. Boring install. I know. But so many have 30's on here............... Just looking for help, advice, pics..... I hope to have it done in a couple days. Its just me doing it all. Post Pics up tomorrow night.
 
DexterDay said:
Well, its been a day and no response.
Sorry, I did post yesterday and saw it here. Now it is gone. Not sure what happened because it has never happened before. Anyway, it looks like you have it figured out.
 
I would knotch out the roof overhang. I did this with my 30's chimney (SS metalbest), but I am also putting a wood/vinyl chase arount it. But - if I weren't building a chase, I'd still knotch out the overhang. My view is that a straight chimney pipe is the best of all worlds. Good for draft, good for cleaning with a brush.

I'm looking forward to hearing your experience with this stove over the coming heating season. Mine is not installed - yet, but I've got it moved out of storage and into my basement. If the skys clear up this afternoon, I'm going to roll it outside to burn the paint-in with the smoke and smell out of the house.

Good luck,
Bill
 
leeave96 said:
I would knotch out the roof overhang. I did this with my 30's chimney (SS metalbest), but I am also putting a wood/vinyl chase arount it. But - if I weren't building a chase, I'd still knotch out the overhang.
My view is that a straight chimney pipe is the best of all worlds. Good for draft, good for cleaning with a brush.
I'm looking forward to hearing your experience with this stove over the coming heating season. Mine is not installed - yet, but I've got it moved out of storage and into my basement. If the skys clear up this afternoon, I'm going to roll it outside to burn the paint-in with the smoke and smell out of the house.

Good luck,
Bill
That's the part I wouldn't like about the offsets......getting a brush through it with rods will be impossible.
 
Look luck with your install, I installed both my wood stoves and really enjoyed it, I also like you ask these guys alot of questions and they really helped me. The first stove i install was like the install you are doing, I purchased a thur thr wall kit and about sixteen feet of pipe. I have a metal roof on my home and a sixteen inch over hang and did not want to cut a hole in my metal roof, so i went to a local guy that has a small welding shop and ask him to weld me up some brackets that would extend my chimmey pipe out to were i would not have to go thur the eve of my house and end up cutting a hole in my metal roof. The brackets worked perfect and really looked good. I can post some pics if you would like to see them. good luck.
 
[/quote]That's the part I wouldn't like about the offsets......getting a brush through it with rods will be impossible.[/quote]

True, but you also can use rope or chain instead of rods, if the angle of the offset isn't too great.
 
PopCrackleSnap said:
True, but you also can use rope or chain instead of rods, if the angle of the offset isn't too great.
Yes you can. That can be hard though. My son's is like this and it is a 2 man job unless you want to go back and forth from the bottom to the top.
 
RIDGERUNNER said:
Look luck with your install, I installed both my wood stoves and really enjoyed it, I also like you ask these guys alot of questions and they really helped me. The first stove i install was like the install you are doing, I purchased a thur thr wall kit and about sixteen feet of pipe. I have a metal roof on my home and a sixteen inch over hang and did not want to cut a hole in my metal roof, so i went to a local guy that has a small welding shop and ask him to weld me up some brackets that would extend my chimmey pipe out to were i would not have to go thur the eve of my house and end up cutting a hole in my metal roof. The brackets worked perfect and really looked good. I can post some pics if you would like to see them. good luck.

Yes Pics Please. I did not mean I was putting in an "Off-set". I was trying to avoid it at all costs. I only have straight sections and I am not buying anymore.

I was either going to Run up the side of the house (Maintaining the 2" Clearance to Combustibles) and "Notch" out my Over-hang. Or I was going to do what RIDGERUNNER did. Make extended brackets. In my post last night, I put in that a Millright will be making me these this week. They should be done by Thursday at the latest. I would like to see some Pics of yours RIDGERUNNER. I have an idea of how I want to do it, but the more ideas and thoughts the better.

My inspector said as long as I get them up before she comes back up, all is well. So ther brackets will have to be about 12" Long (Over-hang is about 10" and I need 2" CTC for the Class A)

Thanks for all the replies. I also got away from digging my hole in the ground for my thimble support. I REALLY MESSED UP my 1st measurements. REALLY BAD. Clean-out T and T support bracket will be above ground. My only problem now is The T being out so far from the house. If I need 12" Brackets, now I have to Frame something for my Cleanout-T Support. I don't even a slight angle on the pipe.

Can I frame out 2x4's or 4x4's? Getting ready to blow a 14.250" Hole in my Block. So any info will be appreciated. i will be checking in periodically (Get emails sent to my phone, but don't check them as I get them. I wouldnt get anything done.. LOL)

Thanks again, Dexter.....
 
here is my setup.
 

Attachments

  • SANY0676.jpg
    SANY0676.jpg
    23.4 KB · Views: 1,219
Thanks RigdeRunner. That's similar to what I had in mind. Because the Tee Support can be mounted to your house (A Combustible/as long as Clearance is met) I am going to make a framed box kinda like that. But because mine is a basement install, I need to have 4-5 brackets that are 12" made to attach the Class A brackets that will hold the 18' run up the side of my house.

On another note, I see your from Eastern Ky. I own 330 acres in Elliot County (Middle Fork is where property is) and have a few Buddies that live in Carter County (Grayson Ky). Also have family in Pike. That's where my Fathers family is from originally. My Mothers side is Virginia.
Thanks for the pics. I may replace my Wood frame down the road. But its a holiday weekend and I need to get this thing installed. Won't be warm much longer and the next 4 weekends are Booked with B-day parties and other events that we must make an appearance.
 
Hey dex was trying to upload some more pics, not having no luck, I had the same problem you had so why noy just extend the brackets to were you can install the chimmey pipe outside the eve, when the insurance company came by to check the install they really liked the idea. you could use some 2x4 treated lumber and build your support brackets. I live in Harlan county back in mountains, I'am about two hours from pike county, be sure and post some pics of your install
 
Those are the brackets I am talking about. I am not doing an off-set. I am running the Flue 12" away from the siding. "Straight-up". I don't know where the off-set idea came from. I stated in my 1st Post I didn't want to do that.

I am going to use the 2x4's on the bottom and the Millright (Maintenance Guy) at work is making my 12" brackets that will extend the Flue out 12" from the house. Won't be done till thursday. But I can still get one on bracket on the Eve of the house. So between that 1 bracket, the T support, and the 2 high elevation poles for the top section, near the cap. (Tall install for flue with no wall to attach to) don't know the actual name for the rods. But I am going to use them. Lots of flat ground out here. Lots of Wind. Nothing like Ky... Nothing...

Thanks again. I had trouble for the 1st 6 months posting pics. They will come tonight when I can have some adult beverages and upload them.
 
Well. I just finished up. i even Fired it up.. 70 degree's outside and I had the Secondaries "Firing" off at 400* with the Last batch of Silver Maple I split. (Only uses small and med splits, but its only been 2 months). I wanted to use it instead of my most seasoned to check it. Burned Great... I cant believe some people have a hard time getting them lit off. My 1st Woodstove and I am amazed at the heat and the Draft.

I have 1 other quick question though. I thought I would use all 18' of Class A. I only had to use 15' and I am 3.5' above my Peak. I have the kit to brace it, Should I add the other 3' section??????

I cant believe how hot this stove got (Scarey Fast). Shut the air all the way down after 15 min, and Wa-La... Great secondary action. Stove hit just over 500* in about 40 min with a small kindling fire, followed by 4 medium splits (Wife, Kids, Buddy, and I all watched in amazment.. The wife did note that... This is the only FDire till Oct or Nov.. When its cold outr.... 70 degrees is warm, if I got it done... I had to "Burn it"...

Here area some Pics... its a basement install. Si its nothing special. I am going to finish this half of the basement this Winter (Other half is Finished, I have a Large Man Cave with a Bar, Pool table, Foose Ball table, dart board, card table, large radio, T.V., etc). Half of why I am finishing it, isd becuase of the time I will spend down there anyways.

The only trhing I have not done yet, is the OAK. I will install one before winter comes. Firm believer in it. House is only 17 yrs old and pretty effiencent.

Thanks for the Help. I have 3 brackets left to install also, but I need the Millright at work to finish them.

Included is some Blood sweat and tears. Took all day to get the Dolly, get it down, hook it all up, do some custom fabrication, and start a Fire..... Also a Pic of my wood Piles from the Top of the House...
 

Attachments

  • Basement Install 1.jpg
    Basement Install 1.jpg
    51.7 KB · Views: 799
  • Basement Install 2.jpg
    Basement Install 2.jpg
    40 KB · Views: 813
  • Basement install 3 (ouch).jpg
    Basement install 3 (ouch).jpg
    79.3 KB · Views: 771
  • Basement install 4.jpg
    Basement install 4.jpg
    94.2 KB · Views: 794
  • Basement install 5.jpg
    Basement install 5.jpg
    97.4 KB · Views: 1,123
  • Basement install 6.jpg
    Basement install 6.jpg
    87.9 KB · Views: 1,367
  • Basement install 7 (Wood from house roof).jpg
    Basement install 7 (Wood from house roof).jpg
    75.9 KB · Views: 819
  • Basement install 8 (Class A done).jpg
    Basement install 8 (Class A done).jpg
    56.8 KB · Views: 813
And some Pics of it Burning..... With Secondaries..... And 70 degree's outside.

Again I will ask the question. If I had pretty good draft at 70... Do you think I need to add my last 3" section???? I have the Kit to install it. Another Brace with adjustable poles... I thought I might need it, but after tonight (With it being so warm and no smoke coming back in), I dont know if I do...

Could it hurt the performance. A stronger draft, will make the load burn faster. If I can get by without it??? Would you put it on???

Image

Burning 1 - installed and no Fire. (Boring Basement install)
Burning 2 - Kindling, Super Cedar and a Med Split
Burning 3 - Added some more splits/Air Wide Open
Burning 4 - Air Shut Down 100%... Good Secondaries. Its 70 outside.
Burning 5 - Shows temp after about 45 Min and I really have No idea what I am doing. Yet.... Had a Fireplace for YEARS and a a Pellet stove for 3 years. I only know, what I know about the 30-NC from what I have read here,,,, Which is a lot..

I love it, I know its not as impressive as some install (A lot), but its Mine and I love it. Hot as Heck in the basement.

Cheers. Thanks again
 

Attachments

  • Burning 1.jpg
    Burning 1.jpg
    52.9 KB · Views: 758
  • Burning 2.jpg
    Burning 2.jpg
    45.8 KB · Views: 775
  • Burning 3.jpg
    Burning 3.jpg
    49.4 KB · Views: 785
  • Burning 4 (Good Secondaries~ 70 outside).jpg
    Burning 4 (Good Secondaries~ 70 outside).jpg
    35.5 KB · Views: 761
  • Burning 5.jpg
    Burning 5.jpg
    37.2 KB · Views: 781
  • High Wind~ High Flue.jpg
    High Wind~ High Flue.jpg
    45.2 KB · Views: 742
Status
Not open for further replies.