Englander insert and insulated liner install pics

  • Active since 1995, Hearth.com is THE place on the internet for free information and advice about wood stoves, pellet stoves and other energy saving equipment.

    We strive to provide opinions, articles, discussions and history related to Hearth Products and in a more general sense, energy issues.

    We promote the EFFICIENT, RESPONSIBLE, CLEAN and SAFE use of all fuels, whether renewable or fossil.
Status
Not open for further replies.

tkirk22

New Member
Nov 20, 2007
299
VA Mountains
I want to thank everyone for all the help in the past few weeks. My install is finally in the last stages. All the hard work is done and I just need to cut a top plate and make some granite surround panels.

I'll post the pics spread across several posts.

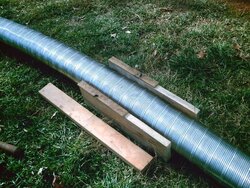
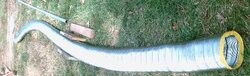
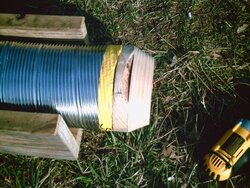
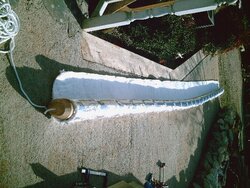
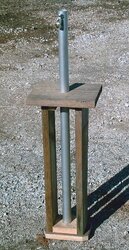
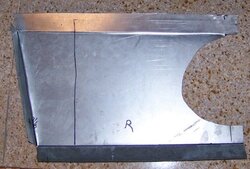
Below are pics of the Foreverflex liner and the method I used to oval it. I ovaled the liner to 5 1/8" and wrapped it with 1/2" insulation and stainless netting. It's a tight fit but it did fit in my 8x12" flue.

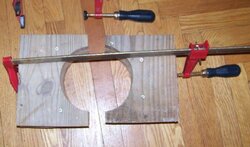
I made the wooden pull cone and fastened it to the liner with 8 screws.
 

Attachments

  • PICT0019_600.JPG
    PICT0019_600.JPG
    105.9 KB · Views: 670
  • PICT0020_600.JPG
    PICT0020_600.JPG
    41.4 KB · Views: 678
  • PICT0022_600.JPG
    PICT0022_600.JPG
    76.2 KB · Views: 659
  • PICT0033_600.JPG
    PICT0033_600.JPG
    86.8 KB · Views: 688
I was short on helpers so I came up with this idea to lift the liner above the roof and drop it straight down. The wooden frame fits into the second flue and holds 24 feet of aluminum tube. It turns out that the pipe was too flexible so I scrapped that idea and found a cherry picker. My wife was suppose to get pics of the bucket lifting the liner but it happened too fast and she forgot :(

The liner pretty much fell right in place and stopped at the damper. I had to cut out the damper a little more to account for the ovalized liner.

PS. Yes that roof ladder is a little scary ;-)
 

Attachments

  • PICT0029_600.JPG
    PICT0029_600.JPG
    74.7 KB · Views: 709
  • SPICT0001_600.JPG
    SPICT0001_600.JPG
    36.5 KB · Views: 722
  • SPICT0002_600.JPG
    SPICT0002_600.JPG
    20.1 KB · Views: 702
The mortar in the firebox was pretty shabby so we remortared everything. It'll all be hidden so I didn't bother cleaning up the brick face. We used regular brick mortar because the firebox will never be used as a standard fireplace again.

We also added a layer of furnace cement around the edge of the mantle.
 

Attachments

  • PICT0023_600.JPG
    PICT0023_600.JPG
    41.1 KB · Views: 704
  • PICT0024_600.JPG
    PICT0024_600.JPG
    39.9 KB · Views: 689
  • PICT0027_600.JPG
    PICT0027_600.JPG
    43.5 KB · Views: 708
  • SPICT0015_600.JPG
    SPICT0015_600.JPG
    26.2 KB · Views: 690
I had some leftover granite so I used that as floor protection and I'll also use it for surround panels. I've never done it before but it cut easy enough with a circular saw and a diamond blade. It's embedded in thinset. We made a heck of a mess with that stuff but it cleaned up.

I'm still unsure of the floor and hearth protection necessary with this insert so I embedded a thermocouple under the granite. If it gets too hot I decided that I could fix the problem from the basement.

There's a temporary wood dam around the granite to keep the thinset from oozing out. I plan to frame the granite in hard wood.

The insert will sit on a steel tube frame to raise it to the level of the granite.

I'll finish up and add more pics at the end of the week.
 

Attachments

  • SPICT0005_600.JPG
    SPICT0005_600.JPG
    23.3 KB · Views: 698
  • SPICT0007_600.JPG
    SPICT0007_600.JPG
    42.1 KB · Views: 684
  • SPICT0008_600.JPG
    SPICT0008_600.JPG
    48 KB · Views: 683
  • SPICT0016_600.JPG
    SPICT0016_600.JPG
    28.1 KB · Views: 660
  • SPICT0017_600.JPG
    SPICT0017_600.JPG
    30.9 KB · Views: 674
  • SPICT0018_600.JPG
    SPICT0018_600.JPG
    26.8 KB · Views: 661
Edit 2/20/08.

Here's some more pics.

I made a stand to elevate the insert slightly above the granite. That's an old aluminum sign I cut to match up to the bottom of the stove. It's unnoticeable when the stove is on it. There's an airgap above and below the plate and it fits loosely on steel runners. It will allow air to circulate behind the insert better. I had thought that the stove would get hotter on the bottom than it does.

The wood pieces are what I used to re-round the liner.

I decided to make the top block off plate in 2 pieces. The brick firebox is not close to straight or square so I made a cardboard template and transfered it to 24 gauge galvanized metal. I rounded over the opening at the liner to avoid the metal cutting into the liner over time. The 2 plates are help in place with tapcons in the brick and self tappers in the metal piece that holds the brick ledge. I sealed all the joints with furnace cement and silicone.

The final shot is a test fire with the granite side panels temporarily in place while I make sure they can take the heat. I'm holding off on cutting the top center panel until the next trip. I want to get everything else straight before I hang the final piece.

The break-in burn put off a little smoke. That was mostly from the metal tape I put on the liner though. I haven't smelled any smoke or paint since that first night.
 

Attachments

  • 100_0047_600.JPG
    100_0047_600.JPG
    65.5 KB · Views: 450
  • 100_0049_600.JPG
    100_0049_600.JPG
    39.6 KB · Views: 438
  • 100_0054_600.JPG
    100_0054_600.JPG
    49.5 KB · Views: 432
  • 100_0057_600.JPG
    100_0057_600.JPG
    77.1 KB · Views: 1,786
  • 100_0114_600.JPG
    100_0114_600.JPG
    53 KB · Views: 486
If you could take some really high quality pictures of the final install, we would all appreciate them here at Englander!
 
Nice work so far. Dude, trash that POS Jim Dandy roof ladder. If your going to make one, put a rail on each side, not one down the middle LOL.
And that roof is walkable, ya lazy cherry picker ;)
That granite will top it all off really beautifully. Great idea, can't wait to see the finished product.
 
Latest Update:

I'm going to mount the granite surround panels with steel anchor bolts drilled into the fireplace face. Then I'll epoxy the anchors in place. Would it be better to drill into the brick or drill into the mortar? Or does it matter? It will be easier to 'hit' the center of the bricks. The panels will be about 35-40 pounds each I think.

I test drilled a couple holes in a scrap piece of granite tonight. My 2 carbide bits didn't do much but the cheapo diamond hole saw bored right through. Wrong speed on the carbide bits maybe???? Hopefully the cheap diamond saw will last for 6 more holes.

I still haven't found a suitable 'nut' to use to hold the panels on. I'm thinking something like a drawer pull or tiny door knob would work. I did score a nice old mid size lathe the other day for $100 :) so maybe I'll make my own 'nuts'.

I was going to weld the insert stand tonight but some $h!T brain ;-) left the gas bottle valve on and it drained. That'll have to be tomorrow now.
 
Kirk22 said:
Latest Update:

I'm going to mount the granite surround panels with steel anchor bolts drilled into the fireplace face. Then I'll epoxy the anchors in place. Would it be better to drill into the brick or drill into the mortar? Or does it matter? It will be easier to 'hit' the center of the bricks. The panels will be about 35-40 pounds each I think.

I test drilled a couple holes in a scrap piece of granite tonight. My 2 carbide bits didn't do much but the cheapo diamond hole saw bored right through. Wrong speed on the carbide bits maybe???? Hopefully the cheap diamond saw will last for 6 more holes.

I still haven't found a suitable 'nut' to use to hold the panels on. I'm thinking something like a drawer pull or tiny door knob would work. I did score a nice old mid size lathe the other day for $100 :) so maybe I'll make my own 'nuts'.

I was going to weld the insert stand tonight but some $h!T brain ;-) left the gas bottle valve on and it drained. That'll have to be tomorrow now.

Hit the center of the bricks, the mortar will blow out, and even if it doesn't, will most likely come loose in time.
I have never drilled granite, but I would test drill with some masonry bits, prolly need a hammer drill.
How bout using a masonry hole/core saw on the scrap pcs and coring out pcs just bis/small enough to use as granite plugs in the drilled holes? Would blend in ok if same stuff.
 
Hogwildz said:
Hit the center of the bricks, the mortar will blow out, and even if it doesn't, will most likely come loose in time.
I have never drilled granite, but I would test drill with some masonry bits, prolly need a hammer drill.
How bout using a masonry hole/core saw on the scrap pcs and coring out pcs just bis/small enough to use as granite plugs in the drilled holes? Would blend in ok if same stuff.

I don't own a hammer drill so I haven't tried that yet. A special carbide bit for granite did not work well in my drill press though.

I thought about counter sinking the nuts but the granite is only about 7/8" thick. But, I could possibly epoxy large washers to the inside of the granite and counter sink it that way. Hmmm....

I think you just stalled my surround panel install for a couple weeks while I try to find the right size hole saws and setup some test pieces.
 
Why do you have to bolt the granite on?
 
CTwoodnpelletburner said:
Why do you have to bolt the granite on?

The 3 pieces will be within 1/4" of the insert and they have to be removable to get the insert out. I'm not entirely sure why but I don't want to hang the panels off of the insert.

I stumbled across the gate strap in the photo below. I think I may go with something like that or maybe something fancier like a plasma cut silhouette of the mountains behind the house.

I think I'll hang the stone panels as originally planned and then fire up a graphics program to finalize the design.
Here's some ideas: http://www.ironshadows.com/did1.htm

Are there any artistic people here?

Corie: I see that ESW also does custom work. Do you guys have a CNC plasma table in the plant?
 

Attachments

  • gatestrap.jpg
    gatestrap.jpg
    5.9 KB · Views: 444
Install is close to being complete. We have fire now. I added some photos in a post above.

I have noticed one thing during a burn that is slightly concerning. The plate on the top of the air chamber will bow up in the front center about 1/8" during a hotter fire. Is that anything to be concerned about?

When I put a magnetic thermometer on the insert's firebox top plate in front of the exhaust air I read upwards of 500 degrees. This is with either a large coal bed or an intense fire with the primary air damped all the way down. How hot is too hot for the insert and where is the best place to measure?

Below is a short video. The lighter flames didn't get picked up by the camera. The burning smoke rolling down the glass was pretty cool and a little scary at first.

[googlevideo]8605385200148806953[/googlevideo]
 
It is kind of difficult to follow this thread with the way the fotos are posted requiring constant scrolling back & forth
to try & read the post. I think you used epoxy to anchor the bolts supporting the granite. Unless that is a real special
epoxy, I believe that the heat will cause it to soften up. Most epoxies start turning to plastic goo (technical term) by
the time they reach 275 degrees. I could be wrong, but I would keep a real close eye on it.
Al
 
Good point about the epoxy. I haven't drilled the bricks yet. Hopefully I'll be able to do it tomorrow. I was planning to look at the datasheet for the epoxy cartridges I have to see if they can take the heat. I think I may just pack furnace cement in the hole with the anchors. The brick does get hotter than I expected.

The photos were uploaded as attachments and unfortunately I do not have control over how they show up on the page. Sorry.
 
Status
Not open for further replies.