laynes69
Minister of Fire
Here is a pic of our heatexchanger. It's easier to see since we have the plenum opening.


EDIT: I just realized that this quote makes it look like I'm laughing at your manhood...What I meant was, I was pickin up on your sarcasm of acting like you are out of wood, when I know you are building "lumber mountain", what you cuttin for winter '20-'21 today?


EDIT: I just realized that this quote makes it look like I'm laughing at your manhood...What I meant was, I was pickin up on your sarcasm of acting like you are out of wood, when I know you are building "lumber mountain", what you cuttin for winter '20-'21 today?
Started the fire 5 hours ago, damper closed ever since it got going. 2100 sq ft farmhouse is still 4F warmer than this morning, and the coals are still cycling the blower.
20F outside, sunny, not much wind. I project I'll start another load about 4-5 hours from now.
Started the fire 5 hours ago, damper closed ever since it got going. 2100 sq ft farmhouse is still 4F warmer than this morning, and the coals are still cycling the blower.
20F outside, sunny, not much wind. I project I'll start another load about 4-5 hours from now.
If your still getting heat you have to be off gassing longer than 90 min if the damper is closed. I suspect you are off gassing more on the end of 6 hrs or so.
That is exactly what the Tundra looks like with the top off.Here is a pic of our heatexchanger. It's easier to see since we have the plenum opening.View attachment 168172
I'm guessin I'm still "Tom"?Thanks laynes, Tom is your unit insulated on the sides? What about the top, insulated? Are you 2 outlets on the front so the air has to travel past the HE? Maybe for giggles make up a plenum and try that, should be pretty easy for you being handy and all. I guarantee the problem is air flowing through the unit, its just a matter of finding what.


That is exactly what the Tundra looks like with the top off.
I'm guessin I'm still "Tom"?
I don't think the top is insulated, it gets pretty warm. I thought the sides were because they stay pretty cool, but I looked at the parts diagram and don't see insulation.
I'm thinking about taking the sides off to have a look around, make sure everything "looks" right, and clean things if necessary.
I'm using the 2 side duct outlets, which is SBIs recommended setup, but it doesn't matter which holes you use, the air has to come past the HEs. SBI says to use the side outlets because they are both pulling heat mainly off the side HEs. If you use the front/rear duct outlets, then you are pulling heat off the center HE more so, and then they (ducts) are in series, so the rear port will always be cooler than the front one. It is more of a parallel setup when you use the side ports, and both sides should run about the same temp.
I very well may take a run at using a plenum, or at the very least try tapping into the front duct outlet along with the 2 side ones, there seems to be a lot of heat at that front port.
It was very interesting, I installed a temp controller (just like my setup) on my sisters Tundra today. She hasn't used it much yet because it was right at the end of the heating season 'til I got it installed last spring, and it has been so warm this fall/winter so far. (she snagged it when Menards was blowin 'em out for $1250 at the end of the winter 2014/2015) Anyways, when I put it in, I hung the existing plenum from the floor joist above and removed the old furnace (Yukon Big Jack) then slide the Tundra back under.
So her setup uses a plenum, but only the two side duct holes are actually open into the plenum.
I finished the controller and we fired 'er up...once up to temp and settled down, 100* AT THE REGISTERS with the Tundra cruising on the secondarys, damper closed! And this is with the return air having to come down the stairs and across a long and very cold basement floor. Totally different results compared to mine. The only real differences are that this unit has the fan and limit switches in the "new" spot, and then obviously the plenum. Speaking of the fan switch, it kicked on way earlier than mine would have so I was expecting cold or at least cool air...nope, nice n warm. Amazing. I'm just shaking my head here.
Obviously I have some more investigative work to do...
I know what you are saying, but I do have a raging fire...like I said earlier, it's hard to stand even remotely close to the door. The problem is a inferno in the firebox equals a warm chimney instead of a warm supply duct. Duct temps are good when the damper is open, but taper off after the damper closes, and fall too low to be of much good after a (too short) period of time. Running the firebox and stack temp up higher in the beginning prolongs the inevitable temp slide a bit, but not much. I am very happy with the ways this things burns...it is just not transferring the heat to the air well.I know on my unit if I don't get the fire raging before letting it shut down I'm disappointed with the heat output. In the beginning of last year I was really getting frustrated with the unit. My issue was not letting it get hot enough
I can set the controller at any temp so no need to discontinue using itMaybe try to eliminate using the controller for right now and from a cold fire box let it burn for at least 20-25 mins.
OK so the gap around the blower is still there, maybe a bit smaller than mine though. I sealed mine up because I remembered somebody posting that it leaked so much they couldn't hit .2 SP. Thanks for the picBreendatomu... I believe you wanted a pic of around the blower. Seems to be a little gap between motor and furnace body, but not much air escaping.
View attachment 168318
As promised...I did pull the side off last night, everything looked to be in order, saw no issues. I will post pics later for anybody that wants to see a nekked Tundra
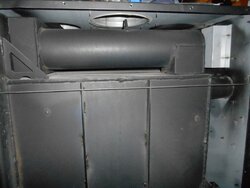 Right side...
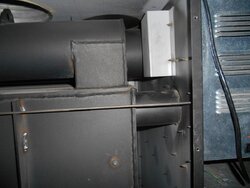 ...toward the back
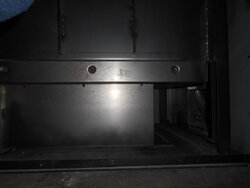 bottom, where the blower comes in, and the pedastal/ashpan area...
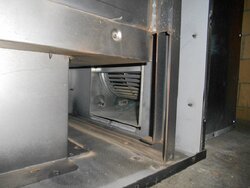 Another angle of the blower entrance...
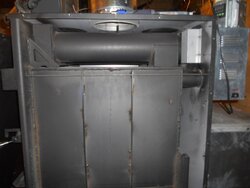 Wider angle, you can see the damper actuator rod that runs front to rear...
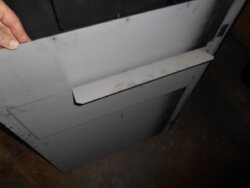 The side panel with air deflector. It directs the air across the HEs and firebox top
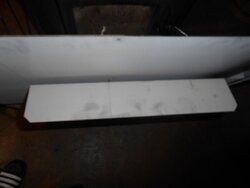 Another angle, you can see the deflector is mounted on a inner double wall panel
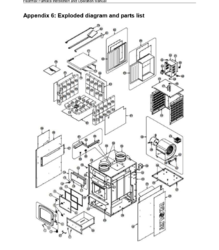
I think Stihly Dan might be on to something...Does the "HEATMAX" logo install on the rear or front of your furnace, pointing forward or backwards? I think it's supposed to install on the rear, but it looks like yours installs on the front? The point is they might have installed the left panel on the right side (and vice versa), and it looks like those deflectors currently force the air up and out from the back, instead of up and out from the front (past the firebox and HX).
I don't completely see the total plan, but maybe something easy to check.
EDIT: Look at the manual and it looks to me that your part 55 is installed in reverse.
It's bothThat does not seem to be an air deflector as much as it seems to be an air cooling gap for the side
Nah, from running it with the duct connection holes open, I can state that the deflectors are doing their jobMaybe the air is going between the panels instead of across the HE.
It's on the back, which is correct...the side panels fit on in a way that they can't be reversedDoes the "HEATMAX" logo install on the rear or front of your furnace, pointing forward or backwards?
It depends which version of the manual you are looking at...the part reference #s change. The one that is online now shows # 31 and 57 being the left and right air deflectors55- 'start off adaptor'? Looks OK to me? Or?
 layer of baked on soot/creosote covering patches in all 3 HEs. It is about as thick as a heavy layer of paint (think old house paint) and to the "untrained" eye, it looks like bare metal. I confirmed it was not metal by hitting it with the torch...yep, it popcorned up like creosote does when heated real hot! This stuff is really hard and the chimney brush will be worn out before it all comes off. Scraping it off with a sharp edge works but is very time consuming and it is hard to reach much of it. I'm gonna wheel my oxy/acetylene torch in tonight and finish burning it off. I thought about spraying it with kerosene and just lighting it... but thought better of doing that, probably make a mini chimney fire

I have a torch set, but I would hafta find and then borrow/rent a "weed burner" so...good idea thoughOne of those propane weed burner thingies might work too - could get it right in there. I think?
This is kinda like an Inspector Gadget episode - lol....

Probably, but it comes right off with a brush once you heat it to the "popcorn" stageIs there any chemical available that would soften the creosote to make removal easier?
I have a torch set, but I would hafta find and then borrow/rent a "weed burner" so...good idea though
Probably, but it comes right off with a brush once you heat it to the "popcorn" stage
As promised...
View attachment 168408 Right side...
View attachment 168409 ...toward the back
View attachment 168410 bottom, where the blower comes in, and the pedastal/ashpan area...
View attachment 168411 Another angle of the blower entrance...
View attachment 168412 Wider angle, you can see the damper actuator rod that runs front to rear...
View attachment 168413 The side panel with air deflector. It directs the air across the HEs and firebox top
View attachment 168414 Another angle, you can see the deflector is mounted on a inner double wall panel
Oh, yeah, I see what you are referring to. That is the tube that the fan (blower) switch is in. That tube is open to the "controls" box on the back thereSo directly below the flue outlet on the back is another pipe that is below the top of the firebox. Is that the secondary air inlet? It seems big. What is it?
Ha! And if you are a member over on AS, then you know what (who) my avatar isOk - now we're into Red Green territory...

Or maybe Scooby Doo, "The case of the missing heat"This is kinda like an Inspector Gadget episode - lol....


