Everything Drolet Tundra - Heatmax...

  • Active since 1995, Hearth.com is THE place on the internet for free information and advice about wood stoves, pellet stoves and other energy saving equipment.

    We strive to provide opinions, articles, discussions and history related to Hearth Products and in a more general sense, energy issues.

    We promote the EFFICIENT, RESPONSIBLE, CLEAN and SAFE use of all fuels, whether renewable or fossil.
We need a fireproof little troll who lives inside the firebox to come out and stir the coals and pile them toward the front of the stove at the end of the burns. That would be tough to engineer but a firebox floor that could rise slowly as the fire burns down.. now that may be possible... tough but possible to engineer and freakin awesome if ya could make it work!

Having a controller on the damper has helped immensely in controlling the coalbed. As your fire dies off, having a controller open the damper will burn off the coals, keeping the heat output up in the process. You can buy a cheap unit for $20 on Amazon if you're inclined, or something more reliable for $70.

When it's really cold, below zero overnight and 10 degree highs during the day, my Tundra can just manage to keep the house in the low 60s as a low, mid 60s as a high. During those cold snaps having a second wood appliance helps immensely.

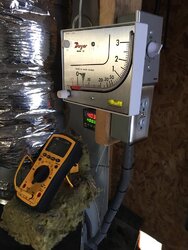
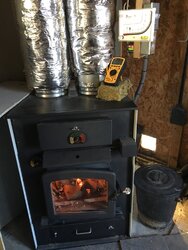
You mean like this?
87bee8327bb5426317239119daab093d.jpg
44de7e56ba99c666b166397e50c5c976.jpg

I have got my Tundra dialed in an operating at top factory spec. My tundra is in a stand alone garage an keeps house around 71-72 most the day during teens an drops to around 65-66 by end of a 10 hr work day. In single digits an below it would be closer to 62-63 when i got home after 10 hrs but i supplement w either the 1400i driving house up to 75 or using gas to balance house out in single digits an colder.

Back to the point.. at this point i am trying to improve upon an nearly ideal setup really. I am likely going to break out the tabs on the main damper to make the intake there larger again. I see no issues w that an benefit when burning of coals after 8-10 hrs. SBI did this along w other things to slow the heating to help stop cracking. After operating Tundras for a few years, having had first unit crack an be replaced w updated Tundra.. i am confident the main damper intake hole size was not part of the equation. It does not fire much faster at all with the larger side intakes on main damper so im going back to them for larger volume of air at end of burns. After firing my damper stays closed for about 6 hrs anyhow before temp controller opens it at low draft speed(flu temp)


Sent from my iPhone using Tapatalk
 
  • Like
Reactions: KC Matt
All in all as mentioned in this thread before and in the operating manual of the Tundra.. Smaller fires is really key. I get forgetful and try to load the thing to the top just to be reminded this simply covers the coals in too much ash causing 16 hour burns or better but with no heat after 8-10 hrs cause the coals are too insulated. Def works better to build smaller loads or very loosely stacked loads. Last night I put in a smaller load and woke up to a nice amount of coals just barely enough to restart. Honestly I thing its simply about finding that happy medium with the loads that works best. This is partially why I am leaning towards the grate. I feel the firebox is simply too tall and loading it to the top is counter productive. I was thinking of ways to get a better burn when loading stove above firebox door.. which is not recommended to begin with.. lol. But... if we good get more air injected into the coals the larger loads would work better. So I believe I'm going to start with taking out the tabs on the main damper putting main intake back to Tundra 1's original design on that part. Beyond that I am interested in a low coal burn of port being added with a temp controlled air injector at the base of the coal bed. Not sure Im going to go that far though. Maybe just learn to work with smaller appropriate loads. The idea here is to add a little more higher heat to the burn cycle when over loading the stove. (past the top of the door). When I load loosely and at or below firebox door or smaller loads this is really not much of an issue. Somewhere in this thread this season Brenndatomu mentioned loading the stove as full as you can with out damaging the 2ndary pipes.. Not sure why cause he knows better. :) I heard this in the back of my head and did it a few times reminding my self when I came home why this was not all that effective. Wind up with way to many coals insulated by way too much ash.
 
I think brenndatomu mentioned this before too and that is building a loose stack as close to the top as you can but not wall to wall. like a small tower of wood in the middle of the box.. can def make for a killer burn. I have had great luck with those loads. Again firebox not slammed full with wood but built in the middle stacked as high as you can.
 
Hey Digger, I don't mean to come across as being an expert, I forgot you had your setup dialed in. This thread is so long it takes a while to look back at who posted what.

My setup is sure not working as well as yours. We are supposed to see 50 degree days this week so I'll be able to shut down and install the manometer.
Your all good. I was just having a little fun. Im becoming an expert on this stuff but only thanks to this thread. lol. I realized you had forgotten who I was and decided to play a bit of a jack arse by saying "you mean like this?" lol sorry your definitely fine and just trying to be helpful. I rem your user name however from earlier in the thread. Your advice was spot on. no worries. If you know something share it. no harm no foul you didn't come off as a know it all in the least my friend. My setup required a ton of work, research and help from the true experts on this feed. having as much smooth solid duct as possible was key in proper CFMs thru the duct setup.
 
Hey Digger, I don't mean to come across as being an expert, I forgot you had your setup dialed in. This thread is so long it takes a while to look back at who posted what.

My setup is sure not working as well as yours. We are supposed to see 50 degree days this week so I'll be able to shut down and install the manometer.
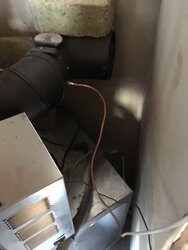
lol I installed my manometer during a peak burn! lmao. I like playing with fire I suppose. I used a copper pipe stubbed out about 2 feet then attached the rubber hose to the manometer. Was a little hot reaching inside the flu but my baro is right next to my manometer port so I used a glove.. lmao. yes I am one of those.. "can't wait gunna figure a way to do it right now dammit" people. Sometimes pays off sometimes not so much. lol keeps life interesting though! :)
 
Hey Digger, I don't mean to come across as being an expert, I forgot you had your setup dialed in. This thread is so long it takes a while to look back at who posted what.

My setup is sure not working as well as yours. We are supposed to see 50 degree days this week so I'll be able to shut down and install the manometer.
And honestly you don't really have to get a nut and fitting on there you really can just drill an appropriate size hole, put a little bend on a copper tube and hang it inside the hole. The tiny amount of air that may get in around the copper pipe is not really much of a factor in anything. I have actually left open hole in the flu at times and noticed no difference in flu operations. So tech you can add it in even if the flu is at 800 deg!
 
2ec2381d9bfb8fb54cb4161ca8d972c1.jpg

The foil is because i am lazy an just jammed the copper tubing on the fitting stretching the copper a bit but was still loose so i just wrapped it w foil tape. Has held for a year or more now easy. Why mess w it? Lol


Sent from my iPhone using Tapatalk
 
What are you guys using to cover the gap in the filter box where the filter goes? It's pulling a LOT of cold air in that gap which I just noticed last night. For now I put a strip of blue painters tape across it but a strip of thin, pliable rubber would be a more permanent fix.
 
Ahh I see. Is that double wall? With double wall I'm guessing you drill the outer layer big enough to drop the copper to the inner layer then seal it will stove cement.
 
Ahh I see. Is that double wall? With double wall I'm guessing you drill the outer layer big enough to drop the copper to the inner layer then seal it will stove cement.

Nope thats single wall. Such a short run to chimney double wouldn't even fit. Bout 1 1/2' or less into chimney. Anyways i dont really think you'll need cement. The cracks around the hole will only draw air in. For example my baro does not seal tight. There is a gap around the flapper part and the outer ring. Due to draft on chimney most holes or cracks simply suck in air. None that will greatly affect draft speed like w baro would but same principle.


Sent from my iPhone using Tapatalk
 
Im saying u can just drill an appropriate size whole, bend a hook from copper tube, insert hang attach tube an go. Will work fine.


Sent from my iPhone using Tapatalk
 
Brenndatomu mentioned loading the stove as full as you can with out damaging the 2ndary pipes.. Not sure why cause he knows better
Yes I do. But, I do fill it to the top when the weather gets like it has been the last few days. The key is making sure there is still room for air/fire flow. I especially like leaving a gap in the wood, at least toward the front, for the boost air nozzle (bottom, front and center...which I make sure is cleared off on every load) to be able to blow on the coals that I just raked up for the reload...a couple pieces of kindlin wood placed right there will get the flames going right quick. I don't like to let the coals build heat until the wood catches like some people do, that causes smoke and smoke causes creosote, so I try to get the flames going ASAP, I'll even drop a match on the hot coals (or hit it with the auto light propane torch) if things don't go right away.
Anywho, by leaving a little gap in between the wood front and center, the fire will progress to the top and get the secondary burn going pretty quickly...and that's where the real heat (and clean burn) is.

Speaking of filling 'er up, now that many of us have just dealt with a real cold spell here lately, it is probably a good time to remind everybody to check to make sure your baffles are properly in place. I checked mine last night and they had scooched forward 1/2" or so somehow.
 
  • Like
Reactions: Digger79
What are you guys using to cover the gap in the filter box where the filter goes
Gap? I don't have a gap around my filter. Now, there are gaps around the metal "knock out" plates in the blower housing where you can mount the filter in one of three places (rear or either side) I had originally covered all the gaps but then I remembered my Yukon furnace. It has a 1" gap between the filter and its housing...on purpose. It's for when the power goes out, so you still get some airflow for gravity heating (or keeping the firebox from melting down...assuming you have properly designed duct work) Yes it leaves a little unfiltered air in at all times, but what else are you gonna do without making things really complicated? (read: expensive)
My Yukon furnace is actually UL certified to be able to run (at 50% loading) without the power on. They tell you to completely remove the filter ASAP when the power goes out for maximum cooling of the firebox, and maximum heat to the house. If the power goes out when you are burning, I'm sure removing the filter from Tundra (or any wood/coal furnace for that matter) would be a really good idea too...
 
Last edited:
And honestly you don't really have to get a nut and fitting on there you really can just drill an appropriate size hole, put a little bend on a copper tube and hang it inside the hole. The tiny amount of air that may get in around the copper pipe is not really much of a factor in anything. I have actually left open hole in the flu at times and noticed no difference in flu operations. So tech you can add it in even if the flu is at 800 deg!
Which direction is the opening on the small copper tube facing. I am using the bent pitot tube on the manometer & it mentions the opening to be 90 degrees to the air flow. Are you also measuring the plenum static pressure the same as your doing for the draft in the chimney
 
Which direction is the opening on the small copper tube facing. I am using the bent pitot tube on the manometer & it mentions the opening to be 90 degrees to the air flow. Are you also measuring the plenum static pressure the same as your doing for the draft in the chimney
not sure what you meant with that first question I posted a photo a few messages up. No not measuring plenum or duct work just flu for firebox damper control.
 
Gap? I don't have a gap around my filter. Now, there are gaps around the metal "knock out" plates in the blower housing where you can mount the filter in one of three places (rear or either side) I had originally covered all the gaps but then I remembered my Yukon furnace. It has a 1" gap between the filter and its housing...on purpose. It's for when the power goes out, so you still get some airflow for gravity heating (or keeping the firebox from melting down...assuming you have properly designed duct work) Yes it leaves a little unfiltered air in at all times, but what else are you gonna do without making things really complicated? (read: expensive)
My Yukon furnace is actually UL certified to be able to run (at 50% loading) without the power on. They tell you to completely remove the filter ASAP when the power goes out for maximum cooling of the firebox, and maximum heat to the house. If the power goes out when you are burning, I'm sure removing the filter from Tundra (or any wood/coal furnace for that matter) would be a really good idea too...
Ive seen a battery backup that should power the tundra for 24 hrs easy. been wanting to add it someday.
 
not sure what you meant with that first question I posted a photo a few messages up. No not measuring plenum or duct work just flu for firebox damper control.
You mentioned that you bent a piece of copper tube & placed it through a drilled hole in your stove pipe to measure the draft . Was the opening of the copper tube facing the air flow. I believe in doing this will result in a false reading, the opening must be 90 degrees to the air flow
 
You mentioned that you bent a piece of copper tube & placed it through a drilled hole in your stove pipe to measure the draft . Was the opening of the copper tube facing the air flow. I believe in doing this will result in a false reading, the opening must be 90 degrees to the air flow
You are correct when testing the high speed positive pressures of ductwork...I think you'll find it makes very little to no difference when testing chimney draft
 
Gap? I don't have a gap around my filter. Now, there are gaps around the metal "knock out" plates in the blower housing where you can mount the filter in one of three places (rear or either side) I had originally covered all the gaps but then I remembered my Yukon furnace. It has a 1" gap between the filter and its housing...on purpose. It's for when the power goes out, so you still get some airflow for gravity heating (or keeping the firebox from melting down...assuming you have properly designed duct work) Yes it leaves a little unfiltered air in at all times, but what else are you gonna do without making things really complicated? (read: expensive)
My Yukon furnace is actually UL certified to be able to run (at 50% loading) without the power on. They tell you to completely remove the filter ASAP when the power goes out for maximum cooling of the firebox, and maximum heat to the house. If the power goes out when you are burning, I'm sure removing the filter from Tundra (or any wood/coal furnace for that matter) would be a really good idea too...

Maybe you don't have the same factory filter housing mine has, but on mine you insert the filter from the back of the unit and after the filter is inserted there is a gap on each side of the filter that's about 3/8". There is nothing to cover the gap from the factory so the return air sucks a huge amount of outside air at that point. In my case the furnace is in the garage and during this cold snap, it's very cold in there.

Covering that massive leak would not in any way prevent heat from rising in a power outage. Nor would a filter, since mine is maintained. However, having it open during powered operation draws in prodigious amounts of sub-freezing air immediately before the heat exchanger which rapidly cools the HE, causing the firebox to cool, causing the damper to open, causing a needless wasting of fuel. As a side 'benefit', it's drawing in outside air which has been at or below zero degrees, cooling both the incoming combustion supply and the floor under my bedroom.

The amount of air this leak was drawing from outside is incredible. I actually noticed it the other night while sitting in the garage because there was so much air flowing across the garage from the garage door area. After I sealed the filter box, the draw across the garage is no longer noticeable.
So it sounds like you have the return air hooked up...that may be the difference.
I bet you would be surprised how much the filter restricts flow with gravity heating....even a clean filter.
 
You mentioned that you bent a piece of copper tube & placed it through a drilled hole in your stove pipe to measure the draft . Was the opening of the copper tube facing the air flow. I believe in doing this will result in a false reading, the opening must be 90 degrees to the air flow
I think i may have confused the issue. I did not use a 90 deg bend. I have a strait fitting the copper is shoved onto on the outside. I mentioned simply drilling a hole an putting a 90 on a copper tube an hanging it in the hole should work fine. Which it will. That would put the pipe perpendicular to the flu. Strait in bend down 90 outside pipe. It may be i did this at first just to see it work cant rem but yes pipe is perpendicular to air flow in flu either way.
 
All I know is that I'm ready for the "warm up" tomorrow - a high of 41°F, I haven't cleaned the stove out in a week and have a huge load of ashes to shovel out - probably 2" above the bottom of the door at this point. I have been going through the wood the last week or so.. I just reloaded my basement "wood room" Saturday with some 1 year old ash, although it is not as dry as it should be. Even with the dry ash before it, with the 0-10°F outside temps, the best I could do was about 70°F indoor temps, maybe as high as 72, and dropping into the mid 60's if I raked the coals and tried to let them burn down more before reloading. The house had a chill if I tried to go 10 hours on a load so I was doing smaller loads at 6-8 hours.

I mean I'm still happy because I never used the LP furnace but I feel there's still some heat to gain out of this Tundra. I need to make a few more improvements on my duct system for sure.

I especially like leaving a gap in the wood, at least toward the front, for the boost air nozzle (bottom, front and center...which I make sure is cleared off on every load) to be able to blow on the coals that I just raked up for the reload.
Stupid question #1: I know where the boost air nozzle is on the outside of the stove, but where does it go into the fire box at? It doesn't appear to go straight through into the fire box. I have felt around before and not found that boost air hole in the firebox, and with the amount of ashes I have right now, I guarantee that it is blocked.

2. Is there any maintenance regarding the secondary burn tubes? On some good dry ash late last week, I watched the stove and did not get a good secondary burn. The middle burner was burning the full width, the front did not light off at all, and the rear was flashing flames on and off. I expected a much better secondary burn, and have previously had a much better secondary burn. If I bumped these tubes with a piece of wood, can they become unseated? Or is it more likely that they need cleaned, or that my temperature set points are not ideal?

I will post a picture of my setup, but essentially, my thermocouple and manometer are tapped almost right off the back of the stove. Out the back of the stove, I have a 90° elbow, then my barometer. The TC and manometer are essentially at the joint between the barometer and the elbow - so before the barometer. I vary my low alarm set point, right now it is 255°F and I believe my alarm hysteresis is 150°. I want to keep the stove running a little hotter, just due to the wood not being as dry as possible, my thought being the higher temps should help with reducing creosote or condensation - at the expense of burn time, which is an acceptable trade-off.
 
I know where the boost air nozzle is on the outside of the stove, but where does it go into the fire box at?
Its right there, it goes straight in...its only ~1/4" hole or so.
Is there any maintenance regarding the secondary burn tubes?
Not really. As long as they are in place and look OK, they are fine. Someone posted here somewheres recently about pulling theirs out to clean 'em and that it was a complete waste of time.
Just because there wasn't an even flame out of all of them at once doesn't mean a thing...very normal.