
3fordasho
Minister of Fire
So it sounds like you have the return air hooked up...that may be the difference.
I bet you would be surprised how much the filter restricts flow with gravity heating....even a clean filter.
Yes- this is why one of the 8" outlet ducts are cold and one hot before the fan kicks in on a cold start up - gravity flow would rather go that way then though the filter.

")
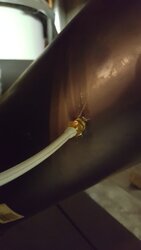
 . Its nothing more than an extension to prevent the rubber hose from melting. Any bends u see in it were just to hold it in position. I rigged it up quick an re located it again leaving pipe bent. Brenn sends me this draft measuring thingy an i had to call him to figure out how to use it properly lol but all i had was a short fitting an a rubber hose w the kit so i grabbed the first piece of metal tube i could find, jammed it on over fitting an foil taped it planning on a more permanent connection that never got done an just aint really needed. I have a camera setup on the dials an was monitoring draft speeds thru out burns to move along faster in understanding were temps would be at dif draft readings. I can remotely monitor an control the entire setup from my phone. T stat, temp controller, power all of it has remote controlling capabilities using my phone an wifi junk. I been meaning to set up a over fire alarm just hadnt got around to it. I do have power loss alarms that go to my phone so I can run home if power goes out. Planning on a battery backup system ive found that will run tundra for about a day if power goes out. Charges an grid power runs thru. No kids no wife no life lol just me an the stove lmao
 Dan
Dan")
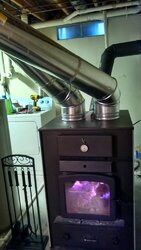
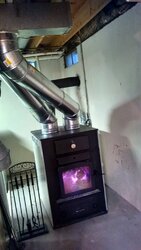
 So far the house heats right up and I have not seen any ill effects due to the 45's. I may consider changing it however since my insurance will want a few pics of the install.