1. Guest , Please be sure to use our new Bookmarks system to save your favorite threads! This lets you refer to them later and direct others, etc. Information on the new feature at this link
  1. mitchinpa New Member

    joined: Feb 25, 2008
    78 posts
    Western PA
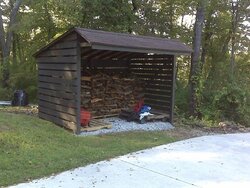
    After several weekends of work, with a few hours here, and few hours there, I was finally able to finish my woodshed. It should hold between 4 and 4 and a half cords based on the square footage for a cord versus the square footage on the shed. We only burn about 2 or 2 and a half cords each winter, so this should hold almost 2 years supply. The mostly cherry already stacked in it was split in May and will be used if I go through the wood I split last summer (which still needs moved and stacked into the new shed). No more dealing with tarps for me!!!

    Attached Files:

  2. muncybob God of Fire

    joined: Apr 8, 2008
    1,396 posts
    Central PA
    Looks good...I'm starting a similar project next month only larger. Plan to use crushed stone too for the base to help level out our totally un-flat land. Are your poles on concrete piers or directly into the ground? I'm debating on which way to go for them.
    Hope to have a shed building party and get most of it done in a weekend.
  3. mitchinpa New Member

    joined: Feb 25, 2008
    78 posts
    Western PA
    Thanks Bob! My posts are in the ground. Digging the 5 holes was probably the hardest part of the project, as most of my ground is clay based. I figured the crushed stone will serve two purposes: 1. to help level out the ground, as my situation is similar to yours, and 2. it will hopefully prolong the life of the pallets the wood is sitting on, as the pallets wont be lying on the dirt, thus retaining moisture.
  4. firefighterjake God of Fire

    joined: Jul 22, 2008
    11,085 posts
    Unity/Bangor, Maine
    Sharp looking woodshed . . . very nicely done . . . and I like the idea of having enough space to have 2 years worth of wood under cover . . . gives one a real sense of security when you have that much wood under cover.
  5. vvvv New Member

    joined: Feb 23, 2010
    1,472 posts
    MAINE
  6. PapaDave God of Fire

    Wow, that's sharp!
    I like the way you added the front overhang.
    It's such a nice feeling to have that wood put in the shed, knowing it's not getting wet anymore.
    I had planned to put some gravel in mine too, or maybe even pour a slab, but I can think about that NEXT year. I have pallets now, so at least the wood is off the ground.
  7. firefighterjake God of Fire

    joined: Jul 22, 2008
    11,085 posts
    Unity/Bangor, Maine
    Very good advice . . . one of the reasons most of my wood is set up so that it runs back to front vs. side to side.
  8. Pagey Member

    joined: Nov 2, 2008
    2,349 posts
    Middle TN
    Very, very nice. Good job!
  9. stint9 New Member

    joined: Oct 25, 2009
    44 posts
    Northern NJ
    Vary well done; a sight for us woodburners' sore (and sawdust filled) eyes

    Is that even a 'drip preventer' I see on the forward edge of the overhang ??
  10. vvvv New Member

    joined: Feb 23, 2010
    1,472 posts
    MAINE
    & 2late for the white roof!
  11. firefighterjake God of Fire

    joined: Jul 22, 2008
    11,085 posts
    Unity/Bangor, Maine
    I still don't quite buy your white roof theory . . . but to each their own . . . if it works for you, go for it is my mantra.
  12. vvvv New Member

    joined: Feb 23, 2010
    1,472 posts
    MAINE
    not my theory! read it in POPULAR SCIENCE mag 30 yrs ago & recently got explanation from science forum which made sense. seemingly it dont make sense but thats what makes it interesting for INTELLIGENT debate & entertaining. different factors as to how would the shed better dry the wood also come into play but the best part is that the "common sense" gets riled & individual's perspective gets somewhat revealed
  13. firefighterjake God of Fire

    joined: Jul 22, 2008
    11,085 posts
    Unity/Bangor, Maine
    Ah now it makes sense . . . any idea why we aren't all driving Flying Cars like Popular Science talked about 30 years ago? ;) HehHeh . . . "intelligent debate" . . . not from me . . . I'm just a dumb firefighter . . . if I was smarter I might be a cop . . . and if I was really smart I would have been a politician . . . but I'm not. :) As I said, what works for you works for you . . . and what works for me, works for me.
  14. SolarAndWood Member

    joined: Feb 3, 2008
    6,592 posts
    Syracuse NY
    wheel very efficient and failure mode not so critical. methinx me wife would be way pissed if I painted the roof white, no science required with that decision.

    BTW, great looking shed Mitch and congrats on putting tarps behind you.
  15. golfandwoodnut God of Fire

    joined: Sep 25, 2009
    1,164 posts
    Pittsburgh PA
    To another western PA guy, good job, I like the overhang. Go Steelers!.
  16. ggans New Member

    joined: Oct 11, 2009
    176 posts
    Michigan
    Nice, but just one photo? :-(
  17. fossil Super Moderator

    joined: Sep 30, 2007
    7,426 posts
    Bend, Oregon
    That pretty shed speaks for itself in just one photo. It's a beauty, nice job! Rick
  18. ggans New Member

    joined: Oct 11, 2009
    176 posts
    Michigan
    Yeah I'll give ya that.. nice job......
  19. mitchinpa New Member

    joined: Feb 25, 2008
    78 posts
    Western PA
    Thanks everyone for the kind comments! Yes, that is a drip edge. I put it on all sides before I laid the shingles. I figured if I was spending the time to do this project, I was gonna do it right so I dont have to repair anything in the next 20 years. My father in law is trying to convince me to put a rain gutter on the front, so in his words "you wont get dripped on going in and out". I'll see how that goes this winter then make that decision.

    Never heard of the white roof theory, but maybe when the 25 year shingles I put on wear down, I will try it! ;-)

    As far as stacking goes, I went side to side this year since I wanted maximum exposure for air flow purposes. That wood was split early this year, and was in the low to mid 20's as far as mositure content. Being against the back wall, with the openings between the boards, I figure will allow it to season a bit more. I plan on leaving a 1 or 2 foot gap between what is already stacked, and what I will be stacking from my old seasoned pile. Next year I'll be going to the front to back method, as I am already bucking a few fallen trees. If I have to restack at that point, no big deal. I can use the exercise. (at least that's what the wife says...)

    And yes, Go Steelers!
  20. wsorg New Member

    joined: Sep 3, 2009
    221 posts
    IL
    Looks great....nice work!
  21. maplewood God of Fire

    joined: Feb 12, 2008
    599 posts
    NB Canada
    Great shed - thanks for posting the pic.
    I burned some cherry this past winter - it dried quickly and was a super hardwood.
    The cherry around here gets a black mold on it easily, so I cut it down when I find it and stop the spread of mold.
    Happy burning from your new shed!
  22. billb3 God of Fire

    joined: Dec 14, 2007
    2,631 posts
    SE Mass
    Yup, nice classic-looking shed.
    I've always wanted a removable back wall. I've seen them hung on hooks.
    Chin link fence ( like a dog kennel) would probably work, too.
  23. Ratman New Member

    joined: Aug 11, 2009
    455 posts
    Bedford, NH
    I want to learn...
    If your going to drop the white roof bomb on me BLIMP then please teach me don't tease me.
    I'm old too so don't get me going...
    hehehe
    Thanks...
  24. cptoneleg God of Fire

    joined: Jul 17, 2010
    1,167 posts
    Virginia
    Nice looking shed, I know you will enjoy.

    Cpy
  25. vvvv New Member

    joined: Feb 23, 2010
    1,472 posts
    MAINE
    many a reason for the white roof but i'm tired of retyping= gotta write & index a blog. i can call u free 4me via googlefone . pm me your # if u want & i'll call.

Share This Page