Finally installing a liner on my Buck insert. More progress. Fire again WOOHOO!! New pics

  • Active since 1995, Hearth.com is THE place on the internet for free information and advice about wood stoves, pellet stoves and other energy saving equipment.

    We strive to provide opinions, articles, discussions and history related to Hearth Products and in a more general sense, energy issues.

    We promote the EFFICIENT, RESPONSIBLE, CLEAN and SAFE use of all fuels, whether renewable or fossil.
Status
Not open for further replies.

WoodpileOCD

Minister of Fire
Jan 19, 2011
722
Central NC
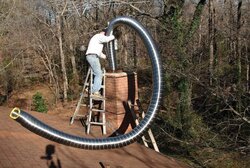
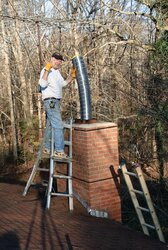
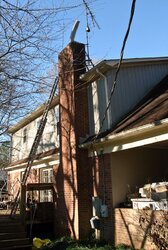
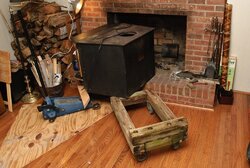
My liner from Rockford Chimney came today so I have started my reline job. Right off the bat things got kinked up. As the Fedex truck is pulling out of the neighborhood, I open the box and realize that I have no rain cap. I order the deluxe terra cotta per a recommendation from BroBart. One phone call and it is on the way but will be a couple days. No biggie. My son in law was supposed to help me get the stove out but hurt his back last night so had to use some leverage and brains rather than brawn (which ain't what it used to be)

I didn't plan this out very well I guess because I figured I would just go out and buy some Roxul at one of the big box stores. Wrong :-S Ordered it from Lowes online and it will be delivered to their local store.

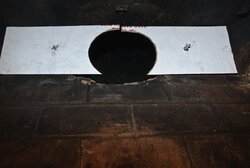
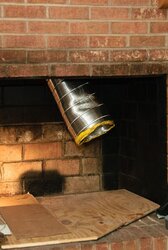
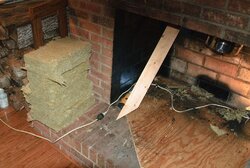
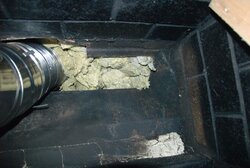
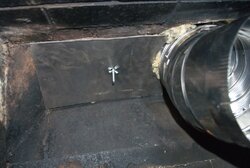
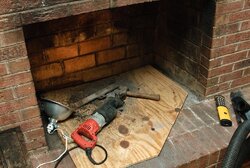
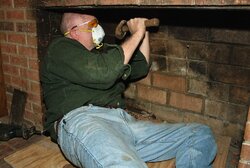
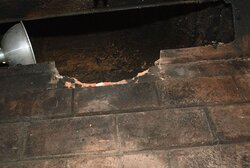
It was raining outside today so I did most of the inside work to get it ready and I have pics to prove it's really happening. Getting the damper frame cut out and removing part of the fire brick went a lot better than I had envisioned it would. A thanks to 'coltfever' for the pictures of how he did his and what it looked like when it was done. https://www.hearth.com/econtent/index.php/forums/viewthread/82619/ Helped me to see what I was trying to do.

I also ordered $100 worth of Perlite instead of $375 worth of liner insulation and it should be here soon.

Anyway, here is the first post chronicling my DIY install. As someone else said in an install thread "How hard can it be, really" I think I have the hard part done actually.
 

Attachments

  • Liner Install 1-1.jpg
    Liner Install 1-1.jpg
    140.1 KB · Views: 1,847
  • Liner Install 1-2.jpg
    Liner Install 1-2.jpg
    150.3 KB · Views: 1,729
  • Liner Install 1-3.jpg
    Liner Install 1-3.jpg
    140.1 KB · Views: 1,683
  • Liner Install 1-4.jpg
    Liner Install 1-4.jpg
    138.2 KB · Views: 1,665
  • Liner Install 1-5.jpg
    Liner Install 1-5.jpg
    132 KB · Views: 1,677
  • Liner Install 1-6.jpg
    184 KB · Views: 1,317
Oh do those pics bring back memories. :lol:

Get'er done. It is worth every skinned knuckle.
 
Great pictures.
Saws-all & a hammer & chisel, that's all it takes :)
Those install pictures really help others who may have to go thru the same knuckle busting job, to see it's doable.
Safety glasses & a dust mask!!! Smart man,
leather gloves might save some nicks ;)
Looking good !
 
  • Like
Reactions: jaychino415

Attachments

  • block off plate mock up-1.jpg
    block off plate mock up-1.jpg
    47.1 KB · Views: 1,371
Progress update. I got the liner down the chimney yesterday and even under probably the best of circumstances it wasn't exactly a piece of cake. As you can see from the pics, I have a fairly flat roof and my chimney only comes up about 4-5 feet from that so a short ladder gave me easy and relatively secure access to the top of the chimney. I carried the liner up still in it's wrapper and straightened it out on the roof. Felt like I was wrasslin a giant Anaconda trying to get that thing straightened out. Even though it was a straight shot down it took a couple of attempts because it kept getting caught on the ledges of the terra cotta where they weren't line up straight. Finally got it down and through the opening I made and I have to tell you, I'm wouldn't want to snake that 8" bas***d past any turns. It may be called a flexible liner but it ain't all that flexible.

I was going to hook it up to the insert but I don't have the roxul in place yet (still waiting for it to arrive) and I was worried about getting the liner connector back out of the stove to pull it again for the insulation and block off plate. The appliance connector (ordered the 45 degree offset one and am glad I did) drops down about 3/4 to 1" into the stove and I'm not sure how I'm going to get it back up that inch if I have to pull the stove later. Barely enough room on top of the stove to get my arms in there so I don't think I could physically lift it that inch without going to the roof and pulling it up again. Anyway, decided to wait and do it one time. Damn I hate running the gas furnace, even for a few days anymore.

Here's pics. Any comments welcome.
 

Attachments

  • liner install roof-1.jpg
    liner install roof-1.jpg
    142.7 KB · Views: 1,399
  • liner install roof-2.jpg
    liner install roof-2.jpg
    144 KB · Views: 1,327
  • liner install roof-3.jpg
    liner install roof-3.jpg
    76.1 KB · Views: 1,296
  • liner install roof-4.jpg
    liner install roof-4.jpg
    119.8 KB · Views: 1,305
  • Like
Reactions: Beer Belly
Woodpilr, how big is your masonry flue? That is, how much wiggle room did you have snaking it down there?

I ordered the insulation kit and am concerned stuffing that whole thing down my 13x13 flue will be tough.
 
Mine is 13x13 as well and it wasn't too much trouble. The key is to get the curve out as much as you can before you start. I got about half way down and had to pull it back out and straighten it more. Whoever the mason was didn't line up the terra cotta liner blocks very well and it kept hitting the 1/2" ledges on the way down. Once I got it straightened out more it went fine with some shaking and wiggling. I think you said yours is a 6" so even with the liner blanket I'm guessing your's will be fine if it is a straight shot, which it looks like. Just posted to your thread about the man lift.
 
WoodpileOCD said:
Mine is 13x13 as well and it wasn't too much trouble. The key is to get the curve out as much as you can before you start. I got about half way down and had to pull it back out and straighten it more. Whoever the mason was didn't line up the terra cotta liner blocks very well and it kept hitting the 1/2" ledges on the way down. Once I got it straightened out more it went fine with some shaking and wiggling. I think you said yours is a 6" so even with the liner I'm guessing your's will be fine if it is a straight shot, which it looks like. Just posted to your thread about the man lift.

I can see no kinks in the flue that would hang things up. The liner I bought has the tee on the end that I could tie off to and tug it down.

How did you cut the excess? Sawzall? Hacksaw? Beaver?
 
Great pictures.
Maybe a rope down first & have someone pull as you guide the top?
Will/can you trim the end if got to damaged?
Looking like lots of progress :)
Again great pictures.
Be careful up there :)
 
bluedogz said:
Woodpilr, how big is your masonry flue? That is, how much wiggle room did you have snaking it down there?

I ordered the insulation kit and am concerned stuffing that whole thing down my 13x13 flue will be tough.

When I did this I regret not having spent the money to get one of those coned heads (from Rockford) with the eyelet at the end to attach rope to. I ended up straighening it out on the ground and then carting it up to the roof. The whole neighbourhood thought it was hilarious and that I was stupid for doing this. I did look a right clown with a 30' silver snake following me up. I did spend a lot of time trying to wrestle the bugger around in the hole by turning it around and around. The lip was caught on some cement that had been squeezed out about 15' down the chimney, if only I had had the pulling cap. I then had to go through two 20° offsets to get it into the fireplace. Not a fun job. I would not like to take it out of there either.

Your photos bring back lots of memories.

Good luck, it looks as dirty as I remember.

Ray
 
bluedogz, I haven't cut the top off yet but the bottom got so buggered up and mangled I had to cut it off to get a round edge to go in the stove adapter. I just used tin snips and it worked fine. The biggest thing was trying to get a relatively straight cut around the liner. The liner was at an angle and the eye wants to follow the continuous swirl of the grooves upward. Finally wrapped a piece of tape around it and made sure it was straight and cut along the tape. Cutting it is no big deal. I figured I'd wait until I'm ready to put the top cap on to cut the upper section off. Hope it comes in the next day or two before we get any rain. It's bad enough with 5' of silver snake sticking out of my chimney much less if I have to throw a tarp over it.
 
anxious to hear what your results are.

pen
 
rayg said:
bluedogz said:
Woodpilr, how big is your masonry flue? That is, how much wiggle room did you have snaking it down there?

I ordered the insulation kit and am concerned stuffing that whole thing down my 13x13 flue will be tough.

When I did this I regret not having spent the money to get one of those coned heads (from Rockford) with the eyelet at the end to attach rope to. I ended up straighening it out on the ground and then carting it up to the roof. The whole neighbourhood thought it was hilarious and that I was stupid for doing this. I did look a right clown with a 30' silver snake following me up. I did spend a lot of time trying to wrestle the bugger around in the hole by turning it around and around. The lip was caught on some cement that had been squeezed out about 15' down the chimney, if only I had had the pulling cap. I then had to go through two 20° offsets to get it into the fireplace. Not a fun job. I would not like to take it out of there either.

Your photos bring back lots of memories.

Good luck, it looks as dirty as I remember.

Ray

Glad to bring back the nightmares or memories to you and Brother Bart. I love the picture you paint of your climbing the ladder with the silver snake. I thought about straightening it out on the ground first but it was easier to carry it up the ladder still wrapped in the shrink wrap and I have a pretty flat shed roof on the back to lay it out on. I'm not sure how you got it down 2 different offsets. Don't think I could have done it with mine without a pulling cone and two people. Was your a 6" and did it have insulation on it because that has to create even more drag.

bogydave: I thought about getting one of the pulling cones from Rockford but I think they wanted 40-50 bucks for it and I was pretty sure it would be a fairly straightforward job which it turned out to be.

To all of you guys out there that do this for a living. You have my respect and admiration. Every roof and chimney a challenge I'm sure. Wouldn't want to do this for a living myself.

Looking forward to the insulation coming so I can finish this up. I'm starting to get withdrawals and I HATE hearing the furnace run. :coolgrin:
 
Instead of buying a pulling cone for mine, I tied a rope to the center of a good sized towel, stuffed the towel into the liner and secured it w/ duct tape, then pulled it down. It wasn't pretty, but it worked just fine.

pen
 
pen said:
Instead of buying a pulling cone for mine, I tied a rope to the center of a good sized towel, stuffed the towel into the liner and secured it w/ duct tape, then pulled it down. It wasn't pretty, but it worked just fine.

pen

Good ole "Duct tape" :)
Good idea
 
pen said:
Instead of buying a pulling cone for mine, I tied a rope to the center of a good sized towel, stuffed the towel into the liner and secured it w/ duct tape, then pulled it down. It wasn't pretty, but it worked just fine.

pen

Ingenuity IS the mother of invention isn't it? Good idea.
 
The Rockford kit came with the 2-piece Tee crimped on already, so my plan was to just clip a carabiner to the tee and drag it through.
 
Ok, I got my bags of Perlite delivered on Friday and I think my Roxul that I ordered is in at the local Lowes. At least the email said it should be delivered on 12/4 so I'm hoping to get everything together tomorrow and get this moving again.

I have a question about the Perlite and it sifting through the Roxul and block off plate. Anyone have any experience with maybe mixing some Portland cement in with it for the lower layer of insulation to give it more substance and stick together some. I'm planning on REALLY stuffing the lower flue and firebox with Roxul and sealing my blockoff with stove caulk but I've read a couple of places where people have had trouble with it sifting down. Any thoughts or better yet experiences are appreciated.
 
Well? Roxul? Perlite?
 
One suggestion of moving the insert in and out a little easier. Use a 3 or 4' dowel placed under the front (once you have it positioned in front of the opening. If you balance it correctly you can move it very easily.
 
  • Like
Reactions: Beer Belly
Roxul is here, Perlite is here and the missing TC top plate and cap are here. All materials present and accounted for.

I decided to do the lower Roxul insulation and the block off plate install tonight (wife thinks I crazy when I start this stuff at 9 or 10:00 at night but sometimes you just have to move with the moment when you have the time. I'm off tomorrow but have a baby grand that's due at any time so the stove may have to take a back seat.

Tonight's adventure was just as nasty and dirty if not more so than cutting out the damper and brick. Stuffed as much Roxul, as far up in the flue as I could get it with a piece of 2x4. I cut up the pieces of Roxul into chunks as you can see and then just started cramming. I was able to get a good bit up into the 13x13 flue around the liner and then jammed the smoke box full as well. I had to do some last minute mods on my 'poor mans' block off plates that I had fabricated a few days ago but got them to fit ok and am pretty pleased with them. I'm probably going to use some stove caulk around the edges and around the pipe to make it as tight as I can. My reason for this is to try to keep the Perlite I'm going to use from filtering down through.

I bought some Portland cement and tomorrow, baby allowing, I'm going to mix the cement with the Perlite in different proportions with water and do some testing. I'm looking for a combination that will be 'pourable' but not set up too hard. My plan is to pour a couple buckets of this mixture in first to try to seal the bottom of the flue around the pipe without it setting up too hard. Just enough to form a semi solid barrier to keep the rest from filtering through then fill the flue with the rest to the top. I'll let you know how my concoctions work out.

gzecc, thanks for the idea of the dowel. I've been using BB's under the stove and it works ok but I think the dowel will make it even easier.
 

Attachments

  • block off plate-1.jpg
    block off plate-1.jpg
    132.3 KB · Views: 909
  • block off plate-2.jpg
    block off plate-2.jpg
    103 KB · Views: 899
  • block off plate-3.jpg
    block off plate-3.jpg
    96.2 KB · Views: 900
You are doing a great job of showing "how to" install.
Great detail pictures.
Careful up there lifting the buckets of slurry. (it's heavy)
Gonna be a nice install job. :)
 
Nice work. I don't think I would do the cement thing just in case in the future the liner needs to be replaced.
 
woodmiser, that's why I'm going to do some testing for texture before I do it. I'm looking for a proportion of cement/perlite that will just allow the perlite to stick together but be able to be broken apart fairly easily when it is dry. I didn't want to do the the Thermix all the way up because of possibly needing to replace the liner or someone (not me) wanting to convert back to a fireplace. If I can find the right texture, I envision the perlite forming a semi-solid shield a few inches thick at the bottom of the flue that will be fairly easy to break up and clean out. The rest will be just perlite.

bogydave, sounds like you are envisioning a wet 'slurry' mix like you would mix up and pour like a liquid. I'm looking for something that is still granular to pour but sticky when it hits bottom. Shouldn't be too much heavier than the perlite itself. Thanks for the encouraging remarks throughout and the concern/reminders on safety.
 
I think it's a little overkill. Between the blockoff plate and the Roxul you really have done about as much as you need. That layer of slurry, in reality, is probably going to be more trouble doing than worth it for the benifit. I call it the "point of diminishing returns". Envision the stuff pouring down the sides of the flue, much of it coating the walls on the way down. How will you know if it's say, 3" thick down there?
 
Status
Not open for further replies.