Finally...New BK Install...With Pics

  • Active since 1995, Hearth.com is THE place on the internet for free information and advice about wood stoves, pellet stoves and other energy saving equipment.

    We strive to provide opinions, articles, discussions and history related to Hearth Products and in a more general sense, energy issues.

    We promote the EFFICIENT, RESPONSIBLE, CLEAN and SAFE use of all fuels, whether renewable or fossil.
Status
Not open for further replies.

fdegree

Feeling the Heat
Hearth Supporter
Oct 20, 2009
403
Southern Delaware
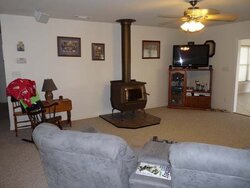
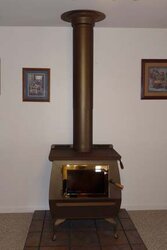
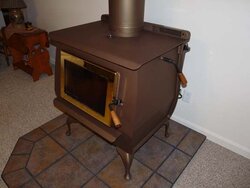
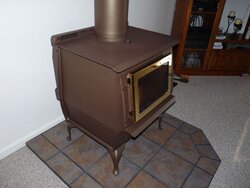
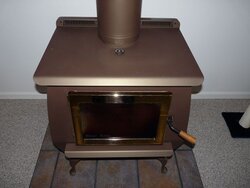
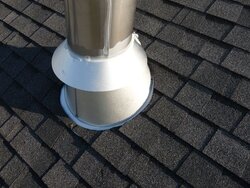
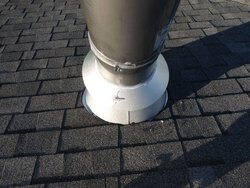
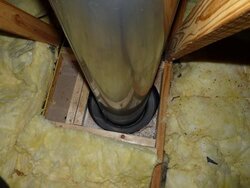
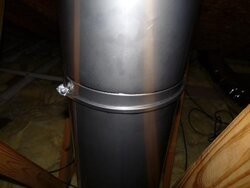
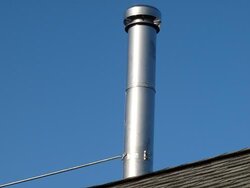
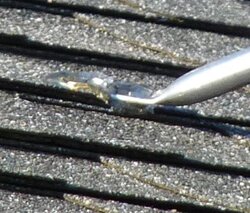
Installers just left. Here is the finished product.

That 8" pipe really is ugly...I think 6" would look better.

We plan to build a raised hearth with a stone finish and stone on the wall behind the stove at some point in the future. Probably a year or two away from actually doing that.

I wish to express my sincere THANKS to everyone who helped me work out the placement issue I was up against...

...THANK YOU - THANK YOU - THANK YOU!!!!
 

Attachments

  • Showing Placement.jpg
    Showing Placement.jpg
    29.1 KB · Views: 637
  • Showing Interior.jpg
    Showing Interior.jpg
    9.7 KB · Views: 636
  • Showing Exterior.jpg
    Showing Exterior.jpg
    21.7 KB · Views: 626
  • Showing Color.jpg
    Showing Color.jpg
    26.3 KB · Views: 647
Spectacular! Now, time to see how many cats you can fit in the stove. Oh, wait... :lol:
 
I always thought the 8 inch pipe can be over whelming in some rooms but it looks good there, nice room to spend the winter.
 
I think it looks fine but maybe a darker wall color behind it would help the pipe blend in a little better if it bothers you.
 
Looks great!! What color is that stove? or is my computer acting goofy.
 
ckarotka said:
Looks great!! What color is that stove? or is my computer acting goofy.

It is Stove Bright's Honey-Glo Brown.

I took the one picture...the close-up of the stove...in an attempt to show the color. It does improve the looks of the BK over the original black. Although, the stove is not quite as dark as it looks. For some reason, the pictures make it look a little darker than it truly is.

These 2 pictures are closer to it's true shade.
 

Attachments

  • Side.jpg
    Side.jpg
    53.5 KB · Views: 508
  • Top.jpg
    Top.jpg
    47.1 KB · Views: 503
Weird roofing around the jack. Wasn't the roof jack square? Then how did they curve the shingles around the bottom. You dno't suppose they nailed roofing to the top of the metal flashing do you? Be sure that there is a healthy inch of flat flashing exposed before the bertical cone of the chimney flashing. That one inch allows water and junk to drain down instead of sideways under your shingles.

I am jealous of the big cat stove. You need a nice stove top meter.
 
Highbeam said:
Weird roofing around the jack. Wasn't the roof jack square? Then how did they curve the shingles around the bottom. You dno't suppose they nailed roofing to the top of the metal flashing do you? Be sure that there is a healthy inch of flat flashing exposed before the bertical cone of the chimney flashing. That one inch allows water and junk to drain down instead of sideways under your shingles.

I'm not sure I follow what you are saying. So, here are a few pictures...maybe with these you can help me understand.
 

Attachments

  • Roof 1.jpg
    Roof 1.jpg
    99.8 KB · Views: 502
  • Roof 2.jpg
    Roof 2.jpg
    112.1 KB · Views: 505
  • Roof 3.jpg
    Roof 3.jpg
    95.2 KB · Views: 497
I really like that setup. Nice and clean looking.
 
fdegree said:
Highbeam said:
Weird roofing around the jack. Wasn't the roof jack square? Then how did they curve the shingles around the bottom. You dno't suppose they nailed roofing to the top of the metal flashing do you? Be sure that there is a healthy inch of flat flashing exposed before the bertical cone of the chimney flashing. That one inch allows water and junk to drain down instead of sideways under your shingles.

I'm not sure I follow what you are saying. So, here are a few pictures...maybe with these you can help me understand.

Yeah, that was done wrong. Not only did they slather white house caulk on the storm collar joint but the roofing work will cause leaks.

The roof jack is upside down. The sloped side should be on the bottom.

They didn't cut enough roofing away from the cone so debris and junk will build up under the shingles and force water into your attic over time. They didn't even cut it nice and striaght, looks like a hack did it.

The shingles weren't done properly below the cone. Imagine if you were water running down the cone and hit that shingle, you would go under it. Water under shingles is not good. More roof leaks. You should see the flat flashing laying on top of the shingles beneath the cone.

Another not so important thing is that when they put the class A pipe in, a good installer will be sure that the seem in teh pipe faces away from the gutter. For looks only.
 
Highbeam said:
Yeah, that was done wrong. Not only did they slather white house caulk on the storm collar joint but the roofing work will cause leaks.

The roof jack is upside down. The sloped side should be on the bottom.

They didn't cut enough roofing away from the cone so debris and junk will build up under the shingles and force water into your attic over time. They didn't even cut it nice and striaght, looks like a hack did it.

The shingles weren't done properly below the cone. Imagine if you were water running down the cone and hit that shingle, you would go under it. Water under shingles is not good. More roof leaks. You should see the flat flashing laying on top of the shingles beneath the cone.

Another not so important thing is that when they put the class A pipe in, a good installer will be sure that the seem in teh pipe faces away from the gutter. For looks only.


Thank you.

I have e-mailed the pics to the installation company asking them to turn the roof jack 180 degrees and ensure the shingles under the "cone" are on top of the flashing.

I appreciate the input...without it, I would not have picked up on these issues.
 
Congratulations fdegree and welcome to the load once a day club. There is nothing ugly about something that is going to heat your house with no hassles. Looks good and sorry about your roof flashing. Highbeam has saved you some grief come this fall rain and spring thaw.
Enjoy and Cheers
 
Looking great! :cheese:

Personally I think it fits your room nicely.

Congrats
 
I know I am a pellet head but shouldn't that stove be further from the wall? but it looks good,

nice to have in the room that you watch TV or watch the stove!
 
BXpellet said:
I know I am a pellet head but shouldn't that stove be further from the wall?

Hey BXpellet, you got some pretty good eyes...

Since this stove has the fan kit on the back, the minimum clearance is 6". The actual clearance here is 6.5". I was hoping we could set it a little further away from the wall, but that would have resulted in an offset to get the pipe around a truss. Therefore, we decided to leave it at that distance.
 
fdegree said:
BXpellet said:
I know I am a pellet head but shouldn't that stove be further from the wall?

Hey BXpellet, you got some pretty good eyes...

Since this stove has the fan kit on the back, the minimum clearance is 6". The actual clearance here is 6.5". I was hoping we could set it a little further away from the wall, but that would have resulted in an offset to get the pipe around a truss. Therefore, we decided to leave it at that distance.

In NYC it's 36", with a heat shield or with a hearth wall it's less, not sure of the exact measurements.

enjoy and hopefully they will take care of the roof thing sooner then later!
 
Since Highbeam pointed out the roof jack problem, I have been wondering if anything else is done wrong. So, here are a few more pics of different connections. If anyone sees anything out of whack, please let me know.

The outside pics were shot from the ground. If anyone needs a closer look, I can get on the roof and take better pics.
 

Attachments

  • Stove Connection.jpg
    Stove Connection.jpg
    11.8 KB · Views: 308
  • Ceiling Connection.jpg
    Ceiling Connection.jpg
    10.2 KB · Views: 282
  • Ceiling Penetration.jpg
    Ceiling Penetration.jpg
    29 KB · Views: 295
  • Attic Connection.jpg
    Attic Connection.jpg
    17.2 KB · Views: 307
  • Roof Connections.jpg
    Roof Connections.jpg
    12.3 KB · Views: 282
  • Roof Anchor.jpg
    Roof Anchor.jpg
    44.1 KB · Views: 295
What is the measurment from the back of the stove to the drywall? The only other thing is the chimney roof brace could be moved up the pipe a bit. You have a swet looking setup.
 
Resiburner said:
What is the measurment from the back of the stove to the drywall?

The minimum allowable clearance is 6" with the fan kit installed. I do have the fan kit installed, and the closest distance from any part of the stove to the drywall is 6.5". So, I'm good there.
 
Status
Not open for further replies.