Finally new stove installed

  • Active since 1995, Hearth.com is THE place on the internet for free information and advice about wood stoves, pellet stoves and other energy saving equipment.

    We strive to provide opinions, articles, discussions and history related to Hearth Products and in a more general sense, energy issues.

    We promote the EFFICIENT, RESPONSIBLE, CLEAN and SAFE use of all fuels, whether renewable or fossil.
Status
Not open for further replies.

Treemoss

Member
Sep 1, 2013
129
LI NY
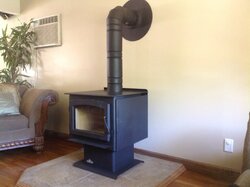
Hello again, Finally the stove was put in yesterday. The installer said he put 2 double insulated black pipe instead of 1 telescoping pipe to the 90°. He said there is no difference in air restriction because of the double insulated pipe. I thought 1 straight pipe would be better then 2 pipes connected. But he said no actually this way costed him more money.


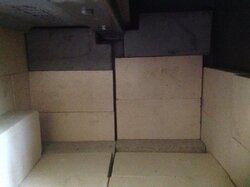
Also the fire brick instructions said to put the bottom brick first from the back wall to the front. But when I do this the back wall brick hit the secondary air tube. So I have to put the back wall in first then the bottom brick I don't know if they changed the setup or not. Napoleon had no idea why. I send pics and they never got back to me.
 

Attachments

  • image.jpg
    image.jpg
    147.7 KB · Views: 271
  • image.jpg
    image.jpg
    169.6 KB · Views: 243
Congratulations, it looks great. The brick does not seem right. Are you following this diagram?

bricks.JPG
 
Congratulations, it looks great. The brick does not seem right. Are you following this diagram?

View attachment 112307

Thank you, The right side of the fire box is like the diagram. The instructions say to put the bottom brick in first from the back wall forward. But you can see that it does not work. The back wall brick hits the secondary air tube. But on the left the back wall brick are in first and it works. Napoleon had no answer for me.i even sent them the picture with no response.
 
Looks like the right-side, back, bottom brick just needs to come forward so that it's not under the back brick.
 
Nice looking install Treemoss, I really like the crown molding look around your hearth pad with the hard wood floors, really sets it off.
 
Thank you, I had Left over molding from my kitchen. I set up the bricks like on the left side. The baffle on top when pushed all the way back leaves a 2" gap in the front of the stove on top. I think this to much of a gap. The baffle is 16" long and the replacement baffle is 17". Should I change to the longer one so there is only a 1" gap so I don't lose all my heat because of a 2" gap.
 
Why do you think the new replacement baffle is an 1" longer. They will not tell me. I thought maybe it had to do with draft. To much heat loss with the shorter baffle. I should have them replace it for free if there is a problem with the smaller baffle Design. Why did they changed the size to a 1" longer then.
 
He probably didn't have a telescoping section on his truck so he made due with what he had vs. another trip with the more proper part. I would prefer the telesoping section for looks, since you could more easily disassemble the system, and also to adjust the horizontal slope of the small horizontal section. We can't tell from the photo but do you have slope on that horizontal section? The installer, even if he knew better, may have installed it flat or backsloped to make it work with what he had.
 
That's what I thought, he put a1" rise on the horizontal run. So I hope that's good enough. The draft is pulling nice but I have not lit a fire yet. Maybe this week.
 
Status
Not open for further replies.