Hello everyone!
My first post on this super helpful site.
I'm a complete wood stove noob, so please take it easy on me")
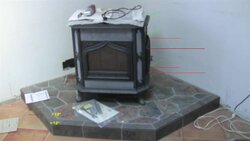
After doing a lot of research (mostly on this fine site), I just got my first stove - Woodstock Fireview . I struggled to find someone local to install it, so installed it myself.
Today was the first fire.. it was going well at first - i checked the draft and it seemed decent. Started the fire with some newspaper and kindling..threw in a small split or two... had damper on 4 at first; but, switched it to 2 as soon as the fire got going (as the manual suggests).... waited for over an hour , and the stove top temps were not going above 150.. kept feeding the fire with one more small split at a time when i saw the wood inside burning up.. 2 hours passed, still have not even reached 200.... so, i tried to add a bunch of wood in - 3 medium size split pieces.... in a few minutes the fire got serious and smoke started coming out of the stove.. mostly it was smoking around the flue and 90 degree elbow...
I have a few guesses of what could be the problem, but these are just guesses:
1. it's a new stove and the smoke is just fumes from new paint.
(in the manual it just states that it will smell bad, says nothing about smoke)
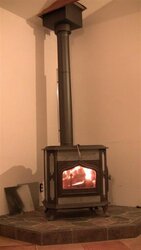
2. i did not connect the 90 elbow with the flue properly and / or the rest of the connector pipes..
(i just used screws provided with the pipes to connect; however, the flue did not come with screws , so i used screws from one of the spare connector pipe)
3. problem with not sufficient draft . my pipe is 12.5 feet total (from flue to top of the chimney) .. Woodstock recommends a 14 foot pipe.. I did not calculate the length properly when I ordered at first, and then was told to give it a try . I was able to get the fire going without problems.
Any suggestions or comments are greatly appreciated.
Thank you in advance
My first post on this super helpful site.
I'm a complete wood stove noob, so please take it easy on me
After doing a lot of research (mostly on this fine site), I just got my first stove - Woodstock Fireview . I struggled to find someone local to install it, so installed it myself.
Today was the first fire.. it was going well at first - i checked the draft and it seemed decent. Started the fire with some newspaper and kindling..threw in a small split or two... had damper on 4 at first; but, switched it to 2 as soon as the fire got going (as the manual suggests).... waited for over an hour , and the stove top temps were not going above 150.. kept feeding the fire with one more small split at a time when i saw the wood inside burning up.. 2 hours passed, still have not even reached 200.... so, i tried to add a bunch of wood in - 3 medium size split pieces.... in a few minutes the fire got serious and smoke started coming out of the stove.. mostly it was smoking around the flue and 90 degree elbow...
I have a few guesses of what could be the problem, but these are just guesses:
1. it's a new stove and the smoke is just fumes from new paint.
(in the manual it just states that it will smell bad, says nothing about smoke)
2. i did not connect the 90 elbow with the flue properly and / or the rest of the connector pipes..
(i just used screws provided with the pipes to connect; however, the flue did not come with screws , so i used screws from one of the spare connector pipe)
3. problem with not sufficient draft . my pipe is 12.5 feet total (from flue to top of the chimney) .. Woodstock recommends a 14 foot pipe.. I did not calculate the length properly when I ordered at first, and then was told to give it a try . I was able to get the fire going without problems.
Any suggestions or comments are greatly appreciated.
Thank you in advance