I got tired of dealing with wood stacks and tarps and decided last fall that I was going to build a wood shed. I was inspired by many posts and designs from the "Show us yours" forum, so I thought I would also post a picture of mine and maybe someone else could get some ideas.
I didn't realize what a huge undertaking this project would be when I started. Midway through the summer I realized this monster structure needed a name, and my wife and I appropriately named it "Woodstock".
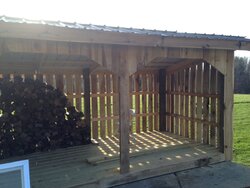
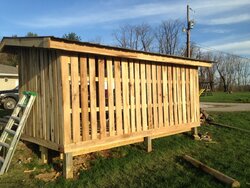
It is 26 feet wide, 6 feet deep, and about 9 feet high (I will stack to about 6 1/2 feet high). It will hold about 5 cords with room between rows for ventilation. That is about 1 cords of wood stacked in "Bay 3".
We're new to wood burning, last winter was our first with a Lopi Freedom Bay and we love it. I expect to burn about 2 cords per year, so this will give me places to store the wood to burn this year, and stack the wood to season for next year.
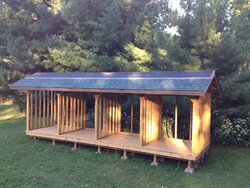
Here's the finished product, and a few pictures from the construction phase. I had never built anything close to this before so it was a huge learning experience from me. It's my own design based off of many other shed projects found here and other places on the internet, and I did the whole thing myself except for parts of the roof where I recruited my brother to help. I still need to decide on a weather vane for the top of the Cupola (I would love to find a Snoopy and Woodstock weather vane!).
Now I'm ready to fill it up and start burning when the weather gets cold!


I didn't realize what a huge undertaking this project would be when I started. Midway through the summer I realized this monster structure needed a name, and my wife and I appropriately named it "Woodstock".
It is 26 feet wide, 6 feet deep, and about 9 feet high (I will stack to about 6 1/2 feet high). It will hold about 5 cords with room between rows for ventilation. That is about 1 cords of wood stacked in "Bay 3".
We're new to wood burning, last winter was our first with a Lopi Freedom Bay and we love it. I expect to burn about 2 cords per year, so this will give me places to store the wood to burn this year, and stack the wood to season for next year.
Here's the finished product, and a few pictures from the construction phase. I had never built anything close to this before so it was a huge learning experience from me. It's my own design based off of many other shed projects found here and other places on the internet, and I did the whole thing myself except for parts of the roof where I recruited my brother to help. I still need to decide on a weather vane for the top of the Cupola (I would love to find a Snoopy and Woodstock weather vane!).
Now I'm ready to fill it up and start burning when the weather gets cold!

") And the neighbors won't complain about the looks either. Very nice.
And the neighbors won't complain about the looks either. Very nice.