First "cut" at milling

  • Active since 1995, Hearth.com is THE place on the internet for free information and advice about wood stoves, pellet stoves and other energy saving equipment.

    We strive to provide opinions, articles, discussions and history related to Hearth Products and in a more general sense, energy issues.

    We promote the EFFICIENT, RESPONSIBLE, CLEAN and SAFE use of all fuels, whether renewable or fossil.
Status
Not open for further replies.

DiscoInferno

Minister of Fire
** Note: Since there's already at least two recent threads on this, let me begin with this: I know that milling with a small consumer saw like the 455 is slow, bad for the saw, and probably harmful to puppies and world peace somehow. I don't plan to use it much for this purpose. Don't do it, and don't blame me if you do. **

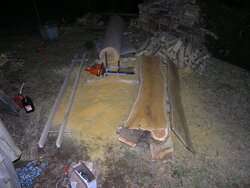
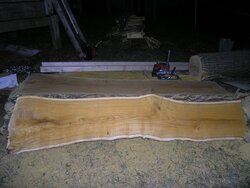
Anyway, I've been turning a lot of nice wood into firewood at our place in MI, and thought it might be fun to get some lumber instead. We're not talking huge trees, so I got the Granberg Small Log Alaskan mill from Baileys. For a test I decided to try it out on the mulberry that just came down here in MD, which was a pain as the base was 8' down behind a retaining wall. I used a pair of $15 Harbor Freight come-alongs and some tow straps attached to deck posts to winch it up to the yard. Overall 15' long and 17" diameter at the narrowest point. So far I've just milled the less-straight top half, getting feel for the mill. It's really a well-built unit; very sturdy considering the single clamp to the bar. I also got the slabbing brackets, which are helpful not just for the first cut but for getting your cuts back to a flat plane if you start to wander. Starting and finishing flat are definitely an issue without the brackets. Still I was quite happy with the flatness of my first attempts. I cut some 1", 1.25", and 1.5", plus a 2" slab for a bench. The thickness gauge on the mill is pretty accurate.

Equipment: The aforementioned 455 w/ a 24" bar (which yields about 20-21" of cut) and Woodland Pro chain; I tried both regular cross-cut (chisel, full skip) and ripping chain (semi-chisel, full comp). Cross-cut chain went dull fairly quickly, ripping chain did much better. So basically I'm overloading everything - 24" is a lot for a 455 in any case (it really doesn't oil enough at the highest oiler setting) and Granberg doesn't recommend more than 20" for that mill. But the 18" bar wasn't quite going to cut it here, and it all worked pretty well Following Jay's suggestions I stop to let the saw idle now and again (good chance to put in some wedges) and try to keep pressure light enough to avoid bogging. I also keep the chain sharp and the saw clean. I'm hoping to get my hands on a HD Makita soon, and if the stock 64cc isn't enough I can get the 85cc kit.
 

Attachments

  • trunk.jpg
    trunk.jpg
    166.7 KB · Views: 329
  • winch.jpg
    winch.jpg
    213.8 KB · Views: 326
  • above_dusk.jpg
    above_dusk.jpg
    218.3 KB · Views: 337
  • grain.jpg
    grain.jpg
    191 KB · Views: 352
Good job.
Beautiful wood grain.
May want to coat the ends with something for a year or 2 so they don't split.
What are yo going to use it for?
 
I coated the ends with some opaque exterior stain I had on hand, hopefully will work well enough. Not really sure what I'll do with it beyond some shelves and a bench, I guess I have a while to figure it out while it dries. Unfortunately there's a series of internal cracks running the whole length of both logs, which is going to compromise a lot of the boards.
 
Now the real fun begins so you'll have a nice finished product you can use in 2-3 yrs.Seal the ends of the planks as soon as possible to prevent/slow down checking & cracking.

Build a sturdy stack so the wood will dry quickly,evenly & stay flat & without warping,cupping or twist.

Select a spot on the property thats on a flat plane,even if its on top of a hill,thats OK.Just make sure it gets good airflow.Also make sure its not in a low damp area underneath large trees,that will drastically slow down the drying process & hasten the growth of mould & fungus on your material.Start by using 8 x 8 x 16 concrete blocks on the ground,or even a concrete slab or patio thats already level if you're lucky.If using blocks,space them no more than 2ft apart width-wise,the same length wise,laying them so holes are visible.Use straight 4 x 4's or those rounded 2 1/2 x 4 landscape timbers that arent twisted.Set them on the blocks & check with a carpenters level.You want the stack to be on the same plane,if needed dig out a little underneath each block & fill in low spots.This can take a while,so dont rush otherwise your lumber will twist & warp if the ground isnt true.Ideally the base should be a foot tall or thereabouts to keep the bottom row of lumber from getting wet from snow,mud,weeds etc.

For 8ft lumber,use 8ft or longer timbers as a base,3ft pieces for the ends & centers,spaced about every 18-24".Once everything with the base is all parallel & true,build the stack.Place the boards directly on the timbers,side by side leaving a couple inches space between them.Make sure each row is all the same thickness - have your thicker lumber be the bottom stack,if you have 2-3 different thicknesses,place the thinner ones in the middle so they're weighted down evenly.Between each layer,use 1 x 1 stickers the same length as width of your stack every 18 to 24" to support the long dimension.Its not a good idea to build outdoor stacks much over 5-6ft tall,especially if you have to move everything 1 piece at a time or manually.Cover the top layer with 1/2 or 3/4 plywood sheets,old corrugated sheet steel roofing,weighing them down with old tires,logs,or whatever's fairly handy.

This is much easier to do than I described,trust me.Plenty of info & pics of stacks in books & online to get some ideas.
 
you store your milled wood outside?
 
Whats the measurement's on that slab?
 
DiscoInferno said:
I coated the ends with some opaque exterior stain I had on hand, hopefully will work well enough. Not really sure what I'll do with it beyond some shelves and a bench, I guess I have a while to figure it out while it dries. Unfortunately there's a series of internal cracks running the whole length of both logs, which is going to compromise a lot of the boards.

Mulberry in larger sizes is famous for those internal checks,especially in colder climates.They are 'frost checks',from the tree's being among the last to drop their leaves in the Fall.Every year its the same,they stay dark green on the tree then soon as there's an overnight low of 28F or colder,you wake up & see all the leaves on the ground.
 
Danno77 said:
you store your milled wood outside?

Once its air dried to 10-12% I move any smaller/shorter pieces inside to the shop or enclosed shed.As long as top is covered in the larger stacks they will stay quite dry for years.You want airflow yet not completely covered on all sides.When I need several 6' or longer pieces,I'll move them inside & lean them against a wall a few days before use.I dont have room inside unfortunately for all of it,but it works out OK.In Spring/Summer the humidity is very close either outside or in the shop,it acclimates better to those surroundings than winter.
 
smokinjay said:
Whats the measurement's on that slab?

It about 7.5' long, 1" thick, 17" wide (bark to bark) at the waist and something like 22" at the crotch.
 
DiscoInferno,

Thanks for the description and the photos. I've always wanted to make furniture from lumber milled from my property, but can't justify the investment for one or two pieces of furniture. Glad someone has been able to take the leap.
 
DiscoInferno said:
smokinjay said:
Whats the measurement's on that slab?

It about 7.5' long, 1" thick, 17" wide (bark to bark) at the waist and something like 22" at the crotch.

That wide and only a inch thick 2 things get it flat flat flat and put weight on it a lot of weight, or rip it down. Or its going to cup and twist bad.
 
Well, the investment in the mill (about $160 including the rails and brackets) is minimal compared to the expense of woodworking tools. Which I guess I will have to start accumulating more of...
 
So how awful is it to dry small quantities of fresh-sawn wood in an unfinished basement? We already run a dehumidifier down there, and I could stick an oscillating fan right in front of the stack. It's certainly the flattest spot I have, and I've sort of used up the better outdoor stacking spots with firewood. Also, outside I have to contend with carpenter bees, wasps/hornets, termites, borers, etc.
 
DiscoInferno said:
So how awful is it to dry small quantities of fresh-sawn wood in an unfinished basement? We already run a dehumidifier down there, and I could stick an oscillating fan right in front of the stack. It's certainly the flattest spot I have, and I've sort of used up the better outdoor stacking spots with firewood. Also, outside I have to contend with carpenter bees, wasps/hornets, termites, borers, etc.

I would lay card board down first. Then stack everything up with "out stickers" yes I said it.......Then weigh them down with what ever you have. Coat the ends good. Dont worry about dehumidirer for a few months. Let it start drying slow. After 3-4 months restack or better yet stand them up on end if possiable. If not then I would leave them flat with weight for 6-8 months.

Your really just pressing the wood flat and it will dry that way....17 inchs wide at 1 inch is the real issue here so you have to do things a different way to keep it from twisting and cuping.
 
Wouldn't stacking without stickers run the risk of mold or mildew growth between the boards? What's the benefit of standing on end?
 
DiscoInferno said:
Wouldn't stacking without stickers run the risk of mold or mildew growth between the boards? What's the benefit of standing on end?

If your basement is wet then yes. Standing on end is how I dry my slabs (2-3/4 to 3-1/2 inch thick) yes less warping cupping with no pressure on the center of the board. Good humidity in the begining is not a bad thing start them out drying slow and you can speed things up in a couple months. I would also seal at-least 1 foot up the ends with the sealer. Slower is better in the early stages of drying.
Flatter you can get the wood with as much weight on top will make better board. (for what you milled at) nothing wrong with it but
takes a little different spin on how you dry it. (wide thin boards cup and warp bad if stickered)

Your just pressing the wood flat to start with and it will finnish that way...I had over 2000bf all cup and warp do to stickering wide thin boards. Got some use out of it but could have been alot better pressing it.
 
Status
Not open for further replies.