
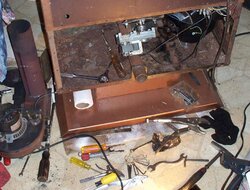
Today my combustion blower wouldn't turn. After removing the firebrick replacement that I made (to access the fan blades) it fell over and broke into 4 pieces. Then there was an area-wide power failure. Hours later when it was restored, I cut a new firebrick middle piece from a section of hardi-plank. After putting it all back in place, the blower couldn't turn freely. It turns a bit but then makes a moaning/rubbing sound for less than a second as some friction slows the impeller. Then it turns faster for a second or two and it happens again, repeating the pattern. I shot a short video of it but I think you get the idea. So I assume I'll need to remove the blower and dismantle it to clean or replace the bearings, but I don't have a clue about the correct method to remove the blower. It seems that the blower needs to be removed with the vent tube still connected to it because there isn't any room to remove it with the tube in place. Things are quite tight in there for the exhaust blower. Since my stove is the Advantage I, it's put together with everything arrange in reverse from the II, (and III i assume) -controls, damper on the left, exhaust on the right, but maybe it's pretty similar other than that. But I can't tell if the vent section that attaches to the blower is welded to the housing or not. Could someone tell me which nuts to remove and whether or not I right about having to remove the vent tube section while it's attached to the blower. Thanks
First the exhaust blower quit, then the firebrick broke, then the power when out! HELP!
- Thread starter arnash
- Start date
-
Active since 1995, Hearth.com is THE place on the internet for free information and advice about wood stoves, pellet stoves and other energy saving equipment.
We strive to provide opinions, articles, discussions and history related to Hearth Products and in a more general sense, energy issues.
We promote the EFFICIENT, RESPONSIBLE, CLEAN and SAFE use of all fuels, whether renewable or fossil.
You are using an out of date browser. It may not display this or other websites correctly.
You should upgrade or use an alternative browser.
You should upgrade or use an alternative browser.
- Status
- Not open for further replies.
D
DexterDay
Guest
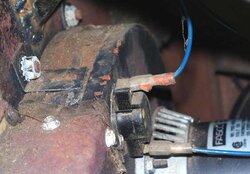
Doesnt look like your stove has the access plate to just remove the blower, without removing the whole housing. You will have to take your flue off. Then remove the 5 or 6 screws that hold the Combustion Housing/Blower (In your pic, 2 of 6 nuts are visible on top). Most stoves have another plate you can remove. so you dont have to remove the whole housing. That would be a PITA if everytime I cleaned my comb blower, I had to remove it. I do this at least twice a year. (Spring and Mid-season). Good luck, maybe I'm missing something in the pic, and you wont have to remove your flue and the entire assembly. But what I can see. Looks to be the case
Yeah, I'm afraid you're probably right, 'cause as I said, there's just no room inside to be able to pull the blower out while the flue pipe is in the way. This is the first and original design, which they improved on later so removal is easier. But what I'm wondering about is whether or not I can leave the flue attached to the blower or is the flue welded or somehow attached to the stove wall. I see nuts that attach it to the blower but not to the housing. And it appears that the blower and its vent housing are one unit so I have to remove it all together. It'll be a groan to remove all those hard to reach nuts that have never been removed before. I guess the gasket will be ruined when I detach the blower. I guess I could make a new one but will have to buy some automotive gasket material (something heat resistant).
D
DexterDay
Guest
Tht Englander I bought was 14 yrs old. All original hardware. Came off much easier tjn expected. Yours shouldn't be welded. Taking the flue off will prob be easier. Just take off all hardware and get a new gasket.
Wood Heat Stoves
Minister of Fire
We have a manual and parts available for the Whitfield Advantage I if you need it. I know on a stove that old parts can be hard to find.
http://woodheatstoves.com/whitfield-advantage-i-users-manual-p-2152.html
http://woodheatstoves.com/whitfield-earth-stove-traditions-pellet-stove-parts-list-p-376.html
http://woodheatstoves.com/whitfield-advantage-i-users-manual-p-2152.html
http://woodheatstoves.com/whitfield-earth-stove-traditions-pellet-stove-parts-list-p-376.html
JohnnyHaulin
New Member
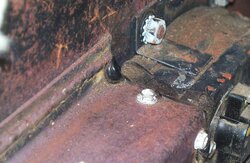
Arnash, I just had mine apart and looking at the blower i see a small nut under the low limit sw there should be 5 or 6 going around the blower. unplug it and take the blower out. Mine was stuffed with ash when i bought it about a month ago.
JohnnyHaulin
New Member
just looked up your motor you should not have take out the blower housing. take another pic of the back of the motor i could tell you better. should be three bigger nuts and 5 or 6 smaller nuts around it. take off the smaller nuts ad the bower should come right out.
D
DexterDay
Guest
That's what I thought too. Should be evident, that the blower is mounted to a round plate with 6 screws. It may not be. But most are.
JohnnyHaulin
New Member
DexterDay said:That's what I thought too. Should be evident, that the blower is mounted to a round plate with 6 screws. It may not be. But most are.
mine is an insert so getting to the back of mine is easier it's all open in the back. there must be a panel you can take off to get to the blower. i would bet being this old that was one of the motors you needed to oil every 6 months at least the new ones you don't have to oil.
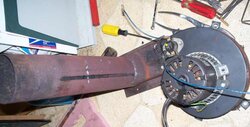
The down side of having a stove this old is that nobody else in the forum seems to have one like it. I awoke this morning to the task of removing the blower. After loosen the 5 nuts/bolts that hold it in place, it was confirmed that the exhaust flue wasn't attached to the housing wall except by one metal screw, so I knew I could leave it attached to the blower. I seriously doubt that any thought was given to this stove ever being disassembled. Most of the nuts/bolts were as hard to reach as possible. But after two hours of struggle to find the right tools and use them to remove the nuts & bolts, the metal screw was the only one left but wouldn't budge until the head twisted off. Oh well.
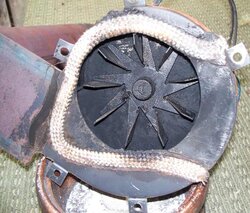
Then I took the assembly outside and began cleaning all the carbon and cobwebs off. Then I put some oil drops into the oil holes, connected an electrical cord to the blowers wires, plugged it in and tested it. It started slowly and slowly sped up, taking about 10 seconds to reach full blast. I unplugged and repeated, and then it started immediately. Problem was that after reattaching to the stove (which took about 1/10th the time it took to remove) I switched it on and to my shock it was doing the same thing that made me remove it in the first place...-a cyclical groaning-moaning whine. I knew that that meant that the bearings needed even more oil (why? I had no idea). So I oiled both holes and tested again, same result but not as bad. Then I repeated a pattern of oiling one hole and testing (still whining) then the other hole and testing again. After about 5-6 times I just let it run and whine figuring the oil would eventually reach the bearings if I let it run. It did. After about 2 minutes it finally went quite. After repositioning the stove to the vent pipe, I tested it one last time, and it started right up. So I lit the fuel in the grate and presto! FIRE! YeeeeHaaa. It's working prefectly so far. Maybe it's good for another twenty years (or twenty months...or twenty days...who knows)
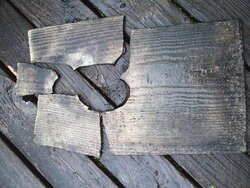
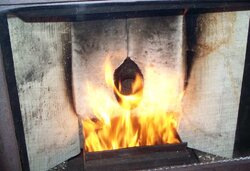
Since the "firebrick" had broken, I had to cut a new one out of salvaged hardi-plank. Photos attached. I wondered how fireproof it is so I used a propane torch on it for a while and the heat didn't penetrate to the back side, but I'm sure it would after enough time. I'll find out if and when the excessive-temp sensor shuts the stove down. If it does, I'll have to make a second one so there's two layers.
Then I took the assembly outside and began cleaning all the carbon and cobwebs off. Then I put some oil drops into the oil holes, connected an electrical cord to the blowers wires, plugged it in and tested it. It started slowly and slowly sped up, taking about 10 seconds to reach full blast. I unplugged and repeated, and then it started immediately. Problem was that after reattaching to the stove (which took about 1/10th the time it took to remove) I switched it on and to my shock it was doing the same thing that made me remove it in the first place...-a cyclical groaning-moaning whine. I knew that that meant that the bearings needed even more oil (why? I had no idea). So I oiled both holes and tested again, same result but not as bad. Then I repeated a pattern of oiling one hole and testing (still whining) then the other hole and testing again. After about 5-6 times I just let it run and whine figuring the oil would eventually reach the bearings if I let it run. It did. After about 2 minutes it finally went quite. After repositioning the stove to the vent pipe, I tested it one last time, and it started right up. So I lit the fuel in the grate and presto! FIRE! YeeeeHaaa. It's working prefectly so far. Maybe it's good for another twenty years (or twenty months...or twenty days...who knows)
Since the "firebrick" had broken, I had to cut a new one out of salvaged hardi-plank. Photos attached. I wondered how fireproof it is so I used a propane torch on it for a while and the heat didn't penetrate to the back side, but I'm sure it would after enough time. I'll find out if and when the excessive-temp sensor shuts the stove down. If it does, I'll have to make a second one so there's two layers.
Attachments
D
DexterDay
Guest
Congrats on getting it going. If it was the bearings, there would be some play in the motor. When you grab it, shake it side to side, in and out. If you dont feel any movement, then your bearings may still be good. Like you said, all they needed was a little lube.
Those old Whitefields seem to be Bullet-Proof.
Those old Whitefields seem to be Bullet-Proof.
JohnnyHaulin
New Member
arnash said:The down side of having a stove this old is that nobody else in the forum seems to have one like it. I awoke this morning to the task of removing the blower. After loosen the 5 nuts/bolts that hold it in place, it was confirmed that the exhaust flue wasn't attached to the housing wall except by one metal screw, so I knew I could leave it attached to the blower. I seriously doubt that any thought was given to this stove ever being disassembled. Most of the nuts/bolts were as hard to reach as possible. But after two hours of struggle to find the right tools and use them to remove the nuts & bolts, the metal screw was the only one left but wouldn't budge until the head twisted off. Oh well.
Then I took the assembly outside and began cleaning all the carbon and cobwebs off. Then I put some oil drops into the oil holes, connected an electrical cord to the blowers wires, plugged it in and tested it. It started slowly and slowly sped up, taking about 10 seconds to reach full blast. I unplugged and repeated, and then it started immediately. Problem was that after reattaching to the stove (which took about 1/10th the time it took to remove) I switched it on and to my shock it was doing the same thing that made me remove it in the first place...-a cyclical groaning-moaning whine. I knew that that meant that the bearings needed even more oil (why? I had no idea). So I oiled both holes and tested again, same result but not as bad. Then I repeated a pattern of oiling one hole and testing (still whining) then the other hole and testing again. After about 5-6 times I just let it run and whine figuring the oil would eventually reach the bearings if I let it run. It did. After about 2 minutes it finally went quite. After repositioning the stove to the vent pipe, I tested it one last time, and it started right up. So I lit the fuel in the grate and presto! FIRE! YeeeeHaaa. It's working prefectly so far. Maybe it's good for another twenty years (or twenty months...or twenty days...who knows)
Since the "firebrick" had broken, I had to cut a new one out of salvaged hardi-plank. Photos attached. I wondered how fireproof it is so I used a propane torch on it for a while and the heat didn't penetrate to the back side, but I'm sure it would after enough time. I'll find out if and when the excessive-temp sensor shuts the stove down. If it does, I'll have to make a second one so there's two layers.
nice job on the stove glad to see you got it working,so glad i have an insert pull it out and there are all the guts. now you know what the inside looks like. probably the best thing about your stove when it breaks down is you learn a whole lot about it. Again nice job
D
DexterDay
Guest
Just bought a new blower for my Englander (and auger) from CSH Inc. They came in today. The new motor with the whole blower assembly was $94. Compared to what Englander wanted, I saved about $40. Really not that bad in terms of what I got the stove for ($300). Your blower mounting bolt pattern looks like the same pattern on the Englander. There were a bunch of other makes and models on that site. Just a heads up for IF and when it does finally go.
The link to the blower I bought. They have many others. http://www.cshincorporated.com/ or the link to what I bought http://www.cshincorporated.com/product_info.php/products_id/3462
The link to the blower I bought. They have many others. http://www.cshincorporated.com/ or the link to what I bought http://www.cshincorporated.com/product_info.php/products_id/3462
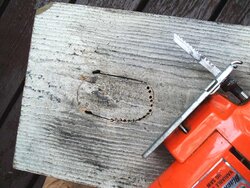
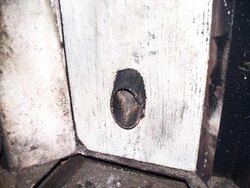
Thanks for the link. (and thanks to woodheatstoves also) The blower looks like mine. I'm glad that parts are still available and most are "off-the-shelf". Today, after a while of stove time, I saw that my hardi-plank firebrick had multiple cracks. When I shut the stove down and removed it, it crumbled into about 5 pieces. I don't know why it cracked but I speculate that I cut it too tight and when it got hot, it didn't have enough room to expand. But rather than go to the effort of cutting a third board, I decided to use the side pieces in place of the original center piece. They're so soft that it was easy to carve out an opening for the pellet chute and shave a quarter inch off of the outside edge so they would fit perfectly. So now they're side-by-side as the back section and I cut (or snapped) some hardi-plank pieces to serve on the sides where there's less heat. I think it will work for the long haul.
Attachments
SmokeyTheBear
Minister of Fire
You might consider having some steel fabricated for the sides and center and using some KAOwool behind the center section (and possibly the side pieces as well) or actually replacing what was there.
There was a party on here last season who didn't pay attention to properly insulating (note no mention of fireproofing) the firebox after doing some restoration work, it cost him blowers, electrical wiring , and control system. He lucked out as it could have been much worse.
There was a party on here last season who didn't pay attention to properly insulating (note no mention of fireproofing) the firebox after doing some restoration work, it cost him blowers, electrical wiring , and control system. He lucked out as it could have been much worse.
I'm not getting how steel would act as insulation. Also, I don't know what KAO wool is but would like to find out. I do know that all my stoves insulation is intact, it's High-Temp sensor is in place and connected, and the original material used for the "firebrick" (on the sides of the firebox) is in excellent shape (unlike the broken and worn-out center section) so that's why they should serve perfectly as the new center section (butted together in the center). After a day of burn time, the "new" hardi-plank side sections look the same as before facing the fire, so I think I'm probably good for the long run. But I have room to put something more behind them because they are just half the thickness of the foam-like original fire shield. That could be best for when using the stove with a big, hot flame.
SmokeyTheBear
Minister of Fire
arnash said:I'm not getting how steel would act as insulation. Also, I don't know what KAO wool is but would like to find out. I do know that all my stoves insulation is intact, it's High-Temp sensor is in place and connected, and the original material used for the "firebrick" (on the sides of the firebox) is in excellent shape (unlike the broken and worn-out center section) so that's why they should serve perfectly as the new center section (butted together in the center). After a day of burn time, the "new" hardi-plank side sections look the same as before facing the fire, so I think I'm probably good for the long run. But I have room to put something more behind them because they are just half the thickness of the foam-like original fire shield. That could be best for when using the stove with a big, hot flame.
The steel isn't insulation it is used as one of the two sandwich plates to hold the KAOwool which is the insulation.
- Status
- Not open for further replies.
Similar threads
- Replies
- 10
- Views
- 1K
- Replies
- 1
- Views
- 1K
- Replies
- 3
- Views
- 613
- Replies
- 6
- Views
- 2K