First Windhager in Tennessee

  • Active since 1995, Hearth.com is THE place on the internet for free information and advice about wood stoves, pellet stoves and other energy saving equipment.

    We strive to provide opinions, articles, discussions and history related to Hearth Products and in a more general sense, energy issues.

    We promote the EFFICIENT, RESPONSIBLE, CLEAN and SAFE use of all fuels, whether renewable or fossil.
Status
Not open for further replies.

Tennman

Minister of Fire
Mar 4, 2009
993
Southern Tenn
It was Christmas in August yesterday. Our new Windhager showed up in Tennessee from Austria via Massachusetts. I consider this Phase 3 of replacing propane with wood and pellets. The BioMass kept the propane truck away, but with my son unavailable, me getting older, and the reality that my wife cannot care for the BioMass without me, I started researching. Where we live the only conventional heating options are electricity or propane. We have a pellet factory near us where we can buy in bulk so supplementing wood with pellets was appealing. 'Course the fact that I really enjoy this stuff and don't own a fancy bass boat is also a factor.

This time Heaterman and Marc Caluwe will provide professional support. Velvet did a cool thread when he installed his Windhager so I thought I'd do the same. What will make our system unique is the 1000 gal of storage fed by either the BioMass or Windhager. We'll burn wood during weekends, holidays, etc to charge storage because it's enjoyable. When we're gone or I'm lazy the Windhager will charge storage based on storage temp. Hope you guys enjoy.
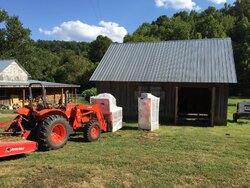
IMG_1966.JPG
 
Awesome! You have to say which model it is. :)
Bulk delivery! Awesome again!
You already have super quality assistance, but let me know if I can help.
 
Nice tractor (the wright color too = Windhager red), nice barn, nice metal roof, nice cord wood drying setup, nice generator, nice woods and a nice sky!
Life is beautiful
 
  • Like
Reactions: TCaldwell
LOL... Life IS beautiful Marc. My wife and I are blessed with great kids, good health, a piece of heaven in the TN hills. Many visitors ask to see the "reactor" in the barn. That red Windhager's gonna be quite a conversation piece this winter.

Thanks Velvet. It's a BioWIN600XL which should have enough capacity for our home and a future radiant-heated garage/shop. We were in Michigan in May and Heaterman took us to meet the happy owner of that triple BioWIN tractor barn install. We were impressed. This is gonna be fun.
 
Holy balls! you must have a serious heat load in TN. that's some serious boiler capacity!
keep us posted.
 
LOL... still smilin' Karl (down here we call them wiffle). With help from folks here I took a stab at our mean btu/hr based on our 14/15 wood consumption and 14/15 was relatively mild. The 450XL would have been more than adequate for our current demand, but there is a heated shop/garage in our future. Since the BioWIN is hooking into our 1000 gal storage the price for the excess capacity was relatively inexpensive insurance. And I hate saying, "I wish I had....".
 
  • Like
Reactions: heaterman
I don't think I have ever heard a male member of the species utter the words, "I should have gotten the smaller one".

Ever.

It is not the American way.

Get those piping pictures sent up here Tennman :)
 
;lol;lol;lol;lol
 
Well VF, she's unpacked and inspected for shipping damage. So far except for a minor sheet metal tab bend (easy pliers repair) she traveled a long way with a number of shippers and arrived in excellent shape. Each package I unwrap, and there's a bunch, I'm continuously impressed. Windhager goes to great measures to prevent shipping damage.

I have and do design a lot of stuff and I'm telling you I'm VERY impressed. In the barn is the BioMass on the left and BioWin on the right. We're not talking Chevy/Mercedes, we're talking Chevy/Tesla. Lots of sensors everywhere, nice stainless sheet metal, well fabricated weldment/hopper assembly, well designed pellet transfer auger/gearbox. This is without a doubt a very high quality piece of equipment.

Modifications to the existing plumbing will be much easier than I thot and minimal draining. Will need to add two check valves so whichever boiler is feeding storage won't push water into the other boiler. I thot I'd need to add sensor wells but we're gonna use strap-on thermocouples which avoids disrupting existing plumbing.

I got the boiler off the shipping pallet which was no easy feat since it doesn't have fork pockets or lifting lugs. So she's close to her final location. Just need to tune its position for the flue to clear the rafters. I'm slammed at work otherwise a mid-Oct commissoning would be possible.

I intend to operate both boilers. When I'm around during the holidays we'll run the BioMass and charge storage because I enjoy running/burning wood (not so much the fetching part anymore by myself). When lower-tank storage temp gets below some yet to be determined setpoint, the BioWin will kick in and top off storage. So we'll burn wood when we feel like it and the BioWin will keep us off propane if we decide to travel. Or, more importantly, the BioWin will keep my wife warm when I must travel. That's the plan anyway.

I'll post pics soon as I start assembly. Very pleased with what I've seen so far. Thanks for asking.
 
Covered up with work for the last several months but finally had some time to assemble the boiler.

First trick was to get the boiler off the shipping pallet onto the floor. There's no fork pockets or lifting lugs so I jiggled the boiler to one side of the pallet and used a sawzall cut the particle board from both sides until it gently broke freeing the support board turning the pallet base into a ramp.
IMG_2069.JPG


Using the Installation manual started assembly. The hopper base is on the floor and the pellet supply auger installed ready for mounting the hopper.
For those who may do an assembly in the future, do not hard tighten the auger, hopper, or hopper support until these major components are all together. Some movement of each part is necessary for all these components to come together. Sorry, tried to rotate but failed.

IMG_2104.JPG


Then installed hopper and support THEN tightened everything. We loosened bolts ~4 times until I learned to tighten after everything was mated.

IMG_2114.JPG


IMG_2112.JPG


Then started installing the cladding. I'm VERY impressed with the quality of this product. I wasn't able to go see and compare other systems but did visit Heaterman and see his triple BioWin install in Michigan and placed the order based on what my wife and I saw and the user's satisfaction. It amazes me how all the holes line up on something this complex made from bent sheet metal. The boiler is completely assembled but I forgot to take an assembled pic. Will this weekend. Starting plumbing and electrical this week. Should be ready for commissioning in 2 weeks. Boiler assembly took about 8-10 hours doing it for the first time. I don't plan on ever doing this again, but with experience probably 4-6 hrs to assemble.

I can't overstate how impressed I am with the engineering and production quality. All the components are first class and even the sheet metal screws (there's a bunch) don't round out like the cheap stuff from China. Living where we do, If this thing works like it looks, we'll be very happy. I'll post next week after we do plumbing, flue, and electrical. Wanted to post things learned for the next guy. Leaves are off the trees so we'll need this thing working soon. Cheers
 
Excellent!
I've never had the cladding off, but your XL unit has a more 'roubusto' general look to it. I like the handle on the hopper and the big wing nuts. It looks like there are three doors on the boiler vs. the one big door. I've also heard the burner pot cleaning mechanism is more tolerant of clinkers, though I haven't had one yet (knock on wood).

Are you doing the flue, plumbing and electrical? There's not way I could do that in two weeks. Two months, maybe. :)
 
Yes Velvet, as I understand it, the XL series is a commercial grade product line. We see this as a 15-20 year heating system investment and without any maintenance support locally, upgrading was cheap insurance. I've only opened the doors to look for parts and install the cast iron upper and lower burner pot assembly. The hopper auger is a work or art, Similarly there's an ash auger that transfers ash to an ash bin on rollers that resides under the hopper. From sensors everywhere to door hinges to paint work it is impressive.

Don't laugh, but it just occurred to me I don't know how the boiler lights the pellets. Guess I'll find out soon. How does yours initially light pellets? In our case we may be burning wood for days until the XL senses the storage temp low set point and brings storage up to temp. Anyway... I'll find out soon. Funny tho... I don't have a clue what lights the pellets.

The electrical is easy since we have 230 single phase nearby so it's a matter of adding a cord to the boiler and moving an existing 230 outlet. I'll install the flue and it would be done by now if a section of the 6" Duratech hadn't been damaged in shipping. We'll contract with the commercial plumbers who did our storage plumbing. They're able to cut and thread the black iron to do it right. Unlike when I did the BioMass and made it work with pre-threaded nipples and a bunch of unions.

Control is so simple even I may be able to do it. Simply a Johnson Controls device with an external thermocouple attached to one of the manifolds on our storage tanks. The Johnson Control sensor will provide high and low storage temps turning on/off the pellet boiler. When the BioMass adds energy to storage the XL just sits there waiting for the low temp set point.

That's the plan. If it works as good as it looks it'll be sweet. BTW, that's not me in the pic. It's my SIL that's sized like an Alabama lineman.
 
Similarly there's an ash auger
I think there might be two!

How does yours initially light pellets?
There's a heating element of about 1500 watts that runs for about 7 minutes on mine.

That talk of 230v...mine is 120v.

They cut black pipe at my Home Depot.

Does the manifold always see tank temperature, or can it be isolated somewhat if it's been resting for a while?

So, you're going to run the pellet boiler until the storage tank is charged! Now, you're going to have long run times! I guess if you started a wood fire while the pellet boiler was running, you could just hit the 'off' button on the pb.

I could've used your SIL when getting the boiler off the pallet!
 
Sorry status reports have been sparse. We had a pro do the plumbing because of my time demands and laziness. This resulted in plumbing so beautiful I hate to cover it with insulation! We used copper in the vicinity of the loading unit and then converted to black iron to go to storage. The copper will be covered by this weekend. I had fun doing the electrical/controls which I usually dislike and avoid.


The BioMass has Laddomat and the Winhager Caleffi loading units respectively. In theory only one boiler will run at a time, but check valves on the hot-to-storage lines assures boiler hot flow only goes into storage, not to the idle boiler. I'll either place the Winhager in idle or burn wood in the BioMass way before the Winhager's low temp setpoint.

Our storage system has a mid-tank manifold to help synchronize the thermoclines between the tanks. Not sure if it really does that, but now it provides a more important function, a stable mid-tank control temp that's not fluctuating based on either demand or loading unit turning on/off. The Winhager's A419 Johnson controller will be set to a low setpoint of about 120-130F (maybe lower with experience) which translates into ~150-160F (estimated) for the house demand line at the top of the tanks. We have a WTA forced air system and when water temp gets much below 140F on cold days the fan runs for a long time.

I've got a pellet handling scheme that if it works I'll share. She's ready for commissioning and first fire which will probably happen this weekend. I want to express again how impressed I am with this system. Not cheap, but since (Lord willing) this is the last home we'll ever own it's a very long term investment. If it performs to the level of the build/design quality, we'll be very pleased.

IMG_2240.JPG
IMG_2238.JPG
IMG_2246.JPG
 
Very nice indeed.

Does the Windhager require a chimney that substantial? I was thinking it could even be direct vented but my thinking could be off.
 
Maple, The XL requires a 6" flue with a recommended length of ~14ft to get adequate draft. That's Simpson DuraTech 6" insulated pipe to protect the barn. Windhager also requires a draft damper that I'll tune once we get fire and I get something to measure draft.

BTW, the black can hanging on the wall is the suction pump for transferring pellets from storage and hopper. All done automatically via electronic pellet level sensors in the hopper.
 
BTW, the black can hanging on the wall is the suction pump for transferring pellets from storage and hopper. All done automatically via electronic pellet level sensors in the hopper.
You'll have to expand on that!
edit: I forgot that it's an XL, so that black unit is by Windhager? Mine has the vacuum unit on top of the pellet store. Perhaps this is easier to feed manually, if needed? Lower height?
 
Last edited:
You'll have to expand on that!

At assembly we installed the hopper's low pellet sensor, the hopper full sensor came mounted. Both sensors are ~1" diameter and ~2" long round plastic cylinders (best memory). I have no idea how they sense being covered with pellets.... sonic, capacitive? The control panel is the small display above the right cladding door. Just firing this thing up is cool. Hit POWER and she tells you she's going thru the series of system self checks and up pops a message stating the hopper is empty. When the boiler senses the hopper is low on pellets it turns on the pellet suction pump (black thing on the wall). The suction pump pulls pellets from the bulk storage room via vacuum and using air flow refills the boiler hopper behind the left door. I'll install the transfer hoses tomorrow. I'll show my bulk pellet handling/storage approach later if it works. We do not have bulk pellet delivery in our area, but do have a pellet manufacturing plant near to buy in bulk. In theory, we now have a totally automatic alternative replacing propane when we choose to leave home for extended time during winter.

Wow, what a thing of beauty, good luck.
I agree Gen. The componentry inside is just impressive as the pretty wrapper. This thing came with lots of sheetmetal and weldments and except for one hole requiring adjustment, all bolted together as if everything was machined. CNC sheetmetal manufacturing is amazing. If it works near as good as it looks we'll be very happy. Hope to make fire this weekend!
 
Keep me posted Larry.

Just in time for Christmas
 
Thanks for answering my questions yesterday HM. After I discovered the Johnson controller jumpers were set for cooling instead of heating the boiler immediately went to the ignition stage. I would have never imagined it would have taken 15-20 minutes to heat the burner pot for that first firing. It's been running perfectly since noon yesterday. I presently have the storage mid-tank low set point at 125F with a 20F differential (125-145F). I mainly have it set that low because the XL was running continuously working for about 10 hours to take the 1000 gals at ~42F to the 145F high set point. Now that the tanks are up to temp I'll increase the low set point to provide hotter mean temp to the house to reduce the fan on time. It took about 240 lbs of pellets to take that 1000 gals from 42F to about 125-130F. The boiler is now dead banding about that big thermal battery. Haven't checked how long it rests between burns but will soon. Today I will slide that low set point up 5-10 degrees. Pretty amazing so far and so easy.
 
Status
Not open for further replies.