I'm new, and not only do I not know what I'm doing with the fireplace insert, but I also started this thread the wrong way. To see pics and research and opinions on the stove, see the old thread:
https://www.hearth.com/econtent/index.php/forums/viewthread/2411/#380730
Here's my addition to that old thread, asking all my questions:
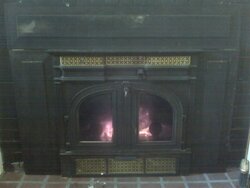
3 days ago I bought a Vermont Stove Company – Shelburne, not knowing the model (so I couldn’t do any research), but liked the looks of it, so I paid $350 for it assuming I can’t lose when comparing it to paying $2000 for a new stove. Now see one closer to me for $50 (not as nice shape), and I’m thinking of buying it for parts and the manual. I like the looks and the flush mount, and was happy with the heat output. I think the fan could be more powerful though. Air doesn’t kick too far forward. Most heat is felt within a foot or so of the stove. It does however seem to heat my three story 2400 sq ft on a sunny 34/25 degree day. (I burnt about a dozen logs that day.)
Two problems I have with this unit:
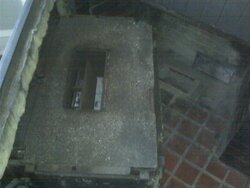
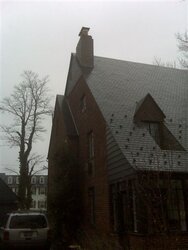
1) Fire exhaust is too far forward (although the complaint in the link above says too much of firebox too far back). I’d probably have to rip out my damper and maybe even some bricks to get a direct up flow. (I’m not going to be the guy to wreck my 80 yr old fireplace, I’d sooner ditch the whole insert idea.) Two of the five inch deep (by 11 inch wide) exhaust is directly below the metal under the masonry two front of my fireplace. There’s only 3 inches between the top of the unit and that metal sheet too. So if I try to exhaust duct this thing, it’s got to go back two inches before rising three, a five inch 90 degree would take at least five inches. A 45* would be better I guess, but doubt it would turn two inches in less than three too. (All of this before any double-wall or anything like that. I’m envisioning something like house ductwork with a single layer of sheet metal.) Round duct is simply not an option. (I know I need to research this, and the ducting options.) As a result of my “slammer” installation, after about 24 hours of burning, I’ve already got creosote on the FRONT of my fireplace. Now I see why a slammer installation is not exactly safe.
2) The fan is REALLY loud. Now the fan doesn’t even work. I pulled the plug on the fan this morning (which I just had running down my ash trap into my basement) when the unit was cold, and then plugged it back in when the fire got hot this morning. The fan was louder, and not kicking air. I assume what was going on was the exterior fan must have been running (I guess this fan is for cooling the fan motor), but the big motor for the room circulation was struggling to move at all. This was a bummer, but not the end of the world since I was thinking of trying to replace the noise maker with something a little quieter.
(Of course I also see that folks say this unit is total junk anyway).
This morning I pulled the wood, cinders and ash out (metal bucket with lid of course), and pulled my “slammer” forward to check out the fan, and hopefully get a part number off it. No luck yet, as it looks like I need to tip this 500 lb beast on it’s face to get the motor off. I’ll try to get that done before 5 PM today, so I can search stores before they all close for the weekend, but I’m not hopeful.
So now that I’ve learned quite a few things in only 3 days, I’m starting to wonder if I should upgrade this stove. I previously thought they were all just metal boxes, with fans, but now see how complex they are. I am committed to an insert, but hate the idea of spending $2000 on a new one. It seems that it will take over a year to get that return-on-investment back. On the other hand, piece of mind and knowing my family is safe is worth quite a bit.
Do the members of this forum suggest I:
a) get a new insert, somehow, somewhere? If so, I’m in the Philly area, and willing to go get the stove.
b) just get (I) a new fan (or jsut fan motor), and get (II) some ducting to get the exhaust connected to my clay lined 45 foot chimney (that my chimney sweep had said would be fine (i) without a liner, and (ii) without connecting the unit to the chimney (aka “slammer” installation).
Fix it, or buy a new one?
I'm assuming most will tell me to buy a new one, I'm looking for suggestions about what stove to buy. I want to heat my house. I don't want it to bump out in to the room (too much), and I want it to look good. And if I'm paying $2000 for it, the fan better be darn near silent. (Our 50" plasma is directly above, so the noise affects TV viewing, hearing crying kids, etc.) I don't want to tear apart my fireplace. My clay liner is about 45 feet and 12 inch round (based on what I see at the top), and lining it is apparently a $5000 project based on one estiamte I've had. So at most, I'm looking to get an exhaust pipe up to the lowest level of clay liner.
info on the stove I have:
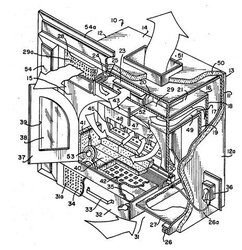
http://www.wikipatents.com/patent_full.php?id=US4465055
Thanks,
Mike
I just now dug up some more info from http://www.stovepartsunlimited.com/pricing/pdfs/2008_magnaflex_pricing_retail_rev_09_02_2008.pdf
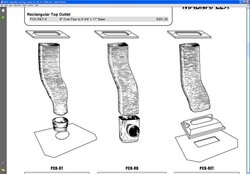
It looks as if I can get a postive connect kit, and they spent some significant time with me to determine that the rectangular positive connect kit should work $301.20 (plus shipping I assume). I just need to make sure it doesn't sit too far back on the unit (being over 10 inches deep in total, and has a 45* rise to over three inches. Hmm.... I just now realized, that although it would all fit together while in the fireplace, I won't be able to get it in there after screwing it all together... because the positive connect kit is over 3 inches tall... Ughhh...
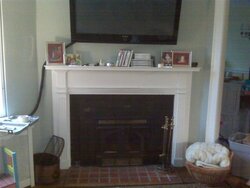
FYI to anyone suggesting a stove to me. My fireplace is not very deep, only about 17" deep at 26" high.
https://www.hearth.com/econtent/index.php/forums/viewthread/2411/#380730
Here's my addition to that old thread, asking all my questions:
3 days ago I bought a Vermont Stove Company – Shelburne, not knowing the model (so I couldn’t do any research), but liked the looks of it, so I paid $350 for it assuming I can’t lose when comparing it to paying $2000 for a new stove. Now see one closer to me for $50 (not as nice shape), and I’m thinking of buying it for parts and the manual. I like the looks and the flush mount, and was happy with the heat output. I think the fan could be more powerful though. Air doesn’t kick too far forward. Most heat is felt within a foot or so of the stove. It does however seem to heat my three story 2400 sq ft on a sunny 34/25 degree day. (I burnt about a dozen logs that day.)
Two problems I have with this unit:
1) Fire exhaust is too far forward (although the complaint in the link above says too much of firebox too far back). I’d probably have to rip out my damper and maybe even some bricks to get a direct up flow. (I’m not going to be the guy to wreck my 80 yr old fireplace, I’d sooner ditch the whole insert idea.) Two of the five inch deep (by 11 inch wide) exhaust is directly below the metal under the masonry two front of my fireplace. There’s only 3 inches between the top of the unit and that metal sheet too. So if I try to exhaust duct this thing, it’s got to go back two inches before rising three, a five inch 90 degree would take at least five inches. A 45* would be better I guess, but doubt it would turn two inches in less than three too. (All of this before any double-wall or anything like that. I’m envisioning something like house ductwork with a single layer of sheet metal.) Round duct is simply not an option. (I know I need to research this, and the ducting options.) As a result of my “slammer” installation, after about 24 hours of burning, I’ve already got creosote on the FRONT of my fireplace. Now I see why a slammer installation is not exactly safe.
2) The fan is REALLY loud. Now the fan doesn’t even work. I pulled the plug on the fan this morning (which I just had running down my ash trap into my basement) when the unit was cold, and then plugged it back in when the fire got hot this morning. The fan was louder, and not kicking air. I assume what was going on was the exterior fan must have been running (I guess this fan is for cooling the fan motor), but the big motor for the room circulation was struggling to move at all. This was a bummer, but not the end of the world since I was thinking of trying to replace the noise maker with something a little quieter.
(Of course I also see that folks say this unit is total junk anyway).
This morning I pulled the wood, cinders and ash out (metal bucket with lid of course), and pulled my “slammer” forward to check out the fan, and hopefully get a part number off it. No luck yet, as it looks like I need to tip this 500 lb beast on it’s face to get the motor off. I’ll try to get that done before 5 PM today, so I can search stores before they all close for the weekend, but I’m not hopeful.
So now that I’ve learned quite a few things in only 3 days, I’m starting to wonder if I should upgrade this stove. I previously thought they were all just metal boxes, with fans, but now see how complex they are. I am committed to an insert, but hate the idea of spending $2000 on a new one. It seems that it will take over a year to get that return-on-investment back. On the other hand, piece of mind and knowing my family is safe is worth quite a bit.
Do the members of this forum suggest I:
a) get a new insert, somehow, somewhere? If so, I’m in the Philly area, and willing to go get the stove.
b) just get (I) a new fan (or jsut fan motor), and get (II) some ducting to get the exhaust connected to my clay lined 45 foot chimney (that my chimney sweep had said would be fine (i) without a liner, and (ii) without connecting the unit to the chimney (aka “slammer” installation).
Fix it, or buy a new one?
I'm assuming most will tell me to buy a new one, I'm looking for suggestions about what stove to buy. I want to heat my house. I don't want it to bump out in to the room (too much), and I want it to look good. And if I'm paying $2000 for it, the fan better be darn near silent. (Our 50" plasma is directly above, so the noise affects TV viewing, hearing crying kids, etc.) I don't want to tear apart my fireplace. My clay liner is about 45 feet and 12 inch round (based on what I see at the top), and lining it is apparently a $5000 project based on one estiamte I've had. So at most, I'm looking to get an exhaust pipe up to the lowest level of clay liner.
info on the stove I have:
http://www.wikipatents.com/patent_full.php?id=US4465055
Thanks,
Mike
I just now dug up some more info from http://www.stovepartsunlimited.com/pricing/pdfs/2008_magnaflex_pricing_retail_rev_09_02_2008.pdf
It looks as if I can get a postive connect kit, and they spent some significant time with me to determine that the rectangular positive connect kit should work $301.20 (plus shipping I assume). I just need to make sure it doesn't sit too far back on the unit (being over 10 inches deep in total, and has a 45* rise to over three inches. Hmm.... I just now realized, that although it would all fit together while in the fireplace, I won't be able to get it in there after screwing it all together... because the positive connect kit is over 3 inches tall... Ughhh...
FYI to anyone suggesting a stove to me. My fireplace is not very deep, only about 17" deep at 26" high.