Floor Protection On Hardwood Floor

  • Active since 1995, Hearth.com is THE place on the internet for free information and advice about wood stoves, pellet stoves and other energy saving equipment.

    We strive to provide opinions, articles, discussions and history related to Hearth Products and in a more general sense, energy issues.

    We promote the EFFICIENT, RESPONSIBLE, CLEAN and SAFE use of all fuels, whether renewable or fossil.
Status
Not open for further replies.

Peregrine

New Member
Oct 14, 2013
4
Western NC
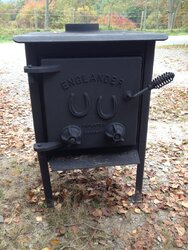
I just purchased my first stove, an Englander. I'm not sure on the exact make of the stove, but here is a description: 20x20x20 firebox, solid cast iron door with two horseshoes on it and two air intake dials, supported by four dainty legs.

It will be professionally installed over a hardwood floor. Currently, there is no floor protection. I need to make it before they can install the stove.

Unfortunately, the port into my chimney is only 24 inches up from the floor. I will have to trim down the legs in order to install it. This means that I have 3 to 4 vertical inches in which to install some kind of floor protection.

Here is my current plan.
First, 26 gauge sheet metal laid directly on the floor.
Next, standard size cored concrete brick -- L 8in x W 3.6in x H 2.25in -- laid so the holes are horizontal. By laying the brick that way I can create air space by connecting the holes and hopefully that will create some cooling convection
____
IoooI (Brick that looks kinda like that) Here is a link: http://www.lowes.com/pd_10298-215-6...bricks&pl=1&currentURL=?Ntt=bricks&facetInfo=
Finally, mortar the brick together.

I pieced together this idea after browsing several sources: manuals for Englanders, NFPA guidelines, &c..

I'm not concerned about clearances; that has already been sorted. What I need is some sound advice on how I can protect my floor and also ways to reduce heat transference through the bottom of the stove.

I'm looking for anything, but please note I'm working on a dime, though I would never compromise safety by cutting corners.

Thanks
 
Hello! First of all I think we could help you more if you took some pictures of what you are working with.

As far as the install, I don't think the sheetmetal will do much for you. I am thinking that you would be better to cut up the hardwood and lay some cement board down in a mortar bed and fasten it to the sub-floor with screws THEN you can put your brick down(I am currently building a brick hearth with this setup now).

The best way to protect your floor would be to build the brick hearth big enough to contain sparks and embers. Extend the hearth about 2' in front of the stove...???

Good luck with the install
 
As far as the install, I don't think the sheetmetal will do much for you. I am thinking that you would be better to cut up the hardwood and lay some cement board down in a mortar bed and fasten it to the sub-floor with screws THEN you can put your brick down.

If I actually owned this house, I could cut out a section of the floor. Alas, this is to be installed in a rental property. By the way, The sheet metal is more to protect the wood from the brick than the wood from the heat.
 
That is an old one for sure, this is an image of a simular stove for others to see:

DSC06266-e1291947048268.jpg
 
Yoiks, that is a bad install example too.

Cutting down the legs on this stove is going to make a bad situation worse. We can't say how much protection will be needed, it would just be a guess. In the least I would attach a heat shield to the underside legs spaced about 1" below the bottom of the stove. Then your idea of a metal sheet and cement blocks might work. But I would monitor the block temp closely. Otherwise you could end up with a scorched floor.

The stove wasn't designed to have an immediate horizontal take off. It sounds like you would be better off with a stove purposely designed for rear exhaust like a Jotul 118, Lange, etc.. Tell us more about the clearances on this stove and post some pictures of the install location. Do you have 36" clear in all directions? The picture above is an example of a stove installed too close to combustibles. That veneer of brick does not offer adequate wall protection.
 
I have a few questions. First, are you sure this port into your chimney is installed for a woodstove? Twenty four inches above the floor seems much lower than the standard woodstove height. Perhaps it is for an oil heater or something like that. If that is the case you probably don't have a proper flue for a woodstove. Second, have you looked underneath your floor to see if there is sufficient support to hold up a 300 - 500 lb. woodstove and perhaps another couple hundred pounds of bricks like you are planning to use for your hearth? If you could add a photo of the stove perhaps someone here at the forum could identify it and you could get the proper specifications for installation. By cutting off the legs that much you might need more clearance to combustibles below the stove than you are considering with your current design idea.

If you find out you can in fact use the sort of hearth you described I would suggest you forget about using those bricks and instead use some 2" thick cap blocks or just some patio stepping stones. Those are thinner and much less expensive. What you are proposing does not really sound like a workable plan to me. Be sure to check on that flue opening and what it is dumping into inside the wall.
 
I just spoke to a local chimney sweep place. The stove will be installed in an existing hearth. The reason for the original idea was to have the stove centrally located in the house. Installing it in the hearth will mean that one side of my house won't get as much heat.

Here is a photo of the stove.
 

Attachments

  • IMG_0416.jpg
    IMG_0416.jpg
    339.8 KB · Views: 163
If there is a visual straight shot from the cooler part of the house to the stove room there is a nifty trick that can even out the house temps nicely. Put a table or box fan in the cooler area, placed on the floor, pointing toward the woodstove. Run it on low speed. It will blow the cooler air down low, toward the woodstove room. The denser cool air will be replaced with lighter warm air from the stove room. Running this way you should notice at least a 5F increase in the cooler temp area after about 30 minutes running.
 
Status
Not open for further replies.