Flue or stovepipe corrosion and condensate issues and maintenance and paint questions

  • Active since 1995, Hearth.com is THE place on the internet for free information and advice about wood stoves, pellet stoves and other energy saving equipment.

    We strive to provide opinions, articles, discussions and history related to Hearth Products and in a more general sense, energy issues.

    We promote the EFFICIENT, RESPONSIBLE, CLEAN and SAFE use of all fuels, whether renewable or fossil.
Status
Not open for further replies.
G'day All,
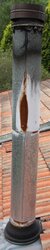
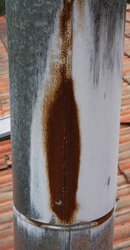
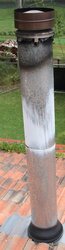
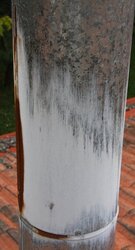
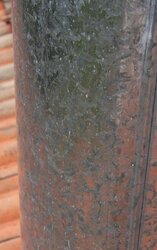
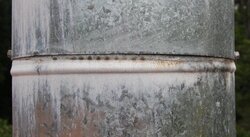
My galvanised steel external flue or stovepipe has a couple of rust patches and what appears to be a white condensate from the burn gases and/or smoke on it.

Some pics below . . .

I was wondering if the condensate, which appears to be worse around the rusted area, has caused or accelerated the rusting? Or is it just a co-incidence that the the condensate is heaviest around the rust?

I was also wondering what the condensate was? It is a white, hard, powdery coating - is the gal coating of the steel flue reacting to something? Or is it just the breakdown of galvanised steel under normal outdoor conditions? Seems strange that only some part of the flue is coated whilst the rest is fine.

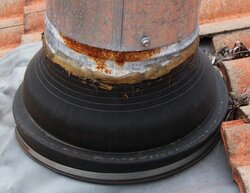
I was planning on pulling it apart and cleaning it, then painting it and putting it back. Would a cold gal paint be best? Can they handle the heat? From inside the roof space to the top cap I am using a 6" stainless steel active flue inside the 10" gal exterior flue pipe that is corroding. Whatever that condensate is, will cold gal paint handle the chemical corrosive properties of the condensate? Is there a special kind of exterior flue paint I should obtain that can handle all this - the heat variations and temps, the usual outdoor UV and weather, plus the condensate?

Whenever I have checked my flue during burning - which is quite often, to admire the smokeless heat haze and good draft - it appears to be drafting very well, so I am surprised that I even have such condensate around my flue. Unless, as mentioned before, it is just the gal breaking down. Can anyone clue me in and give me advice on what to do?

Thanks in advance!
 

Attachments

  • flue_corrosion1.jpg
    flue_corrosion1.jpg
    40.6 KB · Views: 845
  • flue_corrosion2.jpg
    flue_corrosion2.jpg
    58.5 KB · Views: 950
  • flue_corrosion3.jpg
    flue_corrosion3.jpg
    26.3 KB · Views: 868
  • flue_corrosion5.jpg
    flue_corrosion5.jpg
    57.2 KB · Views: 903
  • flue_corrosion6.jpg
    flue_corrosion6.jpg
    35.9 KB · Views: 837
  • flue_corrosion8.jpg
    flue_corrosion8.jpg
    43.4 KB · Views: 878
  • flue_corrosion_base1.jpg
    flue_corrosion_base1.jpg
    44.4 KB · Views: 996
Wow. Looks like burnt zinc. Is that a single wall flue? Zinc oxidizes at somewhere around 1000* F, I think, which seems hot for your flue, but that's exactly what it looks like. It explains the rust, as the zinc would no longer be protecting the steel. It almost appears as if you have a gap in the pipe where hot gases are escaping and burning the galvi. If it were me, I'd start saving for stainless.

edit: I didn't read your post very well the first time before I answered 8-/ I see you already have stainless inside.
It sure looks like high heat from inside. If you really are burning it, a new zinc coating will just do the same.
 
Ummmm unless things are different on the other side of the world. Ive never seen galv stove pipe. Should be cold rolled steel. (A) Vent double wall stainless steel insulated should be used through any penetration and outdoor piping. I know your climate is much different there but I do think the install is really not up to par and there are other issues to worry about than that pipe. It should be removed as it is not for that application. All the pipe connection's are actually upside down that I see. I do love that type of stove you have in your signature. Unless Iam missing something here, I think some changes are in order for your safety. No harm meant by my comments hopefully.. Hope someone can chime in that can type faster and see if Iam on the right track. Cheers Mate.
N of 60
 
north of 60 said:
Ummmm unless things are different on the other side of the world. Ive never seen galv stove pipe. Should be cold rolled steel. (A) Vent double wall stainless steel insulated should be used through any penetration and outdoor piping. I know your climate is much different there but I do think the install is really not up to par and there are other issues to worry about than that pipe. It should be removed as it is not for that application. All the pipe connection's are actually upside down that I see. I do love that type of stove you have in your signature. Unless Iam missing something here, I think some changes are in order for your safety. No harm meant by my comments hopefully.. Hope someone can chime in that can type faster and see if Iam on the right track. Cheers Mate.
N of 60

G'day mate, certainly no harm or offense taken by your comments :) In reply:

1) I'm pretty sure it is gal pipe, for the exterior flue pipe (the 10"). If it wasn't galvanised it would rust in weeks here, I am about 10 minutes from the beach and everything rusts heaps quicker than inland Oz. It's about 3 or 4 years old now. It is however, definitely designed and sold as flue (stovepipe) pipe or shielding here. I am fairly sure S/S is required for the active - it is certainly recommended and used by everyone - but exterior shielding is mostly gal.
2) As I posted above, from the roof space and up to the top cap the install is 6" s/s active and then surrounded by the 10" gal.
3) From the fireplace / woodstove to the roof space (ceiling of a single storied house) it is 6" s/s active, 7" s/s shield, 8" half smooth / half perforated (perforated half facing the room and smooth on wall side) shield and then a 9" half shield (to wall side). This is all done to over-comply with building code regarding combustibles and fireplaces. As you can see from my signature, I have a through wall model, so the flue is within 18" of the plasterboard (drywall) and is supposed to have active / shield / half shield to comply - I have gone an additional shield layer for safety, as recommended by the dealer. I didn't include the internal room flue and shielding info 'cause I wasn't sure if it was relevant to original topic.
4) I did the install myself, but it was checked and passed by local authorities - the inspector was actually quite impressed by the quality of workmanship and extra shielding and distances to combustibles through the flue run, so I am confident the install is up to par. Not sure what you mean by "pipe connectors are upside down"? The way our flue pipe systems work is the top of each length contains a rounded lip which the flue length above it rests upon (it stops it sliding down) and so the lower piece of flue sits inside the top piece. This allows rain to run down the flue always staying outside, and smoke of course drafting up the inside runs smoothly past the lip, whereas if it was reversed it may create more of a condensete point. I cannot see any other logical way of doing this.
5) The lowest flue pipe has a black silicon boot around it which drops over the through-tile roof plate lip and is secured by a metal band. This allows water to flow down the flue over the boot and onto the roof and away. The only possible water penetration point is where the black boot contacts the flue pipe, which is sealed with high temperature silicon (but looks like it could do with a top up or replacement). It is also right side up, or installed as per design and instructions and complies with code.
 
Ya see, I guess I was on the wrong track. :red: and thanks for being so receptive Ive just never seen that type of install or application before. Sounds like you have done your homework on your local codes. I also was mistaking that it was single wall through the roof. That being I figured your inside pipe was stacked the same way. As far as painting goes, it will at least good for the rest of your summer. Or is it your winter now? Cheers. N of 60
 
madrone said:
Wow. Looks like burnt zinc. Is that a single wall flue? Zinc oxidizes at somewhere around 1000* F, I think, which seems hot for your flue, but that's exactly what it looks like. It explains the rust, as the zinc would no longer be protecting the steel. It almost appears as if you have a gap in the pipe where hot gases are escaping and burning the galvi. If it were me, I'd start saving for stainless.

edit: I didn't read your post very well the first time before I answered 8-/ I see you already have stainless inside.
It sure looks like high heat from inside. If you really are burning it, a new zinc coating will just do the same.

Madrone, yes looks like the zinc is oxidising, I just can't believe it gets that hot, hence my thought it could be a condensate.

I mean 1000 degrees F = 537 degrees C, and for that temperature to be the external flue temp of a 10" shield, being heated from a 6" S/S active, which is 15' or so from the firebox . . . how hot would the firebox have to get before the end of a 15' active S/S flue got to >1000 degree F temps?

I do burn dry wood, and pride myself on very low MC, and no smoke, including plenty of hardwood fencing saved from the tip (I get local fencing contractors to drop it off, saves them money) but I run the fire with the blower always on (well after 20 minutes or so from ignition when the firebox has heated up and secondary burn is good) and just can't believe I am cracking 700 or 800 degrees C (1200 - 1400 F) which I am guessing would be what it takes to get the external 10" up to 537 C (1000 F).

However, I don't have thermometers installed, yet, I am trying to get multiple probes at firebox, active flue and first shield points so I can track temps, both for general knowledge, fine tuning the burning we do, and preparing for a ducted system I am planning.

Maybe I will look into 10" stainless steel flue lengths to replace the existing gal. Or, if the zinc is oxidising, maybe I can find a high-heat-tolerant paint and use that to get a few more years out of the existing setup. Can anyone else tell me for sure what is happening and provide advice?
 
I cant see those kinds of temps radiating from the stove upwards. Perhaps the heat was transfering from the cap downward during a burn off of creosole accumulating at the cap and or boiling over from the active interior pipe. Thereby cooling off before it reaches the rubber boot. It just seems strange that the boot would hold up to those temps traveling past it to the area in question. The rust seems to be mostly concentrated on either a lap area or a seam, possible caused by the collection of moist salt air.
 
What you have is very common for this type of pipe. This will accelerate the further deterioration of the pipe and I'd highly recommend replacing it rather than trying to fix it up. If you do replace, I'd also recommend flipping the pipe because as has been pointed out, it is upside down. You can get an adapter so you can do it.

All in all, I would still say you would be a lot better off with an insulated SS chimney. In the galvanized, the gasses cool super fast where they would not cool like that in the SS.
 
The pipe is galvanized for sure. You can tell by the "spangles", or zinc (Zn) crystals visible on the surface. The white powder is probably a combination of common Zn corrosion products, like Zn carbonate, Zn oxide, perhaps some Zn sulfate. The presence of condensate and white "rust" is no coincidence. The moisture from the condensate accelerates the corrosion, and wet/dry cycling makes it even worse. The chemistry of flue exhaust also accelerates the corrosion. Once you see red rust, as in the one large area, the underlying carbon steel that's beneath the Zn is being consumed by the corrosion as well, and it's only a matter of time before perforation.
 
Backwoods Savage & Grommal,
Thanks for your replies :) Looks like the best, if not only option, is replacement with 10" S/S pipe.

However, Backwoods Savage, although you and N of 60 have both said the pipe is upside down, I can't see how this is so. Obviously I installed it, so if I made a mistake, it's back on me - however it was also missed by the council inspector, who was impressed with the install.

I can't see how the pipe is upside down, as there is only one way to assemble it, only one end has a lip preventing the other piece sliding down, and gravity dictates the lip would go below the next piece so it is being forced together not apart. Only in this configuration does rain slide down the outside of the pipe and stay outside - if the pipe was flipped, the rain would come inside the pipe, or would be reliant on a good seal (eg heat resistant silicon) to prevent it - it doesn't make sense to me that pipe would be designed with such a weakness to rain penetration. Can you please explain why you think the pipe is flipped?

I had a quick google and the only images of installed stovepipe or flue lengths I could find were like mine, eg:

http://greenrenovation.files.wordpress.com/2009/03/flue-pipe.jpg

(I didn't place it in an image link as the pic is huge but allows a closeup of the flue pipe joint)

So either we are all getting it wrong, or I am missing something. BS or Nof60, could you explain why my flue is upside down? Cheers!
 
Single-wall pipe is installed so that the female end is on the bottom and the male, crimped end is on the top. This is so that the flow of creosote and condensation remains inside the pipe and does not drip or corrode the outside pipe. If the pipe is securely screwed at 3 equidistant locations around the pipe joint, nothing is going to slip.

However, in the US this applies specifically to interior, stove connector pipe. We don't use single-wall pipe through a roof or ceiling penetration. Normally at this point the pipe switches from single (or air-spaced double-wall pipe) to insulated class A pipe with a higher temperature rating. Correctly installed class A pipe has a twist lock fitting and overlapping exterior skirt that prevents water from dripping down the pipe.

The chimney section of this article discusses chimney installations. Another good resource is the installation documentation provided by major chimney pipe manufacturers like Simpson or Selkirk or their Australian equivalents.
https://www.hearth.com/econtent/index.php/articles/installing_a_woodstove
 
BeGreen said:
Single-wall pipe is installed so that the female end is on the bottom and the male, crimped end is on the top. This is so that the flow of creosote and condensation remains inside the pipe and does not drip or corrode the outside pipe. If the pipe is securely screwed at 3 equidistant locations around the pipe joint, nothing is going to slip.

However, in the US this applies specifically to interior, stove connector pipe. We don't use single-wall pipe through a roof or ceiling penetration. Normally at this point the pipe switches from single (or air-spaced double-wall pipe) to insulated class A pipe with a higher temperature rating. Correctly installed class A pipe has a twist lock fitting and overlapping exterior skirt that prevents water from dripping down the pipe.

The chimney section of this article discusses chimney installations. Another good resource is the installation documentation provided by major chimney pipe manufacturers like Simpson or Selkirk or their Australian equivalents.
https://www.hearth.com/econtent/index.php/articles/installing_a_woodstove

Well, I still don't see how that affects my installation . . . as I said in the original post, and also referred to later in subsequent posts by me and others, it is not single walled pipe.

It is active + shield + shield + half shield to the ceiling and then active + shield all the way to top cap.We (Down Under) are not allowed to use single walled pipe through building penetration either, nor even a certain distance from combustibles (so even running 12" from a drywall it must be triple-wall air-spaced or better).

I understand what you mean about active needing creosote and condensate dripping down the inside of active pipe, and I'm pretty sure that's how my active was installed - there was only one way to do the active stovepipe / flue lengths as well, due to Australian firebox design standards (I presume, or industry regulation) as the (spigot?) on top of the firebox where the active inserts only accepts one end.

However, surely the exterior shield needs to be the way mine - and all others I can find - is installed? With male inside and under female for rain penetration prevention?

The pics I supplied are of the exterior, 10" galvanised pipe, or shielding - not the internal, active, 6" stainless steel pipe.
 
I'm thinking a good brushing with a wire brush, followed by high-temp paint would probably do it.
 
If it is multi-walled pipe, then it's likely installed correctly. Thanks for the clarification. Good to know it is insulated pipe. Normally exterior pipe is described by it's heat classification and the interior pipe diameter. I tried looking up flue pipe sold in Australia, but didn't find any makers for it.

How old is the exterior pipe? Galvanized pipe a few blocks from the beach may have a limited lifespan. Have you asserted that there is no corrosion occurring in the core of the flue pipe? If there's no interior corrosion, then wirebrushing the rust and painting may buy a few more years of life. There are products which can be applied to the cleaned rusted surface that will convert the iron oxide to a stable compound that can then be painted. One of these sold in the states is called Loctite Extend (aka Henkel NJ Neutralizer). I've used it and it works well.
 
Status
Not open for further replies.