
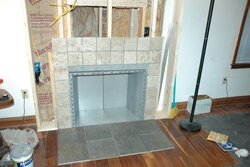
Some have seen this before but this is the final results.
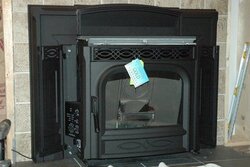
For those who want to see a Harmon Accentra insert installed (zero clearance) install/build portion
- Thread starter Trickyrick
- Start date
-
Active since 1995, Hearth.com is THE place on the internet for free information and advice about wood stoves, pellet stoves and other energy saving equipment.
We strive to provide opinions, articles, discussions and history related to Hearth Products and in a more general sense, energy issues.
We promote the EFFICIENT, RESPONSIBLE, CLEAN and SAFE use of all fuels, whether renewable or fossil.
You are using an out of date browser. It may not display this or other websites correctly.
You should upgrade or use an alternative browser.
You should upgrade or use an alternative browser.
- Status
- Not open for further replies.

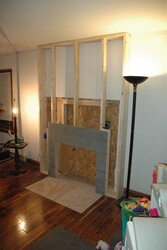
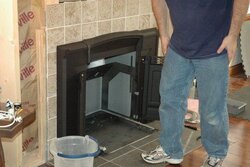
To continue I left out the booring sheetrock part.
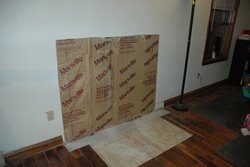
Attachments
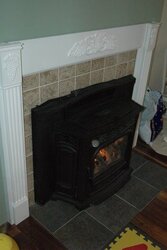
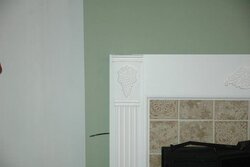
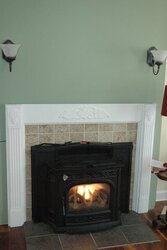
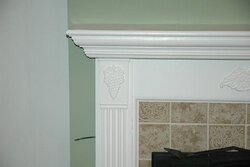

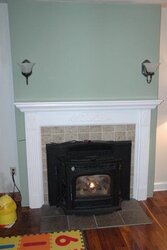
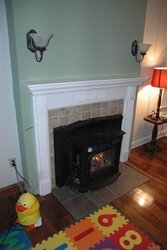
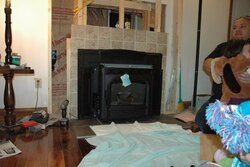
Final trim work (Kick boards) go in tonight and My plan is to paint the room this weekend....
I hate going over old stained (polyurithaned trim with white) but the wife wants it...
I'll get some pics up of the outside of the house soon. Still need to put up the siding but I need warmer weather to do that. If I install now then in the summer I could end up with expanded buckled siding. For now it is just dry in...
S
smoke show
Guest
 ! :exclaim:
curtthegreat
Member
Great post for anyone considering going that route. But, with that kind of workmanship I should advise you to never post your phone number or address on this site, or you'll have to quit your day job. Beautiful!
Some history and the cost breakdown: Note I may have shared this with individuals here.
With Xmass and yanking the wallpaper off the wall in the entire downstairs and doing the wall repairs that the previous owner covered with the wall paper I am only getting back on track this weekend to do the finish work.
Here is some data and why I went this direction:
The house is an 1880 sq foot colonial with this long room on one end (13X25) formal living room
We had electric heat in the house prior to the stove so I was getting killed on the electric bill
There wasn’t room in the walls to install ductwork to go to forced hot air, and any heating system was about 12K that includes install.
After 3 years of heating studies and increasing the insulation in the floor and roof to 32 and 54 respectively the cost to heat was still 2300 per year based on records.
I studied the BTUs needed in Dec, Jan and Feb and found that I could maintain the house with about 22,000 BTUs per hour. This let me know what I needed for output from a stove.
My wife hated the stand alone ints unless they was cast-iron.
We happened on this insert in the showroom and realized it wouldn’t cut our room in half but I would have to install a little addition on the outside wall. OK
About 1/3 of the way in she decided she wanted a little bump out so I used some 2X12 to frame in the stove area but still had to knock out the wall and have the overhang (I do not recomend this if you do not have to). My wife wanted that.
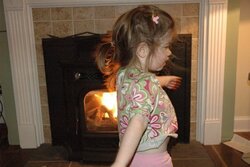
This unit can burn up to 40,000 BTUs of pellets (5 pounds) per hour but it never has. That being said when it is 20-30MPH wind and -1 without the windchill this stove can just keep up, it took 3 hours to raise the house temp 4 degrees. In the deep cold winter don’t use the step back thermostat just run it all day.
Costs:
Pellet insert (3700)
Zero clearance frame (300)
Flue materials (356)
outside framing addition materials (450) Framing, sheeting, roofing, trim, matching siding, insulation
Interior framing (230) Sheetrock, wireing, framing, mudding, kickboard, insulation, lights etc.
Tile for hearth ($80)
Tile for wall (35)
Hearth (324)
Total not including painting entire room and trim… 5475
- Obama discount 1500
$3,976
the stove went in in November so in 2/3 of a month I saved $68 there and December I saved a gross $107.
I figure all said and done I will save between 600 and 1000 per year but the difference is a house that was 68 on the main floor and 67 in the bedrooms is not 73 in the main floor and 71 in the bedrooms ( the room the stove is in does get up to 78) but My wife loves it.
Anyone want to guess what the low quote was from 3 contractors?
With Xmass and yanking the wallpaper off the wall in the entire downstairs and doing the wall repairs that the previous owner covered with the wall paper I am only getting back on track this weekend to do the finish work.
Here is some data and why I went this direction:
The house is an 1880 sq foot colonial with this long room on one end (13X25) formal living room
We had electric heat in the house prior to the stove so I was getting killed on the electric bill
There wasn’t room in the walls to install ductwork to go to forced hot air, and any heating system was about 12K that includes install.
After 3 years of heating studies and increasing the insulation in the floor and roof to 32 and 54 respectively the cost to heat was still 2300 per year based on records.
I studied the BTUs needed in Dec, Jan and Feb and found that I could maintain the house with about 22,000 BTUs per hour. This let me know what I needed for output from a stove.
My wife hated the stand alone ints unless they was cast-iron.
We happened on this insert in the showroom and realized it wouldn’t cut our room in half but I would have to install a little addition on the outside wall. OK
About 1/3 of the way in she decided she wanted a little bump out so I used some 2X12 to frame in the stove area but still had to knock out the wall and have the overhang (I do not recomend this if you do not have to). My wife wanted that.
This unit can burn up to 40,000 BTUs of pellets (5 pounds) per hour but it never has. That being said when it is 20-30MPH wind and -1 without the windchill this stove can just keep up, it took 3 hours to raise the house temp 4 degrees. In the deep cold winter don’t use the step back thermostat just run it all day.
Costs:
Pellet insert (3700)
Zero clearance frame (300)
Flue materials (356)
outside framing addition materials (450) Framing, sheeting, roofing, trim, matching siding, insulation
Interior framing (230) Sheetrock, wireing, framing, mudding, kickboard, insulation, lights etc.
Tile for hearth ($80)
Tile for wall (35)
Hearth (324)
Total not including painting entire room and trim… 5475
- Obama discount 1500
$3,976
the stove went in in November so in 2/3 of a month I saved $68 there and December I saved a gross $107.
I figure all said and done I will save between 600 and 1000 per year but the difference is a house that was 68 on the main floor and 67 in the bedrooms is not 73 in the main floor and 71 in the bedrooms ( the room the stove is in does get up to 78) but My wife loves it.
Anyone want to guess what the low quote was from 3 contractors?
tinkabranc
Minister of Fire
offjack said:Great post for anyone considering going that route. But, with that kind of workmanship I should advise you to never post your phone number or address on this site, or you'll have to quit your day job. Beautiful!
Offjack,
As my wife will tell you, I can be bought. I'm a slut I'm just not a cheap slut........
Thanks for the compliments
HEMI
Feeling the Heat
summit
Minister of Fire
jtakeman
Minister of Fire
CanadaClinker
New Member
")
dingees said:did you use Harmans zero clearance kit in the wall cavity to set the stove/insert into ? also how did you put the plastic vapor barrier in place ?
Yup used the harmon zero clearance kit.
Sorry no pics of the outside right now... The vapor barrier runs up to the wall thimble where I used alluminum tape to seal against the bottm and sides of the wood. On the top U used aluminum flashing over the thimble and under the vapor barrier with so the plastic never actually contacts the thimble. Siding will go on in the spring over all of this except the trim work box I built around the thimble and the Door I have in the side to allow access to the vent pipe (between the inside wall and the outside wall) this allows for any emergency work or god forbid if I have to dissassemble anything... Not great access but access to the entire back of the stove.
I didn't show it here but the power is run through the floor into the baement where I ran its own circuit (standard plug box) and put on a surge supressor. This allows be to disconnect power easily but keeps things well hidden.
summit said:that is a very professional looking and neat install... are you a stove guy by trade?
Nahhh I'm a dumb engineer. Work in the plastics packaging business.
I
imacman
Guest
smwilliamson
The Stove Guy
I saw that level and tape measure in the background...you are probably one of those guys who checks his own work...I know your type. Good looking install.
smwilliamson said:I saw that level and tape measure in the background...you are probably one of those guys who checks his own work...I know your type. Good looking install.
Thanks... If that type is Measure twice, cut once, dryfit once, swear 10 times cause you cut the wrong end, run to the store, get more, come back and start over and when done check again and ask how this thing is off by 1/4 inch then yup that is me....
Wi Thundercat
Feeling the Heat
L
Lousyweather
Guest
DBCOOPER said:Could you emai me those pictures. I tried to blow them up but they get to fuzzy. You said you used 2x12s and still had to knock out the wall. How far does it extend beyond and how is it supported?
Will do.
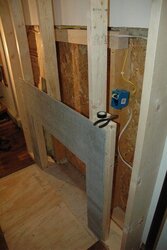
On the distance outside the original envelope of the home. I think it was 4 more inches. But then you needed to add the studding for the wall because the exhaust MUST come strait up out of the box and I wanted the height outside to be above anything a child could reach I went to 8 feet outside which was nearly 5 inside. So here I am building out anyway if I need to go 4 inches minimum I might as well go out 18 inches which is what i did and use standard 2X6 walls like the rest of the house and insulate.
As for how I hung that there. it is cantilevered out to code but then I added metal straps to the ouside of the cantilever and up to the original studs. Not needed especially when I later realized that all the weight of this stove is right over the sill and over the center beam of the house. But I wan't sure till after I picked up the actual zero clearance kit.
I couldn't get exact dimensions from Harmon so I built bigger and framed out the inside separately.
- Status
- Not open for further replies.
Similar threads
- Replies
- 2
- Views
- 561
- Replies
- 11
- Views
- 990
- Replies
- 20
- Views
- 834
- Replies
- 1
- Views
- 199