Grandma in need of ..................

  • Active since 1995, Hearth.com is THE place on the internet for free information and advice about wood stoves, pellet stoves and other energy saving equipment.

    We strive to provide opinions, articles, discussions and history related to Hearth Products and in a more general sense, energy issues.

    We promote the EFFICIENT, RESPONSIBLE, CLEAN and SAFE use of all fuels, whether renewable or fossil.
Status
Not open for further replies.

Nighthawk

New Member
Jan 26, 2014
4
CT/NH
Hi All,
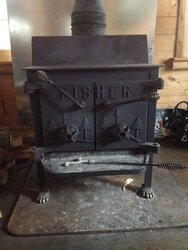
I found this forum a week or so ago and have been amazed by the wealth of info on here. Thank You! I have what I believe is the Grandma Bear stove (unknown year - I will be up there next weekend to look into it further and get better pics). I have been using it without a lot of knowledge or background on it in a camp cabin for a few years, but plan to do a quick refresh of it this summer if I can. If anyone is looking to unload a screen for the stove or can offer some more info/advice on it, let me know. The stove has been great.

Admittedly, as an ignorant user I have had so much ash in there I have not even really been able to see the brick and all brackets - I will remedy that this weekend as well. I am also going to check the baffle.

Is there anything wrong with the door levers being uneven? To get the door to seal somewhat tight the lever really needs to be pushed down and even then I am not positive it seals like it should. Should I look at replacing, repairing or adjusting something? Thanks in advance.

Mike
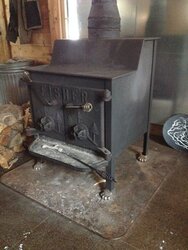
IMG_5026 resize.jpeg IMG_4766 resize.jpeg
 
Welcome to the forum;
You have about a 78 or 79 stove since it has the latest spring handles and 5 fin dampers.
Leave about an inch of ash on the bottom and use the ash outside just like you would lime for acidic soil or potash to invigorate flowering. (vegetable reproduction)

No factory smoke shelf baffle in that one, you will be amazed at the smoke reduction
and reduced stack temp with one. Use a pipe thermometer with baffle to make sure you keep it hot enough.

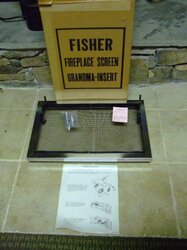
Used screens do come up rarely on eBay and are not cheap, usually over $100. CamFan on this forum had some, you would have to go to one of his posts and click on his user name and "start conversation" to private message him. The one you want fits the full size Insert, Grandma and Goldilocks shown below; His are new in box.
Screen eBay 12-6-11.jpg

Can't see if you have a damper in the pipe above stove, but you will need one with a screen since it will be the only control to slow the fire during open door burning. If you have no electric in the cabin, it's a good light source, but the heat output isn't the same with doors open, having a much lower efficiency such as a fireplace when in "fireplace" mode. A screen is good to get a fire going quick, but it looses it's appeal quick after a few fires when you realize it becomes a radiant heater with doors shut controlling the fire.

You'll notice there is a wedge shaped piece of steel welded inside the right door that the handle rod pulls against to pull tight. The bend in the rod inside determines where the handle stops on the wedge and should be adjusted to match the same angle as the left door handle. It's not critical (pulls just as tight) until it gets so low that the handle slips off the wedge allowing the handle to go all the way around. In time if overtightened and hot inside, they tend to straighten out, allowing the handle to tighten lower on the wedge becoming noticeably lower than than the other handle where yours is now. It needs to be heated with a torch (you can get it hot enough with propane but it takes a while) and when red put a pipe or large adjustable wrench on the end of rod and bend at about a 90* angle. They do bend easy cold, but don't be tempted since when heated, they go back to where they were.

With a good fire going, close both draft caps and see if the fire goes down to a glow or smolder and tries to go out. It should not be burning with a flame when you crack the door to peek in. If it continues to flame closed down, it's getting air around the seal. Wire wheel any soot or rust from door seal and back of doors for a clean metal to metal seal. You should be able to see where it makes contact in three places - the center of channel to the raised portion on door, and the two protruding edges of the steel channel to the back of door. People tend to look at the space between door and stove front and think it's not sealing and over tighten the handle. The contact is made inside the channel iron, and the door will be the same distance away from stove face as the thickness of the web of the channel iron door seal. Notice the edge of door doesn't touch the stove.
Testing with cardboard in the groove will show if there is room for gasket material to allow door to close properly. Gasket material (flat 5/8 wide) can be added in the groove of the steel door seal on the stove face if needed. Glue in place with Rutland Stove and Gasket Cement. It was not used originally, and one of the selling points of the stove was not requiring maintenece of a gasket. The length of burn can be increased adding it, and it dampens the hit if inadvertently closed hard. When you keep hinges greased they tend to get away from you and slam. Yours look squeaky dry. ;) I think your stove is trying to tell me something.
Keep the draft cap threads greased well with high temp or silver anti-seize to prevent thread wear.
 
Thank you for the great info Coaly! I will give it a good look this weekend and take some more pics if I have any more questions.
 
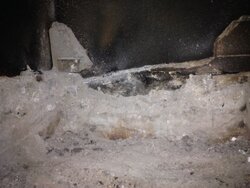
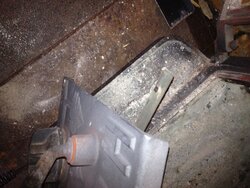
Gave the stove a quick ash emptying and ended up seeing this when checking the bricks. It looks like the remnants of angle iron across the back. The left side is pretty shot, and the brick is broken/missing. The metal can wiggle around, but wants to form to the droopy shape in the pic. Thoughts? Is this something I should have repaired/re-welded this summer? I plan on fixing the broken brick in back center, the rest are in good structural shape (hard to see in pic - sorry). I was surprised to see the two corner pieces of brick on top of the angle iron - They don't match the diagram in the manual... Any thoughts on these?
IMG_1054.jpg

I also took a look at the doors. The hinges and pins seem to be in pretty good shape. A very slight bit of wiggle in the right door, but not too bad. I was able to easily slide the bottom hinge pin out without a problem and didn't notice any deformation on it or the hole. Grease on its way... ;-)

When looking at the arm that secures the door, I see the wear on the lever (not as much on the wedge on left side). Any issues with the significant wear on the arm?
IMG_1061.jpg

Also, the entire locking arm is a bit loose/wobbly where it goes through the door when open. Any way to tighten this up? It is not a major thing (more my OCD when I focus on troubleshooting) but it is just a bit sloppy. Obviously, when closed and locked, it is stable.


Draft cap lugs are not protruding at all when closed. Should I be concerned about this? They seem to open up just fine and close down fine.

Thanks again. You guys have been great.
 
Status
Not open for further replies.