grandpa bear baffle

  • Active since 1995, Hearth.com is THE place on the internet for free information and advice about wood stoves, pellet stoves and other energy saving equipment.

    We strive to provide opinions, articles, discussions and history related to Hearth Products and in a more general sense, energy issues.

    We promote the EFFICIENT, RESPONSIBLE, CLEAN and SAFE use of all fuels, whether renewable or fossil.
Status
Not open for further replies.

sgt panties

New Member
Jan 1, 2014
12
NC
DSCN0179.JPG

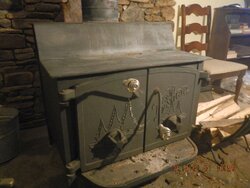
Hi, I have a top venting Grandpa Bear with the date on the arched doors as 4/20/88. I've read read almost all of the retrofit baffle posts.

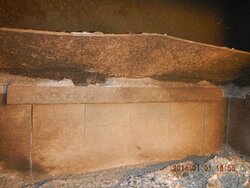
What bothers me is that my stove already seems to have a baffle, albeit a modest 6" deep. See pics. I am not the original owner. Is this a factory baffle? It feels fairly stationary so it is probably welded in. Will know more once I clean it up.

Anyway I'm going to assume I should put in a much deeper baffle. The measurements and positioning of it are clear. My question is: should I opt for a solid-steel-plate type baffle or a angle-iron-w/fitting-fire-bricks type baffle?

I would think the steel plate would be better because you want the baffle to get hot quickly so it can start doing its secondary burn job. Which would you guess is is better?

That will be my first project. What would be a good 2nd project to make this stove more efficient or easier to use?

Another question, what is the cursive weld bead writing on the bottom of my stove? All I can make out is "Carlton B.....". Is that the name of the welder?
DSCN0176.JPG
 
Last edited by a moderator:
I run a grandpa with a firebrick baffle, haven't run a steel one to compare. the deeper baffle would be much better than a shallow one, my baffle changed the lower level to be hotter , and the upper level to be cooler. (it was the opposite before) My stove has a small shelf in the middle below the horizontal pipe, since yours s vertical they probably wanted a bigger shelf to slow down the heat. I would use that small baffle to support the rear of your new baffle.
Coaly is the expert on Fishers, I believe he has mentioned the welders marks on stoves.
 
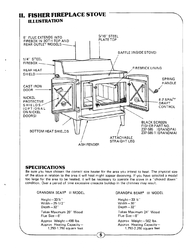
The Factory Smoke Shelf Baffle sat on welded angle iron on the sides of the later stoves.
Originally the size for the Grandpa was 27 X 3 1/2" and became larger in later stoves trying to lower particulate for the stricter standards that took effect in stages, lastly in 1988.

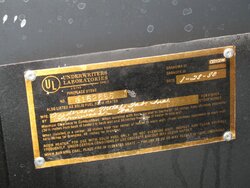
Welders from some fabricators initialed for warranty purposes. Is there a tag giving fabricator?

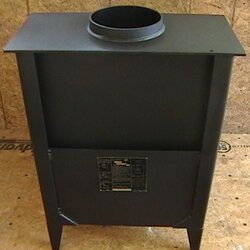
Can't tell from your picture if the corners have angle iron that becomes the legs, or if it has bent corners forming the box without the angle iron. An '88 stove would not have angle iron corners. And should have bottom and rear shield with a tag.
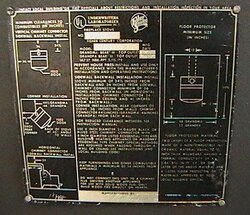
Shown with factory baffle below. Entire manual is available in Hearth Wiki.

upload_2014-1-2_12-19-44.png
 
Thank you Coaly.

Yes, the angle iron extends down to form the legs and also the baffle is supported by 3" long angle (clip angles). That date I mentioned
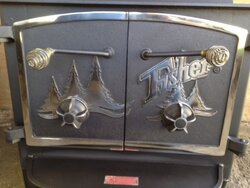
is just the date I could make out on the front cast door. The door to my left has GP/L/2/EDG (slashes indicate vertical spacing) and the door my my right has
GP/R/B/4-20-88/EDG. I've looked all around the bottom and back and can't find a tag. What are the tags made of --an embossed aluminum piece? What year do you think it really is?
 
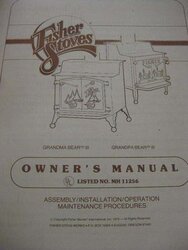
IF they are the original doors, which I don't doubt, (about the 88# or date later) In 1979 the double door Fireplace Series became Series III. (manuals have 1978 date on front, but first print was 4-79 on back) They were the original style box with angle iron corners with old style flat top doors or optional "Cathedral" style doors. (yours) The redesigned box with bent corners was being introduced and was the only style available for1980 when the old flat top doors were dropped. Here's a picture of the manual for '79 showing both doors and box style available the same year;

1979  III Manual.jpg Yours is the one in background with new style doors.

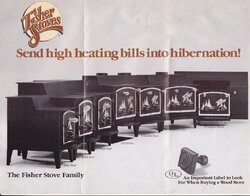
Here's the bent corner redesign box for 1980 showing only cathedral doors on 1980 brochure;

Front Bottom.jpg

7-1-1988 was emissions day when the stricter smoke particulate was phased in. (and the end of production of MANY stove brands across the US) The start of that law was years prior with the second stricter phase in date as of 7-1-1986. So if they were still casting doors at one of the foundries for Fisher in April of '88 it would have been the last. (or your doors were replacement bought after that) The door opening is the same, the rounded top just raises above the straight top opening.

Secondly, if yours was that new, it would not only have a tag on rear shield, it would have drilled holes through ash fender for red warning tag - look for tiny holes where tag would be ;

Grandpa III 2-2013.jpg

First type tag on rear shield (model III) ;

Grandma 1-28-80 tag.jpg

Tag on one piece stove body with clearances (model III) ;

Grandma III 7.jpg

Here's the back of that stove showing wrap around construction 1980. (model III)

Grandma III 3.jpg

At the same time as these developments, the single doors were designated as VI with the 79 having angle iron corners and old style doors, and 1980 dropping the angle iron corners and flat top doors for Cathedral only doors. They still carried the VI designation into 1980, so I call it the "early" and "late" VI.
 
Coaly, you are a true scholar on this topic. Thanks.

He is unbelievable, The great thing is he only states facts that he has and not speculate. The Gma and Gpa III were introduce and production started. But due to higher costs to fabricate they sold at a higher price also. We never stopped building the original angle iron leg stove. The price point is the reason I guess. I was not in management, I just worked around the shop. The angle iron leg, III series and IV were in the showroom at the same time. They may not have been supposed to do that according to Fisher Century but it was done. With Coalys help I am trying to piece together some of the points I never knew about. I am also sharing stuff with him so he can fill in the gaps of what he has. Today will be such a bad weather day I probably will go through stacks of stuff to send to him in the near future.
 
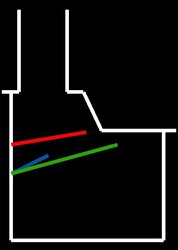
Hi All. I need some advice now about two different baffle configurations for my top-venting Grandpa Bear. The drawing below is basically true to scale.

The blue line represents the factory installed baffle which I'm going to remove. It would not make a terribly good anchor point since it is either bent by design or warped (not depicted).

The red line represents a 11" wide baffle. This would give me maximum firebox room but I don't know whether it would be as effective as the wider one.

The green line represents a 16" baffle. It starts where the old factory one did and goes 7" past the flue.

Which one would be best to use? Any better suggestions as far as position, width and angle?

(PS. Both red and green designs have the required 2" minimum opening. I weld, so I will be using four clip angles to put it right where I want it. Also, I've never had a problem with getting sufficient draft going. I was also going to use the 2x3 notches on each side of the leading edge of the plate the way I've seen it done in some pictures.)


Stove2.jpg
 
Last edited:
The green is not going to let the top surface get as hot, so if you cook a lot on it and need the lower surface for simmer, you're going to lose that.

The exact smoke space (opening for exhaust to travel) depends on chimney diameter and draft. (insulated / masonry / interior or exposed exterior / height)

What your drawing doesn't show is the vent pipe extension down into the firebox. (normally 3 inches) So the object is to keep flames from having a straight shot up that pipe. Which the red baffle does better.

The largest factory baffle (Goldilocks) would be like extending the blue line to just cover the vent pipe. Extending it to where the red line ends may be the best of both worlds. This gives a steeper angle that doesn't impede on firebox height, and allows plenty of heat to the upper surface for a hotter step top.

If you have an IR thermometer, it's best to experiment with bricks on the side under baffle to try different angles before welding brackets since everyone's use and chimney is going to be different. You can adjust your two top surfaces and percentage going up the chimney with very little adjustment. Cutting a brick like a small wedge can be used to adjust the baffle and check temps.
 
  • Like
Reactions: Wise Ash-burner
Right Coaly, my flue extends down 2.25" from the top plate, I missed that. I have an uninsulated 8" flue that runs exposed vertically, then a 10" lateral kick just before the penetrates the ceiling and then thru the roof.

OK for my first try I'm going to start where factory baffle started at the back then extend to where red one ends.

A second question occurred to me: If you had your choice at no expense would you go with a steel plate baffle or a steel-angle-frame-with-fire-brick baffle?
 
Since the baffle's main job is to prevent direct escape of heat and to keep combustible gasses in the stove longer giving them a longer route before exiting, both materials accomplish that. I used steel since Fisher developed the smoke shelf baffle for double door stoves, and I simply adapted the design to the single door stoves. The second reason is the plate thickness fits between the steel plate "shelf" under the outlet pipe on a rear vent. The thickness of brick would cover the bottom part of outlet pipe, or be lower taking up firebox loading space.
Locomotives use brick and call it a brick arch at the front of firebox to prevent direct heat from hitting the front sheet where exhaust flues are connected to the sheet.
So stoves should be steel, and locomotives brick. Because "that's the way it was always done".
 
Status
Not open for further replies.