Grandpa Bear help needed, please.

  • Active since 1995, Hearth.com is THE place on the internet for free information and advice about wood stoves, pellet stoves and other energy saving equipment.

    We strive to provide opinions, articles, discussions and history related to Hearth Products and in a more general sense, energy issues.

    We promote the EFFICIENT, RESPONSIBLE, CLEAN and SAFE use of all fuels, whether renewable or fossil.
Status
Not open for further replies.

dabills

New Member
Nov 7, 2016
15
LeRoy, NY
Hello all. I have many questions, please "bear" with me I am very new at this. I've been reading for hours and hours about my Fisher Stove. I love it. This forum is fantastic thank you all for your contributions.

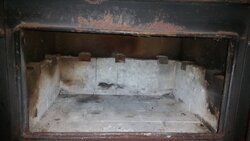
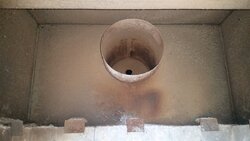
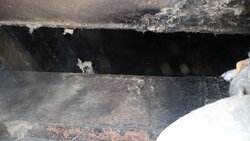
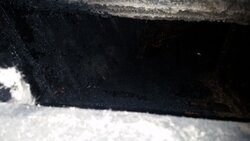
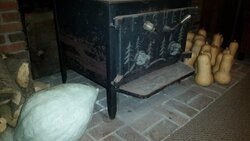
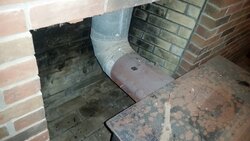
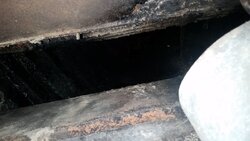
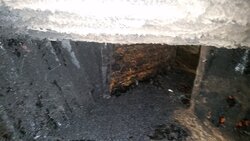
I moved into this home in December 2014 and it came with the stove sitting in an existing fireplace.. As it sits the pipe vents out the back and a couple feet up the existing chimney then stops. Some of the chimney tiles are slightly out of alignment with an inch or two gap here and there so I have not felt entirely comfortable burning it. Tell me if I'm off base here. My thought is that I would get a chimney liner. My question is it has an 8 inch vent but it seems that with that large of a vent I would be losing a lot of heat. I would also want to burn sometimes with the door open and screen in. Would it be wise to go to a 6 inch, would I have enough of a draft? Please see pictures,. I think I would have a tee that would go up the beginning part of the chimney then about 3-4 feet of an angled piece maybe about 50-60 degree angle and then it's a straight shot(not sure if I could get to the straight shot without one more angled piece aimed towards the back of the chimney or not) to the top of the chimney. It's about 25 feet in total. Would I go with a straight pipe or a flexible pipe. Is the main advantage of a non flexible pipe the ease of cleaning? I don't know with that angle if it would be possible to use a straight pipe. Do you think a beginner would be able to install liner? Flexible seems like it would be easy. Double or single wall? Any recommendations?I don't think a professional would go from an 8 to a 6 anyways but I'm unsure of that. I also plan on putting in a baffle that I have read about.

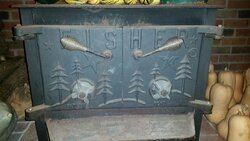
I'm also trying to figure out how to source firewood without buying it. Please let me know if you have any advice. That seems like a difficult hurdle. I have found some black walnut and other hardwood for about 52-55 a facecord which doesn't seem too bad. I think overall it would be cheaper than heating oil but I would like to cut my own wood or get it for free somehow. I have loads of box elder but I read that since it is so soft it is not the best for winter heating, although it makes a decent shoulder wood. Any idea how many facecords of a decent hardwood it would take to heat all winter in western NY? It gets cold in the winter. House is 2000 sq. feet and stove is in the basement. Lastly what can you tell me about the stove I included some pictures for fun, tell me what you think! Thanks in advance. Hopefully Coaly stops by he seems to be the expert around here. If you have any questions for me or want more pictures just let me know.
 

Attachments

  • 20161107_190830.jpg
    20161107_190830.jpg
    95.3 KB · Views: 419
  • 20161107_190835.jpg
    20161107_190835.jpg
    94.7 KB · Views: 414
  • 20161107_190922.jpg
    20161107_190922.jpg
    125.3 KB · Views: 392
  • 20161107_190931.jpg
    20161107_190931.jpg
    81.6 KB · Views: 400
  • 20161107_191823.jpg
    20161107_191823.jpg
    96.6 KB · Views: 410
  • 20161107_190818.jpeg
    20161107_190818.jpeg
    118.7 KB · Views: 404
  • 20161107_190851.jpg
    20161107_190851.jpg
    117.8 KB · Views: 401
  • 20161107_191255.jpg
    20161107_191255.jpg
    105.7 KB · Views: 407
  • 20161107_191249.jpg
    20161107_191249.jpg
    134.4 KB · Views: 398
Last edited:
For firewood Craigslist often advertises cut it and you can have it, or cut it cheap by the truckload. Also tree trimmers leave piles along the road.

I'm not the expert here but my guess is you will need to reduce the flue pipe to 6" and run it all the way up the chimney.
If you see loose, out of aligned tiles I would defiantly not burn the stove until ether the chimney is repaired or a liner is installed.
 
From what you describe the install as it sits does not meet code and the truth is can be dangerous. Search slammer here to understand the concerns. *If the flue pipe actually goes up and attaches to a plate permanently to the old damper or clay tile that is a legal install but not desirable.

So good idea to add a liner but it is against code to reduce from 8 to 6". There is a resident expert on Fishers here who will most likely chime and tell you if it would work but technically that's not OK.

As nice as Fisher's are they are old tech so you'll have to decide if you want to line with an 8" knowing most modern stoves use 6" if you ever want to change.
 
There's lots of info here on reducing the pipe from 8" to 6" and how to improve the efficiency of these stoves.
 
  • Like
Reactions: jatoxico
I have a Grandma Bear that I went from 8" to 6" with 32 ' of double wall stainless. I get a phenomenal draw . I installed a damper to slow the draft if I ever had to . I also have a Hearthstone Mansfield that is about the same size stove that has a factory 6" flue , so it works . But as far as up to code , I don't know. Its your call.
See my thread https://www.hearth.com/talk/threads/grandma-bear-retrofit-with-secondary-air.140515/
 
  • Like
Reactions: jatoxico
Yes adding a baffle can be a big help. There's a thread or sticky on the topic in the older stoves forum I think.
 
Welcome to the Forum;
As you probably read, the 8 inch outlet was for open door burning and allows more heat up the chimney for larger existing fireplace flues. As mentioned above it is technically against code to reduce a pipe or flue smaller than the outlet size of stove more than 1 inch. Many do and you'll notice more for sale with a reducer to 6 than with 8 inch pipe! You won't have a smoke issue with open door burning reducing with a direct connected liner all the way up. If there is room, it should be insulated. Many have added baffles along with the reduced flue with no smoke roll in issue.
The chimney pros can tell you what fits and how difficult to get different types of liners in. It may be stepped around obstructions making it very difficult even for a flexible liner. Not sure if that can be answered without looking at it.

As far as wood consumption, is the basement 2000 sf as well, insulated or finished?
I heat with wood only and like 7 full cords on hand here in NE PA. I've had very mild winters when only 2 were burned but the norm is 5 to 7. Since it's my only heat source I stock a little heavy, more like 10. I have a second chimney with a coal stove, so every few winters we take a break from wood and burn 2 tons of coal. That's just over 200 a ton now but as simple as dumping a bucket or two in a day and shake morning and night for very even heat. If I had to buy either fuel, it would be coal hands down.The reason I don't do it all the time is the wood stove in in the middle of kitchen with an oven, huge stove top, and 25 gallons of hot water. The oven is always ready to bake at 350* all winter, and my wife likes it better than the gas range. So it's not difficult getting help with wood. (OK, sometimes she does more than I do)

My decision back in 1985 to cut my ties with the oil furnace was due to getting a Goldilocks and having 2 1/2 wooded acres here with many neighbors that don't burn wood. Since then I retired and own a few rental homes with wooded acreage that introduces me to another batch of neighbors as we bring foreclosed homes up to speed to rent. Two years ago I was given about 10 cords 3 miles away and this year was given a lot more that has been cut to length and piled improperly for 2 years or more. This time it's 10 miles away and I wouldn't want to haul farther than that. I've never had to buy it, so that makes wood a good choice for me. When I do cut a tree, it's standing dead or storm damaged. Since our older stoves are not too finicky about the fuel quality, I'm never ahead with enough seasoning all summer like it would have to be with a secondary burn stove. The stuff I get has been cut and down awhile so I split immediately and my wife is the stacker. Mostly oak or hickory seems to be 28 to 30% when I split it, and within a month or so is 18%. Apparently 2 or 3 year old cut to length drys quick criss-crossed and top covered. Most of the bark falls off hauling and splitting and doesn't make a mess inside. So when someone says I've been trying to get rid of this wood a long time, they are happy to get rid of it and it works for me. Many times I'm out getting wood from their property and someone will stop and ask if I want more. When you get some smoke coming out of that chimney, some may ask if you want wood too. Let people you work with or meet anywhere know you burn wood and you'll be surprised how many people want a tree taken down or have some laying around.
 
I have a Grandma Bear that I went from 8" to 6" with 32 ' of double wall stainless. I get a phenomenal draw . I installed a damper to slow the draft if I ever had to . I also have a Hearthstone Mansfield that is about the same size stove that has a factory 6" flue , so it works . But as far as up to code , I don't know. Its your call.
See my thread https://www.hearth.com/talk/threads/grandma-bear-retrofit-with-secondary-air.140515/


I like your build. Could you explain how the secondary air manifold works? I'm not really clear on it. Pros/cons?
 
Coaly, thanks for the response. Upstairs is about 1500 sq feet, downstairs 500. All is insulated. I got the idea that you weren't a big fan of the secondary air manifold in Mark Cline's thread. It burns at a lower temp as I understand?

The Grandpa Bear takes coal as well? That may be an idea until I get my wood stockpiled up. I think there is plenty of space in the chimney for a 6 incher but I'll take some measurements. I gather that the flexible pipe is a little harder to clean. My plan would be to reduce right at the stove with a T then run the liner right up the chimney. Does anyone know if I should close of the opening on the bottom of the chimney with a piece of sheet metal with a hole in it that the chimney can go through? Seems like a lot of heat would escape up there. Also would you recommend doing anything else to the stove besides add a baffle?
 
Last edited:
  • Like
Reactions: tommyleacher
I like your build. Could you explain how the secondary air manifold works? I'm not really clear on it. Pros/cons?
I built my manifold after seeing how my hearthstone mansfield worked , the mansfield has a glass door so you can see the smoke ignite and burn off the secondary air.. It burns very clean ,efficient and hot , I don't think it burns cooler than just a baffle. Completely opposite , it burns the smoke which would have gone up the chimney and lost .It puts more usable heat into the living space rather than up the chimney as unburned smoke/ gas.
 
Because the flexible liner is single walled, from what I've read it needs to be wrapped with insulation before installation, this will help with heat loss and flue draw.. All the major pipe supply stores/websites carry it. If/when i install my insert I'll look into covering the masonry opening going into the chimney with sheet metal.
 
Last edited:
Ok I ordered 25 feet of flex king HD. I have an adapter running directly from the stove outlet (out the back) that goes from 8 to 6 then it goes into a tee then directly to the liner. I'm gonna have to ovalize or cut away the damper in the chimney. I am also insulating it. My question is do I need a baffle? I have read that it's recommended but the only place I can put it right now is on the horizontal tee right next to the stove. The only other option would be to get a 12 inch piece of straight stainless pipe above the tee, install the damper in that, and then run the liner off the top of that. Coaly where do you get those large diameter hole dampers that you posted a picture of in another thread/?
 
I would put a damper in just in case you want to burn with open doors and screen to view fire. It's also an emergency brake if you take an exceptionally long time with a piece of wood stuck in the door. This becomes your only control to slow the fire with doors open.
Antique dampers on eBay. They don't have to be expensive collector Griswold brand.

I tried a secondary air inlet that worked fine for a couple hours of usable heat, then a pile of coals for an extended period of time that didn't heat for as long a time duration as I need. Only by feeding a log or two on top to keep it filled would it provide constant heat for my entire house. I'm not here every 2 or 3 hours to feed it slowly. It was more efficient on the wood and house temps dropped. I burn 24/7 to heat the house, not save wood. Others may disagree.
 
Thanks for the response. Do you know if it is ok to put the damper right in the tee pipe after the 8 to 6 reduce where the stove vents out the back? Maybe 5 inches from the stove on a horizontal section of pipe. Everything I've been seeing says vertical somewhere above stove. The old 8 inch damper is on the horizontal run right next to the stove though.
 
There was a coal grate available but does not work as well as a coal stove with hard coal. Mixing soft coal with wood is a practice in some countries but smokes black unlike smokeless hard coal you want to use. Coal must have lots of oxygen moving through it and the only way is burning on a grate with little to no leaks around the grate. It then takes a secondary air source above the fire to allow coal gas to ignite which causes a blue flame across the top. It is also corrosive to metal liners which is the reason for more expensive grades of stainless for coal burning.
 
Doesn't matter where the damper is. It is a variable resistance that slows velocity of flue gasses. This in turn reduces draft which slows air coming into intakes. Normally cracking intakes slows it enough, but when starting with kindling and cardboard it may want to roar up the stack, and this is a good time to slow it with damper, not depriving the new fire of oxygen by closing off air.
 
Doesn't matter where the damper is. It is a variable resistance that slows velocity of flue gasses. This in turn reduces draft which slows air coming into intakes. Normally cracking intakes slows it enough, but when starting with kindling and cardboard it may want to roar up the stack, and this is a good time to slow it with damper, not depriving the new fire of oxygen by closing off air.


Thank you so much for your help. You have no idea how much you have helped me.
 
Your welcome. Somehow I missed your post and questions on Tuesday.
Since no one answered how the secondary intakes work, I'll give you a quick explanation;
Air rushes into any stove due to first heating the chimney flue so rising gasses lighter than outside air cause a low pressure area or vacuum in the connector pipe and stove. Atmospheric air pressure pushes INTO stove intakes feeding fire oxygen. After starting a secondary burn stove, you close off the primary intake like yours has and a tube under baffle plate is open to atmosphere that looks similar to a gas burner on a BBQ grill. I made mine with a hollow baffle plate with holes in the bottom plate for air admission.The key is getting the baffle and smoke hot enough first, along with preheated air to not cool the upper combustion area. When primary is closed, atmospheric pressure can only push into the tube with holes under baffle where smoke is present igniting smoke particles. The ability to burn was always there, but not enough oxygen was present. It is best to use a glass door stove to be able to tell when the secondary combustion is burning above the smoldering wood feeding it smoke. Otherwise you have a smokey fire worse than your moderately smoking stove. By angling the baffle and holes towards the glass you can get a hot clean burn that keeps the glass clean as well. I found this reduced the stove top temp below cooking temperatures. You also need very dry wood since it only takes a little steam or extra water vapor to quench the upper combustion zone. Hence the need for wood with less than 20% moisture content.
 
Hello again. Well my liner came today and I just finished cleaning the chimney in preparation for the new liner. Then I just have to insulate it and I can begin the install. Gonna wait until my buddy is available because it seems like a two man job lowering it into the chimney and I don't think my wife is up to it. So here's my question. I have an 8 to 6 reducer to connect the stove to the "snout" I believe it's called. Since the stove is 8 and the reducer is 8 then the reducer is 6 and the snout is 6 I am trying to figure out how to best install this portion. Do I need to crimp? Use some sort of collar? Could you explain how this works? Do I need caulk or screws or anything? Thanks.
 
If the 8 inch side of reducer is crimped, the 6 inch pipe may fit the female 6 inch side?? We don't know the liner OD.
Normally screw each joint together with 3 screws, but this is more of a question for the chimney pros that is not Fisher specific.
 
None of it is crimped but I'm going to crimp it. Just wondering if I need to use screws on stove connection? I'd rather not drill holes in it if avoidable. Thanks. I can ask chimney pros too
 
I've seen many with only one hole in the stove collar. As far as I know 3 is code and makes a solid connection. 1/8 hole with self tapper in the thicker collar works.
 
Status
Not open for further replies.