Hampton HI300 Installed! And questions!

  • Active since 1995, Hearth.com is THE place on the internet for free information and advice about wood stoves, pellet stoves and other energy saving equipment.

    We strive to provide opinions, articles, discussions and history related to Hearth Products and in a more general sense, energy issues.

    We promote the EFFICIENT, RESPONSIBLE, CLEAN and SAFE use of all fuels, whether renewable or fossil.
Status
Not open for further replies.
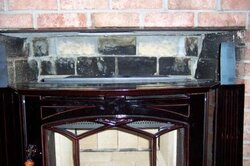
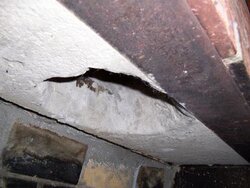
Well, here are the pics, enjoy. It is late and I have to get to bed, but this has been quite an experience. I am not sure where to go from here, to be honest. The only place they have insulation right now is on the top piece of surround. I think what has happened here is that the people I am dealing with seem to be very knowledgable about chimneys, but not so about wood stoves and venting them. They have just gotten into the business of installing them, and got me a great deal on the stove itself, but I am afraid I have received some extra heartache for my bargain.

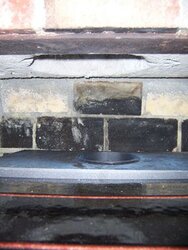
What happens if I get a pipe installed from the stove up into the flue (it is a corner chimney, so the flue makes a fairly immediate turn) and a block off plate? What are my issues then other than it maybe not drafting as well and not having the required area in front of the stove.

Again, thanks for any and all opinions.

p.s. It is 9" from the stove to the flue opening
 

Attachments

  • stove installation-wide-web.jpg
    stove installation-wide-web.jpg
    25.1 KB · Views: 449
  • stove installation-flue detail-web.jpg
    stove installation-flue detail-web.jpg
    22.9 KB · Views: 455
  • stove installation-cu-web.jpg
    stove installation-cu-web.jpg
    20.9 KB · Views: 469
Man that's an ugly installation.

Honestly, I wouldn't even consider using that stove without the complete liner. If you direct connect it though, you will definitely deal with reduced draft, specifically if you have to make an immediate jog to one side or the other. The draft may be decreased to the point that the stove won't operate well at all except under nearly full open air control.

Like has been said previously by a few, I'd run the full liner.
 
That would definatly be what we call a "slammer". Might want to suggest to that dealer- that they actually open the installation manual on their next job, before they start someones house on fire.

*Why the heck is it that if you put the word dealer followed by anything that starts with a "t" is takes out the space! Drives me nuts.
 
What the hell is the third picture on the right? Is that where the poured the liner and filled the damper? or is that some kind of insulation
 
elkimmeg said:
What the hell is the third picture on the right? Is that where the poured the liner and filled the damper? or is that some kind of insulation

Looks like the end of the concrete liner. See the brick lintel.
 
I'm not going to argue with my cohorts here, but given the pictures and description, here is what I see.

The stuff at the firebox top looks like part of the poured cement liner......in other words, there is no smoke chamber, which is fine (if true).

According to your manual, the minimum installation would seem to be a pipe stub which went up into the flue - and was sealed with a sheet metal plate or adapter of some sort. A tight seal at the damper would mean they do not have to seal around the panels (to the fireplace front).

The BEST job, as mentioned clearly in the manual, is to line the chimney with 6" stainless steel pipe...however, this is going to cost a heck of a lot more than $550. Given previous posts here, it would probably average $1500.

So, yes, it is an installation (currently) that is in no way correct. The manual makes it clear that the MINIMUM install is a pipe stub or direct connect and that the best job is a full liner. Given the minimum manual suggestions, these three things are wrong:
1. No pipe
2. No proper seal of pipe to damper area (block off plate)
3. Improper front clearances

#3 is quite normal - in other words, many installs are done and the installers inform the homeowner of the need to get a stoveboard, piece of bluestone, etc to extend the hearth. However, they should have informed you of this both before and after.

#1 and #2 are definitely sins of omission. In some ways, it is better than doing a botched up install - they didn't mess anything up - they just didn't do anything! Basically, they just delivered the unit! That should cost less than $250, even considering setting it on the hearth! Now it has to be installed...
 
I agree......you need to at a minimum do the following:

1) get a short section of liner (enough to get about a foot or so into the 10" flue they poured) and connect it to the stove using a stove connector and push it up a foot or so into the 10" flue.

2) get a block-off plate installed that surrounds the liner and seals to the bottom of the flat liner they poured. If you don't do this here's what will happen: as the chimney draws air and flue gas up into the poured liner it will "entrain" (pull) massive amounts of room air around the surround up with it and this means your house loses heat. Sealing the surround WON'T work because while it stops room air from being entrained and drawn up and out the chimney, you have then forced your stove to draw combustion air from the only other pathway available which is from the spent flue gases which are trying to exhaust up the chimney....this means your stove won't work properly (unless your stove has an outside air kit). Also, not only does this counteract/kill the chimneys draft but there's also insufficient oxygen for combustion in spent flue gases and your stove becomes a cresote factory and works poorly if at all....

3) do NOT block off the surround with insulation. The stove draws it's combustion air from your room (unless you have already vented it to the outside with an outside air kit) in which case you could seal the surround


to recap: doing #1 and #2 gives the stove it's own sealed and dedicated exhaust pathway that will prevent combustion gas from being sucked back into the stoves air intake. Leaving the surround open to the living room (meaning DON'T seal it) allows the stove to have it's own dedicated pathway to draw clean air into the combustion chamber (unless of course your stove has an outside air kit in which case you could seal the surround).
 
Cast to be code compliant the cross sectional code requires a full liner it is an exterior exposed chimney the area is too large to do a direct connection.

Also missing is the flue adapter required to connect to the liner. It alttaches to the flue opening and is held in place using sheet metal screws and 3 angle brackets

Cast you are correct if there is a decent seal around what used to be a damper with a plate then the suround would not need the fiber glass slealing strips..

Another more alarming observation, I have inspected recast liners. I have never witness one where the damper is fliied in like this. Usually it is the liner. The damper and throat area is not filled. It is criticle to channeling smoke up the chimney, by code a damper is required . The entire dymanics of the original fire box and throat has been altered , eventhough the liner size maybe ok,
I doubt it would ever work properly as a fireplace again. Unfortunately it was done by people that had no clue as to what they were doing. In fact as a fireplace. I would have to fail it due to the fact the normal smoke chamber shelf damper and throat have been filled in and altered.

Truth be told, instead of pouring a liner a insulated liner would have surficed, therefore not needing a poured in liner and he would still have a fire place usage. Again a 10" ss liner could have been installed without altering and filling in the damper throat and smoke shelf. What a shame how it turned out. The installers of the poured in liner BS here because they had no idea of what they were doing.
 
These guys told us our chimney was damaged by a lightning strike, and we had to have it repaired no matter what. There were some cracks in the tiles toward the top of the chimney and one stove dealer (different than the guys that did the "install") was trying to get us just to put a SS liner all the way up, but when we told him about the damage he said we couldn't do that, the chimney had to be repaired first. It is killing me that we could have possibly just put in a SS liner and got the stove and we would've been all set. It seems like lots of people on here have SS liners, but I had heard some not so good things about them, like having to replace them from damage. I guess that's what sold us on the poured liner, it fixes the structural problems, doesn't need to be replaced, etc. Now look where we are.

What would be the best course of action, getting a 6" SS liner dropped inside my 10" poured liner, having a direct connection from the stove to the chimney top? I can't believe I am going to have to spend another $1500 to make this install right.....
 
Hmmmm, I dont think we have run into any severly damaged chimneys. We always just drop a 6" SS liner though, havn't really had any problems with them.
 
As others have said, the optimal fix is to drop a 6" liner down from the chimney top, however you probably don't need to worry about insulating it, which will save you a bit. This appears to be the only 100% code compliant solution.

I would have some definite firm discussions with the firm that did the work, possibly drag in the insurance co. that gave them the business, and point out that they have RUINED the functionality of the hearth as a fireplace by filling in the damper and smoke chamber area, and forcing you and all future owners to run stoves or inserts, but that the resulting poured flue was also not code compliant with running a stove without a liner... I would point out that you wouldn't be subject to additional labor if they had done the job right (and per the specs you said you were asking about in the first place) - I would say that you shouldn't let them charge you for more than thier cost on the SS liner, and would be tempted to try to make them eat that.

Did you pull papers / get inspections done on this? I'm no fan of gov't inspections, but if you did, I'd certainly call the inspector (or threaten to) and show him the violations - I can't speak for Elk, but I know in other cases he has been willing to work with out-of-town inspectors to show them just what code requires... This can get expensive for the company, as it leads to the inspector wondering "I wonder how many other jobs they did like this..."

You also need to fix your front clearances - this is NOT the chimney outfits job, IMHO, as it looks like the original fireplace was compliant, but the way the insert (which looks nice in the space otherwise) sticks out, you need to look at a couple of things -

1. Does your mantle have any clearance issues? Depends on exact distance above the insert, and how far the mantle sticks out - see your owners manual, this varies by stove. You may need to put some sort of heat sheilding under the mantle.

2. As many have already mentioned, you need 18" in front of the insert, and it looks like you only have about 6" going by the bricks. There are lots of ways to fix that, some depend on what the insert requires for R-values, but I think the neatest way to do it is to remove a strip of the carpet and floor boards in front of the hearth, then build back up with Micore, Durock and tile until you have something about even with the rug - can look nice and be fully compliant.

Gooserider
 
Well, just to update any interested parties, I called the installer and asked him if they got a permit and he said no, but he can do it no problem, he just wants to wait for the new surround that will cover the entire opening of the fireplace. He said this will pass inspection.

So, we will see. I'll let the inspector and him go at it and see what happens. I tried to tell him about our reservations of the install and he basically said that it will work fine and that I don't understand the dynamics of the fireplace, which I admit I don't. So, I'll make sure the inspector checks it thoroughly and go from there.

BTW, the inspector already passed the reline (for use as a fireplace), so I don't know how that flies with what I've been hearing from the experts here.....
 
Claws do you want me to e-mail you the codes concerning your issues so that you can present them to the inspector prior to inspection?
I'll bet the outcome will become more favorable for you, if the inspector knows you provided him codes detailing your concerns.

I have already voiced my concerns, all of which can be backed up by code concerning you insert installation and your relining..

Ask you installer what is the NFPA 211 cross-sectional code. See how he BS'S his way around that or out and out lies to you.
After that you should get the full picture of his character and know at what point to believe the BS he is dishing

The 2004 NFPA 211 references chimney position in the building( which influences the temperature of flue gases and therefore draft), for maximum flue sizes.
“ The cross-sectional area of the flue of the chimney with NO walls exposed below the roof line, shall not be more than 3 times the cross sectional area of the appliance collar. The cross-sectional area of the chimney with one or more wall exposed to the outside below the roofline, shall not be more than 2 times the cross-sectional area of the appliance.
 
That would be great, Elk. I'll PM you my email, thanks alot.
 
If elk is correct, and I suspect he is, then the smoke shelf should not have been filled in (eliminated) by the new liner, and the inspector should not have passed it. Not even for fireplace use. Isn't that right, elk?

If the above is true, a red flag should go up regarding the inspector. This could be a case of the blind leading the blind.
 
2003 NFPA 211

Chapter 12 Solid Fuel-Burning Appliances

12.4.5 Connection to Masonry Fireplaces.
12.4.5.1 A natural draft solid fuel-burning appliance such as a stove or insert shall be permitted to use a masonry fireplace flue where the following conditions are met:
(1) There is a connector that extends from the appliance to the flue liner.
(2) The cross-sectional area of the flue is no smaller than the cross-sectional area of the flue collar of the appliance, unless otherwise specified by the appliance manufacturer.
(3)* The cross-sectional area of the flue of a chimney with no walls exposed to the outside below the roofline is no more than three times the cross-sectional area of the appliance flue collar.
(4) The cross-sectional area of the flue of a chimney with one or more walls exposed to the outside below the roofline is no more than two times the cross-sectional area of the appliance flue collar.
(5) If the appliance vents directly through the chimney wall above the smoke chamber, there shall be a noncombustible seal below the entry point of the connector.
(6) The installation shall be such that the chimney system can be inspected and cleaned.
(7) Means shall be provided to prevent dilution of combustion products in the chimney flue with air from the habitable space


2006 direct cut and paste

RESIDENTIAL
CODE®
FOR ONE- AND TWO-FAMILY DWELLINGS

Part V — Mechanical
CHAPTER 18 Chimney& Vents
MECHANICAL

M1803.4 Connection to fireplace flue. Connection of appliances
to chimney flues serving fireplaces shall comply with
Sections M1803.4.1 through M1803.4.4.

M1803.4.1 Closure and accessibility. A rigid noncombustible
seal shall be provided below the point of connection to prevent
entry of room air into the flue. Means shall be provided
for access to the flue for inspection and cleaning
 
pulldownclaw said:
Well, just to update any interested parties, I called the installer and asked him if they got a permit and he said no, but he can do it no problem, he just wants to wait for the new surround that will cover the entire opening of the fireplace. He said this will pass inspection.

So, we will see. I'll let the inspector and him go at it and see what happens. I tried to tell him about our reservations of the install and he basically said that it will work fine and that I don't understand the dynamics of the fireplace, which I admit I don't. So, I'll make sure the inspector checks it thoroughly and go from there.

BTW, the inspector already passed the reline (for use as a fireplace), so I don't know how that flies with what I've been hearing from the experts here.....

Correct me if I'm wrong Elk, but I thought if one was going to pull a permit, you are supposed to do so BEFORE the job starts, not after it's finished :question:

Among other things a good inspector will want to see what's behind that new surround, preferably BEFORE it goes up so that one can look without taking the surround off... Given that this guy seems to be yanking your chain, it might be very much worth calling both the inspector and the insurance co. and letting them know that the installer appears to be trying to sneak defective work through by not following proper permit procedures.

Gooserider
 
I got this Pm from claws
Hi Elk,

I’m sure you haven’t forgotten, since it was such a messed up job, but the oversized surround is finally in for our Hampton and I am planning on finally getting the inspection done. Anything else you recommend I do other than showing the inspector the code you posted in the thread?

Thanks for your help.

what happened to the liner block off plate?
 
My plan was to show the inspector the installation as is, when they bring the oversized surround, and then continue the discussion at that point as to what exactly should be done, and who should pay for it. I guess the consensus of the thread has been that at the very minimum I should have a short section of pipe go up into the poured liner with a block off plate and make sure not to seal around the surround, and the optimum situation would be dropping a ss liner all the way down. Is the block off plate something that can be purchased, or is it always a custom job?
 
Blockoff plates are basically custom as there is to much variation in setups to make them a stock item. OTOH since it's basically just a hunk of sheet metal or two, cut to fit between the pipe and the damper opening, they aren't that hard to make, and "fancy" doesn't really matter.

I would also say that you should NOT accept the "direct connect" (short pipe into the chimney) approach. As mentioned it may not be legit code-wise, and it certainly is a poor solution from the standpoint of cleaning and maintainance. Hold out for the full length liner, even if you might have to pay a little extra for it.

Gooserider
 
I thought that I'd post this at the end of my old thread for the people that are getting installations done soon......

Well, for all interested parties, I got my "installation" inspected today, and it failed. Big surprise. The installer tried to put some stovepipe up into his poured liner, stuff some insulation around it and hold it in with some bricks.

After it failed I called him up and told him to make me a blockoff plate and bring it when he comes to patch up my crown. I just ordered a 6" 316ti liner kit from chimneylinerdepot.com (having a good sale right now on 6" kits) and I'm going to do it myself, with some help from a buddy.

Now for the installation questions. It seems like you use refractory cement at the connection to the stove and around the liner where it goes thru the blockoff plate? And high temp silicone around the outer edge of the blockoff plate and at the top cap? Anything else?

Thanks to everyone for your help, we are beyond relieved to be nearing the end of this nightmare and anxious to get burning!!!
 
You pretty much have it right - refractory cement at the junctions between the pipe fittings, and around the block-off plate, High temp silicone between the blockoff plate and the fireplace wall, and to seal the top plate for the liner to the cap.

In one minor way, the botched job on the poured liner where they filled in the smoke chamber will make things a bit easier for you... You now have a nice flat surface for your blockoff plate to seal to, all you basically need is a "donut" as big as the stainless liner on the inside, and bigger than the poured liner on the outside, then you can just put on a bead of silicone and tap-con it into the poured liner, no need to do fancy shapes or other such.

Gooserider
 
Status
Not open for further replies.