Hampton Wood Insert - Just Installed

  • Active since 1995, Hearth.com is THE place on the internet for free information and advice about wood stoves, pellet stoves and other energy saving equipment.

    We strive to provide opinions, articles, discussions and history related to Hearth Products and in a more general sense, energy issues.

    We promote the EFFICIENT, RESPONSIBLE, CLEAN and SAFE use of all fuels, whether renewable or fossil.
Status
Not open for further replies.

Nebrsmithers

New Member
Oct 14, 2007
43
Northern Alabama
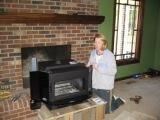
Put this stove in with a little help from my dad. I decided to DIY the project after finding out from the retail installer that he would not do the install the way I wanted. (ie: he told me I did not need to clean/ have a chimney inspection done prior to the install, there was no need for a top plate and, last but not least, a damper block off plate was a waste of time.) Frankly the guy's lack of installation knowledge, or his unwillingness to communicate it, scared me a little bit. Or maybe I spent a little to much time on hearth.com getting advice about the proper installation techniques. :)
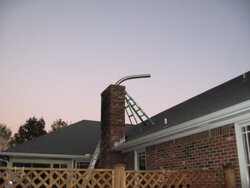
Regardless, the job is done! The way I wanted it done! I had the chimney cleaned and inspected, put in a full SS liner w/ a terracotta top plate, a block plate at the damper that is sealed up nice and tight, I also leveled the hearth with masonry cement & a piece of 22 ga sheet metal just to make life a little easier.
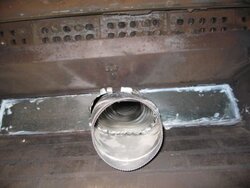
The liner was a cinch to drop in and because I have the last 2 ft of the pipe ovalized; it slipped easily thru the damper area. The toughest part of the install was connecting the stove to the liner, because the stove was forward a few inches from flue opening. No worries though, we pushed the stove far enough back to connect the the sleeve easily, used the metal straps supplied with the stove to anchor it and then dad went up on the roof and pushed on the liner as I pulled on the stove. We were able to slide it forward enough to get the surround on. And "wall-la" the install is complete! It's all over but the burning.

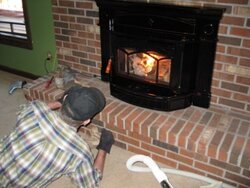
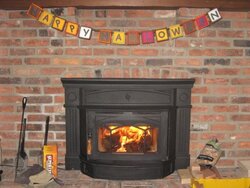
Dad and I fought over who would start the first fire; he won. I figure he earned it. Be carefull, all you dad's out there, your daughter's are watching and learning your values. I will happily admit to being my father's daughter. I admire all his hardwork and even though I hated cutting and hauling the wood as a kid; I love it now! In fact, I saw that a neighbor took down a nice oak yesturday and left the wood out by the street for pick up, so I am off to load it up in the truck/haul it home and split it with my maul.
 

Attachments

  • Hampton Install020resz.jpg
    Hampton Install020resz.jpg
    17.6 KB · Views: 2,109
  • Hampton Install001resz.jpg
    Hampton Install001resz.jpg
    12.2 KB · Views: 2,072
  • Hampton Install027resz.jpg
    Hampton Install027resz.jpg
    23.2 KB · Views: 2,128
  • Hampton Install008resz.jpg
    Hampton Install008resz.jpg
    28.2 KB · Views: 2,218
  • Super Installer002resz.jpg
    Super Installer002resz.jpg
    22 KB · Views: 2,207
  • Hampton Install016resz.jpg
    Hampton Install016resz.jpg
    5.1 KB · Views: 2,435
That's a classy insert;enjoy your carbon-neutral heat.
 
Oop's I wanted to ad a few more pic's. I also put a "first burn" video on u-tube: http://www.youtube.com/watch?v=-K9GilA1bOA
With my husband in Iraq and family spread out in Nebraska and Kansas this is the best way for them to see what I am up to around the house.
Big shout out to my dad, who is on a plane back to Nebr; "Love you Dad, thanks for all your help!"

And a big THANKS! to all the hearth.com experts who offered help and advise, I wouldn't have attempted this DIY or known proper installation technique's without you!
 
Good job, you educated yourself and did it right the first time. You will be happy with the enamel it looks real good. Now go back and slap your dealer upside the head >:-(
 
Nebrsmithers said:
Oop's I wanted to ad a few more pic's. I also put a "first burn" video on u-tube: http://www.youtube.com/watch?v=-K9GilA1bOA
With my husband in Iraq and family spread out in Nebraska and Kansas this is the best way for them to see what I am up to around the house.
Big shout out to my dad, who is on a plane back to Nebr; "Love you Dad, thanks for all your help!"

And a big THANKS! to all the hearth.com experts who offered help and advise, I wouldn't have attempted this DIY or known proper installation technique's without you!


Wow, nice vid. For someone new to woodheat you really know what your doing...That fire is burning just about perfect. You have done everything right, research, install, clean burn!
 
I grew up cutting, hauling, splitting and burning wood, so I wouldn't say I am new to it. Although, this was my very first insert install!

This insert makes burning a pleasure. I was giddy when the secondary burn kicked in!!! 
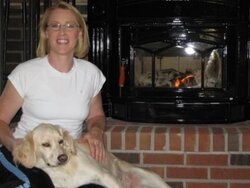
What a beautiful sight!
 
You go girl!!! Your stove is beautiful and you can sleep better knowing your install is safe because you did it the right way. Isn't the secondary burn better than tv? I'm sure your husband will be pleased to hear and see that you're keeping the home fires burning, so to speak. And all that wood hauling and splitting keeps you in great shape - abs of steel I tell you! You have a great Pop there helping you out - I hope you didn't test his patience too much - just kidding :p

My most heartfelt thanks to hubby, you and your family for your sacrifice in helping keep us safe. Hats off to you.
 
Very nice !!! . . have the same in matte black . . unfortunately I got to pay for the install ($400) but I thought the money was
well spent because my chimney is over 40ft. and I have only a 32ft. ladder.
 

Attachments

  • FirstBurn070001.JPG
    FirstBurn070001.JPG
    53.4 KB · Views: 2,064
Beautiful insert, beautiful install. You husband is one lucky guy.
Give him my thanks for such bravery and honor.
Take those photos to the dealer and tell him you'll offer him consults for a reasonably large fee. ;)
 
Absolutely awesome. Great job and a beautiful stove. Kudos to you and your dad and a salute in gratitude to your fighting man.
 
Awesome job you and your father did!
Your husband is going to be as proud
of you as you are of him.
Dog looks very happy too. Enjoy!
 
churchie said:
Very nice !!! . . have the same in matte black . . unfortunately I got to pay for the install ($400) but I thought the money was
well spent because my chimney is over 40ft. and I have only a 32ft. ladder.

That is a great looking insert!! ;-) I think you got a great deal on the install @ $400. Unfortunately for me the sales person quoted me $450 for installation, then the priced was changed to $650 by the "bid guy" who came out to take measurements. When I questioned this change, he told me it was because it would take 3 guys (instead of 2) to install the stove. I wouldn't have minded the change in price if the guy would have listened to my requests for a block off plate, but when he blew me off I decided I would have to do it myself if I wanted it done right. Besides a little Internet searching revealed they were up charging me $200 for the liner kit. (and not telling me what liner product they would be using.) I understand these guys are about making money, but, ultimately, I wanted and needed to know what they were installing in my house. After only a few, well spent, hours on this site I was knowledgeable enough to know that the liner you use is as important as the stove you install. With my husband overseas and no family for a thousand miles I needed to know that our little family unit would be safe! I couldn't sleep at night if I didn't have complete faith in the installation job. Thanks to my dad, I sleep like a log!
 
Nice Job!!!

I am in the process of installing my Hampton, waiting on the liner to come in the mail! One problem I'm having is acquiring the flue collar adaptor, did you get yours from the dealer, Hampton, or is it an aftermarket deal?

Looking forward to posting my pics once I'm up and burning :)
 
pulldownclaw said:
Nice Job!!!

I am in the process of installing my Hampton, waiting on the liner to come in the mail! One problem I'm having is acquiring the flue collar adaptor, did you get yours from the dealer, Hampton, or is it an aftermarket deal?

Looking forward to posting my pics once I'm up and burning :)

If you are talking about the connection from the stove to the liner, then yes it came from the liner company. They gave me the option to ovalize as much of the pipe as need and in the same token they would ovalize one side of the adaptor to the same diameter. Everything went together quick and easy.
The block plate at the damper was a home made job. Piece of tin, a pair of tin snips and some high-temp caulking. I got the piece of tin from a local Heating and Air contractor for free. Which was cool cause all the damper block plates on line were $80 to over $100. I stuffed some rockwool around the pipe, after we got the stove in place, to seal up the block plate a little better.
You are going to love this insert! Can't wait to see the pic's.
 
Status
Not open for further replies.