Happy Jotul Dance Also Question and Concerns

  • Active since 1995, Hearth.com is THE place on the internet for free information and advice about wood stoves, pellet stoves and other energy saving equipment.

    We strive to provide opinions, articles, discussions and history related to Hearth Products and in a more general sense, energy issues.

    We promote the EFFICIENT, RESPONSIBLE, CLEAN and SAFE use of all fuels, whether renewable or fossil.
Status
Not open for further replies.

Homesteader

New Member
Sep 1, 2008
29
Northern Michigan
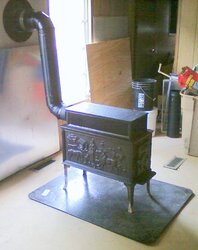
I couldn't contain my glee when I gave the guy $95 for an original Jotul-118. Yep, I gave it a once over and satisfied it was an original, I forked over the dough. When I lugged that beast into the house and started cleaning it my heart sank a little. On opposing corners of the top there are hairline cracks. One a little bigger than the other. Tipped it on it's side and noticed that a crack on the side relief split the pine tree right up the middle. It looks like it was brazed or maybe welded together. Probably welded because I can see a bead pattern. Also noticed that one of the side plates is diamond plate steel and not original of course. There are also several seams filled with furnace cement.

It's definitely seen better days. I'm only concerned about functionality at this point. Which brings me to a question? Where do I get an adapter that will fit? I'm running 6" black stovepipe to a stainless 6" supervent chimney wall mount kit. I measured the diameter of the stove flue and it's almost 4 1/2" in diameter. I picked up two 24" sections of black stovepipe and two elbows. If they make a 90 degree adapter I can take one of the elbows back. If not it's ok. Thanks. Also, why are there two removable plates on the sides of the box on top towards the rear? Just curious.

Pics:

Photo0109.jpg


Photo0105.jpg


Photo0108.jpg


Photo0107.jpg


Photo0099.jpg


Photo0101.jpg


Photo0106.jpg
 
I was able to get an adapter from a hearth store that sold Jotuls.

It took a bit of explaining, but they eventually figured out what I needed. I think it might have cost $30 or more. One thing you might notice is that the adapter comes with holes for screws, but the part of the stove it connects to doesn't. I drilled holes.
 
It's an original Jotul 118, though pictures of the cracks would be more helpful. Cracks in the areas you are describing are unusual. They seem to indicate either overfiring or issues with the interior burnplates (or both).

Can you provide the actual flue collar dimension. It sounds like a 125 mm collar, but it would be good to be sure. Adapters are available still. Here is one location:

http://www.stovepartsplus.com/Merch...M-05-124817-JOT-602BUL&Category_Code=JOT-602B
 
I'll get pics of the cracks and the flue dimension tomorrow and post them. I don't think it's a coincidence that one of the side burnplates is diamondplate and one of the sides had cracked. I think someone must have fired it up without a burnplate and cracked it. The weld seems to be holding though. The cracks on the corners I can deal with by forcing some furnace cement into them.

Thanks for the link....
 
Flue Diameter
Photo0122.jpg


Welded Side Panel
Photo0116.jpg


Rear/Right Crack
Photo0115.jpg


Front/Left Crack
Photo0113.jpg


The wall mount chimney kit that I bought yesterday was basically just the hardware at around $250. Had to go back today and spend another $132 for two sections of 36" insulated pipe to build the damn thing. All I need now it the adapter and I can start installing it.
 
Ok,

I ordered the 6" stovepipe adapter from the website link you gave me. That should be coming no later than next week. I removed one of the windows and left the aluminum window casing in place. The outside flange of the casing is 5/8" so I got a sheet of plywood sheathing of the same thickness. Measured the frame and cut the plywood to size.

Installed the mounting hardware for the supervent to the sheet of plywood. I had to set the chimney tee on the support and trace the diameter where it met the plywood. Then I removed the tee and set a long piece of supervent inside the circle I drew out. Slipped the outside thimble over and down the chimney pipe and traced that out on the plywood. Cut the hole out with a jigsaw and put the hardware back on to see if everything fit together nicely. Excellent work. Since the plywood is going to be exposed to the elements. I'm in the process of putting on at least two coats of polyurethane to protect the wood. I'll run a bead of caulk between the plywood and aluminum frame as an added measure.

I'm framing the inside of the window with 2x4 as a nailer for the cement board. The cement board will go up on the inside facing the woodstove and painted with high heat paint. I may put up two sheets, overkill? There is a ducted vent right under this window. I'm going to tie this vent into the bottom right corner of the cement board. In the top left I'm going to punch out another hole.

What this is going to accomplish it that as the Durock warms up behind the stove it will create a thermosiphon. Drawing in cool fresh air from the now defunct vents as the warm air inside the cavity rises and escapes into the room. The vent hole on the top left will have a closeable cover to prevent reverse airflow.

Photo0127.jpg


Photo0129.jpg


Photo0130.jpg
 
Well,

It's been four days since I ordered the adapter and I noticed that it had not been deducted from my account. I sent Stove Parts Plus an email last night and have not heard back from them. So I did some searching and found another online supplier of the same adapter for 1/3 the cost (shipping incl.). So I sent Stove Parts Plus another email telling them to disregard and cancel my order.

What happened is that Stove Parts Plus is in the process of jacking up their prices and the link was for the item at a cheaper cost. So when I did the checkout I was locked in for the lower amount. They can't overcharge my account because I ordered it cheaper than what they are charging now. Try that link again. You'll see now that the price has went up considerably.
 
I got my plug adapter last week and finished the installation the next day. A bit of overkill on my part for adding a metal heat shield with spacers behind the stove over durock. I spent the night for my test burn and the sheet metal never once got warm to the touch. I'm glad now that I didn't waste my time with the vented wall void.

Here's a pic anyhow. Can't wait to finally spend the winter off-grid.
 

Attachments

  • Photo0166.jpg
    Photo0166.jpg
    103.3 KB · Views: 582
I don't know if you noticed, but if you want to save some space in that room you can move the flue collar to one of two other positions.

There are removable plates on the sides at the back - you could rotate the stove 90 degrees clockwise or counterclockwise. I have done this, but at the same time I took a few turns out of the stovepipe, so I can't say whether there was a net effect on draft.

With that great heat shield you have on the wall you wouldn't have to worry about radiating a lot of heat into the wall (and out of the building), but I can't tell if you would then have clearance problems because the side clearance is more demanding than the rear clearance, or because a heat shield facing the side of the stove would have to be bigger than for a rear-facing heat shield.

But, it would keep the stove from sticking out into the room so much.

Just a thought.

One other thing - have you checked whether your floor protection is adequate? There's a lot of heat radiating out the bottom, and the requirements for an unlisted stove like that are pretty strict I believe. I can't tell for sure, but it looks like what you've got there is just a non-combustible hearth pad without any real insulation.
 
Awww man....

I had asked about those removable plates but no one answered. I wanted to put the stove like you suggested. I just never put 2 and 2 together that the flue could be moved to the side. I believe the clearance won't be an issue because with the supervent section and the elbow I'm a little over 2' from the heat shield. Twice the rated distance for using a spaced heat shield over a non-combustible wall. I'll check it again after I move things around and get back to you on the clearance.

The hearth pad is UL Listed, Steel over cement board. It says it is for use under woodstoves. I've got another sheet of cement board that I could cut in half and stack under the hearth pad if you think it's necessary.
 
Have you ever heard the expression. "If it's not broken, don't fix it."

Well now my Jotul is broken and I don't have the money to replace it with another stove. All the bolts snapped off and now I'm left with a hunk of scrap cast iron. I don't have any money to buy another woodstove and winter will soon be here. I have no way to heat my off-grid cabin.

Thanks for the advice!!!!!
 
If the bolts snapped off - or I assume the heads snapped off - you can drill and tap the holes. Not really a big deal - just know the size of the bolts and get a matching tap.
 
Ok... I'm going tomorrow with the flue collar and try to find an E-Z Out set that I can use to remove the bolts. I can't afford a tap set right now so I'm hoping this will work.
 
George what did I tell you when we talked on the phone? Don't worry, our collective experience will see you through any difficulty....You got the stove for next to nothing, It has at least another year or 2 or 3 or 4 before it dies. So breath easy my friend and do not worry. Ask yourself where will you be in 1 year from now or 2 years from now.... No one can predict that....See how easy we solved the broken bolts problems? The rest is just as easy. Have faith in me and in this forum, We will get you up and running.....a little furnace cement, a few new bolts, hey we are sailing....and in a few days you will forget all the problems you had.. Your problems are our problems and we are here to solve them for you....and remember what I told you about the distance back to Eden.....A long way right....so we decide to not sweat the small stuff.....George, you are on your way and you have this whole forum behind you.
Good Wishes, Joey Chang
 
Ran that stove before I picked up the new one. It is a very easy stove to burn with, wife actually cut her teeth on it and was very nice to her. Mine had a crack in one side as well. Stove is also nice with the fact that you can put some good length logs in that thing. Burns a bit quick compared to the newer stoves, but damper it down, make sure you clean the chimney often, and it will keep you warm for the winter.
Chad
 
I did a test burn the other night. I think I may have dampered it down too much. I noticed creosote (black glassy deposit) on the inside of the stove and the door. I'm gonna have to keep an eye on that in the future. The creosote that's on there will burn off next time if I make a hot fire right?
 
Status
Not open for further replies.