
Harmon Accentra Insert
- Thread starter jmcvinnie
- Start date
-
Active since 1995, Hearth.com is THE place on the internet for free information and advice about wood stoves, pellet stoves and other energy saving equipment.
We strive to provide opinions, articles, discussions and history related to Hearth Products and in a more general sense, energy issues.
We promote the EFFICIENT, RESPONSIBLE, CLEAN and SAFE use of all fuels, whether renewable or fossil.
You are using an out of date browser. It may not display this or other websites correctly.
You should upgrade or use an alternative browser.
You should upgrade or use an alternative browser.
- Status
- Not open for further replies.

Harman Lover 007
Minister of Fire
That auger is definitely missing a piece on the end. As far as whether or not that's a crack at the very end of the weldment/feeder tube....apparently I'm the only one seeing it so I'm probably wrong.
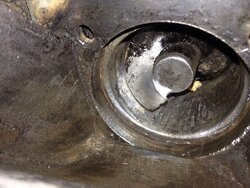
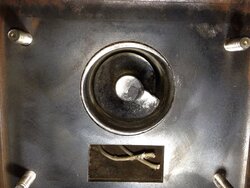
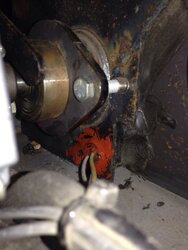
tell me the area inside the red box is not a crack and I'll go away happy!

tell me the area inside the red box is not a crack and I'll go away happy!
I
I do believe that is just a scratch, will check again when I get home. Appreciate your info.That auger is definitely missing a piece on the end. As far as whether or not that's a crack at the very end of the weldment/feeder tube....apparently I'm the only one seeing it so I'm probably wrong.
tell me the area inside the red box is not a crack and I'll go away happy!
View attachment 173702
I'm gonna pick up a good wire wheel tonight, like you said clean it up good to determine if that is actually a crack or not. I've been looking in the archives for a procedure on how to dissemble this stove just in case I have to remove feeder weldment and burn pot. Anyone have that information available? ThanksYeah, wouldn't hurt to make up a new burnpot gasket and see what that does, but the extent of the char there is indicative of a lot of air getting in.
IF that bright line is indeed well sealed with a weld, should be ok, else it has to be corrected. If cracked, it could be more symptomatic than causual.
The auger itself looks good to me.
If there is a jet of flame near that area still, or burning going on at the auger there is an air leak.
Maybe a part of the hopper assembly missed its RTV? Since new..?
Well when the burn pot is off, consider buzzing that suspect area on the weldment with a mini wire wheel to clean it up and be most certain.
Whatevery the root cause is, I suspect its been there for a good while.
Harman Lover 007
Minister of Fire
Burnpot is held on with the 4 nuts that you can see from the front. The studs that those nuts are attached to are a part of the feeder weldment. The weldment is removed from the back side which would require you to pull the entire stove out to a position that you could work on it. I assume that means "uninstall" it. It may actually be easier that your stove is an insert to access the weldment. On my free standing Invincible it was a major disassembly. Lets make sure you have a cracked feeder tube first!!
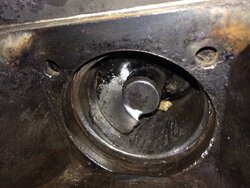
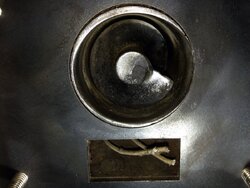
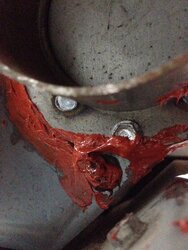
I just finished cleaning the burn pot and took some new pictures. I found what appears to be a void between the feeder weldment and burn pot at about 8 o'clock. I don't think it is a crack but I may be wrong.
Attachments

Harman Lover 007
Minister of Fire
That may be the very beginning of a problem and something to keep an eye on but I feel much better now that you have it clean and we can get a good look. The tip of your auger is definitely broken off so I would put that on your list of repairs after the heating season is over.I just finished cleaning the burn pot and took some new pictures. I found what appears to be a void between the feeder weldment and burn pot at about 8 o'clock. I don't think it is a crack but I may be wrong.
Yes, I see and concur the auger is compromised. Likely by the jet of air and resulting hot burn from the air leak aimed at the auger tip.
Time to get that burn pot off , find and correct the source of the rogue air. Either gasket and/or an open seam on the burnpot. After that, if the burn is still irregular, then there is air coming from the hopper/feeder.
Solve that before compromising a fresh auger
Time to get that burn pot off , find and correct the source of the rogue air. Either gasket and/or an open seam on the burnpot. After that, if the burn is still irregular, then there is air coming from the hopper/feeder.
Solve that before compromising a fresh auger
Last edited:
Sounds like a good plan. I'll need to order a new gasket today. What tools do you guys use to remove the nuts on the burn pot. Does appear the burn pot may interfere with a straight driver, it may not just haven't checked for clearance. I can't wait to get this resolved.
Harman Lover 007
Minister of Fire
Getting ready to order a new auger for my stove, any idea on how I can determine if I have the older style or newer one? The stove was manufactured in 2006, the serial # 012780. ThanksIt's either 7/16" or 1/2" nut. They come off easy with a wrench.
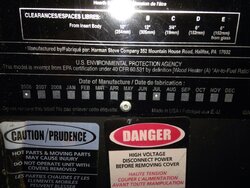
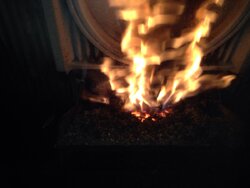
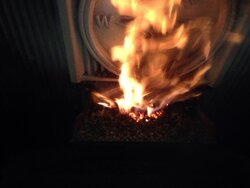
Changed the burn pot gasket tonight. Going to run it tonight and hope not to have the excess ash build up in the burn pot. I have a feeling I have a air leak in the hoper. Any way to check for the leak or should I just seal all the joints. I see it was sealed on the inside, I assume from the factory. Should I seal the outside? ThanksGot the correct part number for the auger and it is ordered. Picture of the manufactured date on the nomenclature.
Plan on taking off my burn pot to replace gasket this weekend. Hope to find source of air leak soon.
Attachments
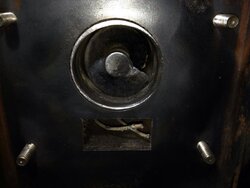
Thought I would take a few pictures of fire this morning and post, seems like it may be slightly better but I'm not really sure. Still seems to be burning towards the back of burn pot, I guess my next step is to seal my hopper/feeder. Any advice on proceeding would be greatly appreciated. Thanks.Changed the burn pot gasket tonight. Going to run it tonight and hope not to have the excess ash build up in the burn pot. I have a feeling I have a air leak in the hoper. Any way to check for the leak or should I just seal all the joints. I see it was sealed on the inside, I assume from the factory. Should I seal the outside? Thanks
Attachments

Lake Girl
Moderator
I have not done the seal check with a dollar bill, but I certainly will check that tonight. Thanks again.I went back and read that you checked the hopper lid gasket. Did you do the "dollar bill" test? Close the hopper lid on a dollar bill or piece of paper. If you can pull it out w/o tearing or too much effort, you have to replace gasket. Same with the burn chamber door...
Checked the gaskets using a dollar bill. My lid had pressure but not near enough to create a tear. The dollar slide out easily. My door had a tighter fit, again not tear worthy but close.I have not done the seal check with a dollar bill, but I certainly will check that tonight. Thanks again.
Lake Girl
Moderator
Sometimes you can adjust the latches on the hopper and door hinges/closures so they fit tighter (not sure on the Harmans). I do recall someone with an Englander Stove having to go larger on the gasket on the hopper so it would seal well.
I didn't see any adjustment on the hopper lid, the gasket looks good and appears to be sealing. The only reason I say that is because I can put my weight on the lid to compress the gasket more and I don't see any noticeable change in the flame when I do this.Sometimes you can adjust the latches on the hopper and door hinges/closures so they fit tighter (not sure on the Harmans). I do recall someone with an Englander Stove having to go larger on the gasket on the hopper so it would seal well.
We are just getting finished with a large cold front in N. Wisconsin so really have not done much with the stove this last week. The forecast has high 30's coming our way for the upcoming weekend. I'm planning to pull the insert out so I can seal all the hopper seams. I'm still not very familiar with the stove as we only been using it for 5 weeks, but am learning with the help from this forum. I'm thinking I might have to pull the hopper to be able to seal everything. If anyone is familiar with having done an Accentra insert please advise how to properly remove the hopper if required. Also, is there any other potential leaks points? Anything that I should be looking at? Any other gaskets that might need to be replaced? I should get my new auger this week as well, are there any gaskets that need to be replaced when replacing it? I appreciate everyone's feedback.
I didn't see any adjustment on the hopper lid, the gasket looks good and appears to be sealing. The only reason I say that is because I can put my weight on the lid to compress the gasket more and I don't see any noticeable change in the flame when I do this.
We are just getting finished with a large cold front in N. Wisconsin so really have not done much with the stove this last week. The forecast has high 30's coming our way for the upcoming weekend. I'm planning to pull the insert out so I can seal all the hopper seams. I'm still not very familiar with the stove as we only been using it for 5 weeks, but am learning with the help from this forum. I'm thinking I might have to pull the hopper to be able to seal everything. If anyone is familiar with having done an Accentra insert please advise how to properly remove the hopper if required. Also, is there any other potential leaks points? Anything that I should be looking at? Any other gaskets that might need to be replaced? I should get my new auger this week as well, are there any gaskets that need to be replaced when replacing it? I appreciate everyone's feedback.[/QUOTE
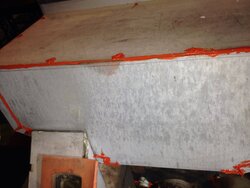
Pulled the insert out today, sealed all seams on the hopper , also sealed all likely looking leaks. The auger fastening bolts were loose, thinking this could be part of my problem. Also replaced the combustion motor, the old has been making a lot of noise. I'm holding off on replacing the auger until I'm certain the leak has been corrected.
Attachments
Lake Girl
Moderator
I replaced the auger and really no noticeable change. Still have a lot of ash in the burn pot, actually cleaning out the burn pot 3x's a day. I am currently burning Indeck pellets, bought 4 bags of Uncle Jed's and will try those this weekend. Hoping the new pellets will be the answer. Just seems the stove does not push the pellets far enough into the burn pot and as the ash builds up the poorer it burns. After cleaning the pot it seems to burn great for an hour or two. My pellet feed rate is at full speed, not sure what else I can do. The stove gets cleaned weekly, don't understand??What changes have you noticed with the tightening of the auger and the combustion motor?
- Status
- Not open for further replies.
Similar threads
- Replies
- 2
- Views
- 780
- Replies
- 11
- Views
- 984
- Replies
- 6
- Views
- 331
- Replies
- 2
- Views
- 555