Hearth Construction

  • Active since 1995, Hearth.com is THE place on the internet for free information and advice about wood stoves, pellet stoves and other energy saving equipment.

    We strive to provide opinions, articles, discussions and history related to Hearth Products and in a more general sense, energy issues.

    We promote the EFFICIENT, RESPONSIBLE, CLEAN and SAFE use of all fuels, whether renewable or fossil.
Status
Not open for further replies.

ironguy

New Member
Nov 15, 2012
41
Hi Everyone. I'm in the midst of designing a hearth for an Aurora wood stove we recently purchased, and I have a few questions I'm hoping you can help me with. I'm thinking to make both the horizontal pad and the vertical heat shield from brick. So the vertical shield would essentially be a brick wall, with a 1" air space behind it. I'm curious if others have done this? I've read that the top and either the sides or bottom have to be open to promote air movement. Which method have you done and liked or disliked? I'm not sure I'd like how the wall would look with a visible 1" space behind it; but I'm not sure either that I'd feel real good about a freestanding brick wall that doesn't even have a full course of bricks across its bottom. I was thinking you could possibly do something to conceal the gap if you left the sides open; but I'm still working that out.

Thanks a bunch for any thoughts or suggestions.

I wouldn't have a free standing brick wall in my home. I'd mount metal 2x4s, 3.5" side on the wall & screw concrete board to them leaving the 1" air gap top & bottom, but that gap would only be BETWEEN the studs, so the concrete board would be notched, & the studs hidden. Then I'd mount masonry strap anchors to the concrete board so that every 4th or 5th course of brick was actually secured to the wall. The sides can be closed in with brick.
 
  • Like
Reactions: ScotO
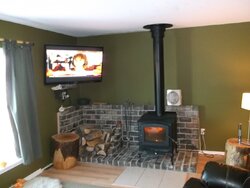
I did mine with 1/2" furring strips screwed to the wall at studs and 1/2" duro rock over that. You cannot see the gap except at the open end to the left under the TV and I added oak trim over there. Somewhat crude but it was the look I was after with 100+yr old pavers that once lined the streets of Owosso Michigan. I left a brick out at the bottom/back under the step wall devided for future OAK if I decided I wanted to try one but so far all is good w/o it.

stove 004.JPG
 
  • Like
Reactions: ScotO
Thanks for the input guys.

I like the idea with the metal studs---that, plus the space spanned by the metal ties, could make a rather natural width for bricks to fill in along the sides. I'm not sure I completely understand the notching out of the cement board, though----you'd have spaces and bricks staggered, then, along that bottom course, to let air in to the cavities between the studs? Is that correct? Could you just mount the cement board to the metal studs up high enough to create space for the air to enter without having to notch the board out?

Bob U., I like your setup. Is your stovepipe a double walled pipe? Or how did you work that with the clearance for the pipe, up where there's no heat shield.

Thanks again.
Andrew
 
Thanks for the input guys.

I like the idea with the metal studs---that, plus the space spanned by the metal ties, could make a rather natural width for bricks to fill in along the sides. I'm not sure I completely understand the notching out of the cement board, though----you'd have spaces and bricks staggered, then, along that bottom course, to let air in to the cavities between the studs? Is that correct?

Yep.

Could you just mount the cement board to the metal studs up high enough to create space for the air to enter without having to notch the board out?

That would work. The only reason for notching woulb to have a solid backer for the bottom course of bricks...

Bob U., I like your setup. Is your stovepipe a double walled pipe? Or how did you work that with the clearance for the pipe, up where there's no heat shield.

Thanks again.
Andrew
 
Yes - DBL wall Dura Vent. I did use tie backs in the morter for the bricks. Although I am glad I did it is probably overkill on a wall that short. The bricks I used are 10lbs a piece 4x4x9 solid.

I think if you just left a small air gap at the bottom of your dura rock/hardibacker you would be fine for the air gap. Just leave enough for the morter to adhere to. Personally I forgot to leave out the bricks but have air space/flow behind the bricks from both ends and when I extended my hearth I added the empty space. I prefer the larger look of the DBL wall but some do not because it has a gap at the stove. This is for air flow and I never noticed it until it was mentioned on Hearth a few times.

When I went from my old stove(not as deep but wider) to the 30NC I was afraid I may need to add a course out front but with the pipe in place it fit perfectly with the front legs about 2" from the front edge of the hearth. I just added the tile out front semi subset into the floor for legal and pratical safety purpose as it is a front loader and the only place on my hearth that gets hot to the touch are those tiles out front.
 
Thanks again. I should be building this hearth sometime in the coming days. All that's really left to do is get the materials. I'll take pictures and post them here.
 
  • Like
Reactions: ScotO
Sumb!*ch, a change of plans. I realized yesterday that I'd gotten so absorbed with the design of the hearth that I hadn't plotted exactly every detail of the chimney pipe and flashing. I figured I'd have to shift things a little one way or the other; no big deal. Well, it is a big deal. I won't bother elaborating on it in great detail, because I think it could easily start to sound like Who's on First, but suffice it to say, the locations of various things (joists; a nearby window; a shed-style roof that departs from the house roof) pretty much dictate one spot where the stove could work, and it's very much less than optimal with respect to the window. I don't really want to put any jogs in the pipe; I think that sounds like a fire hazard waiting to happen, with the way those bends would catch creosote. But luckily we have another location that would be very good. It's almost like the house is telling us where it would like its stove. And in fact, the more we think about it, it's a bit surprising that this second location wasn't our first choice.

Here is my new question. This stove location is a florida room with glass on three sides. So obviously i can't do a heat shield here that goes up the wall. But what I did want to do is a heat shield of some sort that stands on the hearth pad behind the stove. I see they are offered commercially. Like this one here. I'm thinking I can make one myself, provided I can find the steel for not a lot of money. Or, I was wondering, can you make this kind of heat shield out of tiled cement board? I think that could look really nice if done well. But I don't know if anyone has ever done it. Or if there would be a reason not to.

Thanks for any thoughts.
Andrew
 
Status
Not open for further replies.