Hearth Pad

  • Active since 1995, Hearth.com is THE place on the internet for free information and advice about wood stoves, pellet stoves and other energy saving equipment.

    We strive to provide opinions, articles, discussions and history related to Hearth Products and in a more general sense, energy issues.

    We promote the EFFICIENT, RESPONSIBLE, CLEAN and SAFE use of all fuels, whether renewable or fossil.
Status
Not open for further replies.

brandytab

New Member
Dec 10, 2007
24
Upstate NY
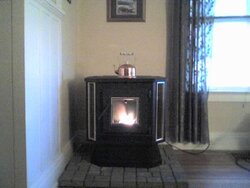
Could someone be so generous as to give me directions on putting together a hearth pad? We're going to puchase the larger Englander (25-pdv) tomorrow evening and would like to install it this weekend. I can't find anywhere locally that sells pre-fab hearth pads and it seems that it should be simple enough.

Any idea what size pad I need if it's going to go in the corner?

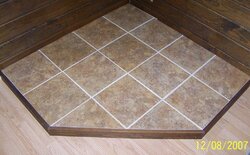
It is as simple as cutting a piece of plywood and laying tiles on it? Any type of tile that I should avoid due to the heaviness of the stove?

Thanks!
Brandy
 
well the size of it depends on how big the stove is. you want 6 to 8 inches of the hearth pad on each side, front and back. i would use wonder board instead of plywood. the plywood tends to curl up when using thinset to lay the tile.
 
You need to get a hold of the user manual to see what the correct dimensions
and thickness of the pad should be for that stove. If you do not have the
stove yet, you might be able to find the manual online.
You may be able to find it on Englander's site.

Good luck! Looking forward to seeing pictures when you are up and running.
 
I'm making one myself as well...wonderboard is much better....but what I am doing is using 1/2" plywood on bottom and the thin wonderboard over the top, that way I can install a nice trim on it a bit easier...something to attach it to as the trim doesnt attach to well to the wonderboard. :) Much much cheaper to make yourself than to buy pre-made, if your handy.
 
Eight inches on each side and eighteen inches from the front opening of your stove.
Check with your local township for the proper building code requirements.
 
Brandy, at this point, Thursday morning, you'll need to carefully check the set up or drying times on any thinset and grout you buy since you don't have a lot of time to get this together before putting the weight of a stove on it. As for tile I think any floor tile would do but unless you have a wet saw you'll want to go with a size and layout that minimizes or eleminates cuts.

When you say corner do you mean you plan to put the stove catty corner? If so, you'll need a 45 degree elbow that isn't included in the standard install kit. Ask me how I know this..... :roll:

I recently had to rush the install on our stove and I just used 1/4" plywood with cobblestone pavers laid out on it. No thinset or grout. But, if I had to do it over again, in a hurry, I'd use cement board instead of the plywood and I'd use wood trim around the edges to stop the pavers from shifting. We didn't put the trim on ours and the pavers wanted to move when we tried to position the stove. Some of the larger, 16 x 16, pavers would probably have been easier. Some construction adhesive would have helped in our situation too.
 
AwsumSS said:
I'm making one myself as well...wonderboard is much better....but what I am doing is using 1/2" plywood on bottom and the thin wonderboard over the top, that way I can install a nice trim on it a bit easier...something to attach it to as the trim doesnt attach to well to the wonderboard. :) Much much cheaper to make yourself than to buy pre-made, if your handy.

Good idea -- that's why I was thinking plywood, so I could get a trim on it. Wonderboard and plywood it is!
 
pegdot said:
Brandy, at this point, Thursday morning, you'll need to carefully check the set up or drying times on any thinset and grout you buy since you don't have a lot of time to get this together before putting the weight of a stove on it. As for tile I think any floor tile would do but unless you have a wet saw you'll want to go with a size and layout that minimizes or eleminates cuts.

When you say corner do you mean you plan to put the stove catty corner? If so, you'll need a 45 degree elbow that isn't included in the standard install kit. Ask me how I know this..... :roll:

I recently had to rush the install on our stove and I just used 1/4" plywood with cobblestone pavers laid out on it. No thinset or grout. But, if I had to do it over again, in a hurry, I'd use cement board instead of the plywood and I'd use wood trim around the edges to stop the pavers from shifting. We didn't put the trim on ours and the pavers wanted to move when we tried to position the stove. Some of the larger, 16 x 16, pavers would probably have been easier. Some construction adhesive would have helped in our situation too.

You are right about the 45 degree elbow -- and of course HD is out of them. GRR. Going to check another HD today to see if I can get ahold of one. Do you have yours in the corner?

Maybe I'll use the bigger pavers then (though I really like the cobblestone!). Think I'll be good with the wood trim and no thinset?
 
If Home Depot doesn't have it, many of the Ace
and Aubuchon Hardware stores carry 3" pellet vent
as well as any stove shop that sells pellet stoves.
 
Yeah, it's in the corner. We wanted it catty corner but couldn't lay hands on that elbow so it's installed straight. May move it next summer but for now this arrangement will just have to do. Guess I'll rebuild the hearth at that time as well. Make it more of a permanent thing.

Excellent idea, layering wood under the cement board!
 

Attachments

  • 12-03-07_1636.jpg
    12-03-07_1636.jpg
    37 KB · Views: 1,310
I just installed my Enviro EF-2 3 weeks ago on a hearth that we built.

Mine is in a corner location and we wanted a pentagon style hearth.

I cut 3/4" plywood to the size I wanted.
I then put a sheet of 24 gauge sheet metal over that.
Then I put a layer of 1/2" of Dura-Rock over that.
All of this was screwed to the existing floor.
Next we layed out a design in 4"X8" paving stones for a border.
Then we filled the border in with 6"x6" paving stones set in a running bond pattern from the front center.
The pave stones were buttered in with thin set.
For grout I used Polymeric sand http://www.groundtradesxchange.com/pavers/polymeric_sand.htm.
It hardens with water.
I didn't want to use regular grout due to the pave stones being so rough surfaced that I thought the grout would be hard to wash off the faces.

I then wrapped the hearth face in 3" of red oak trim.

We like it.
So far the sand has not moved. Even when vacuumed.

My stove required a hearth at least as wide as the stove with at least 6" front clearance to a combustible floor surface.

Here is how it came out.
StoveCloseup.jpg


Work with your fire/buildinginspector. They can save you lots of heart ache.
They will tell you what they want before you start spending $$$ and driving nails.
My stove inspection cost me $10.00 and the walk-thru took all of about 5 minutes.

---Nailer---
 
That looks great, nailer.
What a great idea on the sand.... tell me..... where did you buy it? Is it possible to purchase at HD/Lowes/Curtis Lumber/Ace?

I am on my way to the inspector this morning to get my permit (before the snow starts!), I will see what he recommends also.
 
pegdot said:
Yeah, it's in the corner. We wanted it catty corner but couldn't lay hands on that elbow so it's installed straight. May move it next summer but for now this arrangement will just have to do. Guess I'll rebuild the hearth at that time as well. Make it more of a permanent thing.

Excellent idea, layering wood under the cement board!

Peg, does the copper pot give off steam? Does it get warm enough up there??
 
Brandytab,

The sand was purchased at the same stone yard I purchased the pavers from. It is fairly common. Almost anywhere that sells pavers will have the sand. It is real common.

Mine was $20.00 for a 40lb bag. I think I used about 3lbs.

I have heard, but I won't swear by. If you mix Portland cement in with regular masons sand it will do the same thing.

The polymeric sand is nice because all you do is spread it over the stone. Then sweep it into the joints. I used a random orbit sander to vibrate it down between the joints. Also I pounded the surface with a rubber mallet and a board. Once I was satisfied the joints were full I swept off the extra sand. Once I was happy with the look, I used a spray bottle and saturated the sand and stones with water. I sprayed enough water to get it standing on the surface. I did this 3 times in about an hour. About 3 days later the sand was rock hard.

Good Luck,
---Nailer---
 
brandytab said:
pegdot said:
Yeah, it's in the corner. We wanted it catty corner but couldn't lay hands on that elbow so it's installed straight. May move it next summer but for now this arrangement will just have to do. Guess I'll rebuild the hearth at that time as well. Make it more of a permanent thing.

Excellent idea, layering wood under the cement board!

Peg, does the copper pot give off steam? Does it get warm enough up there??

It gets pretty warm up there but so far I haven't run the stove on high long enough to see just how hot. We're having a heat wave. Record breaking highs for the last few days. Can't last much longer though.....
 
nailed_nailer said:
Brandytab,

The sand was purchased at the same stone yard I purchased the pavers from. It is fairly common. Almost anywhere that sells pavers will have the sand. It is real common.

Mine was $20.00 for a 40lb bag. I think I used about 3lbs.

I have heard, but I won't swear by. If you mix Portland cement in with regular masons sand it will do the same thing.

The polymeric sand is nice because all you do is spread it over the stone. Then sweep it into the joints. I used a random orbit sander to vibrate it down between the joints. Also I pounded the surface with a rubber mallet and a board. Once I was satisfied the joints were full I swept off the extra sand. Once I was happy with the look, I used a spray bottle and saturated the sand and stones with water. I sprayed enough water to get it standing on the surface. I did this 3 times in about an hour. About 3 days later the sand was rock hard.

Good Luck,
---Nailer---

That is a great idea....now I'm undecided if I want to do that or the tiles...hmm....again....excellent idea....love this forum, it gives you so many ideas and thoughts. Although I have new hardwood floors....I wont screw anything to the floor....but the weight of it all will be enough to hold it there...
 
I used porcelain tile because that's what my wife liked. I found out later that ceramic tile and porcelain tile are almost the same but the big difference is that the porcelain tile must be cut with a wet saw whereas ceramic tile can be cut by scoring and snapping. I got my tile from Home Depot (Lowe's didn't have anything we liked) and found later that HD doesn't cut tile and Lowe's wouldn't cut the tile I bought at HD so I ended up buying a wet saw from Harbour Freight for $60. It did a great job, but had I known ahead of time, I would have gotten ceramic tile. I put my hearth over a floating laminate floor so I didn't nail it down. I used 2x4s laid flat and attached 3/4" OSB to the 2x4s. Covered that with 1/2" Wonderboard and laid the tile in thinset. The grout is standard grout. The wood trim is pine 1x3s stained to match the wainscot behind the stove. It took me 4 days to complete the hearth. My avitar isn't very good of the hearth. I'll post a better picture tomorrow.
 
Here is a closeup of my hearth pad. The tiles are 12" porcelain tiles and the grout is slightly lighter than the tiles. The camera flash just makes it look white. The 3/4" OSB was cut out of a 4x4 sheet, but the Wonderboard was only 3'x5' so it had to be pieced. It only took one 3'x5' board. Both OSB and Wonderboard were attached to the 2x4s with galvanized screws.
 

Attachments

  • hearth-small.jpg
    hearth-small.jpg
    151.7 KB · Views: 4,171
Status
Not open for further replies.