Hearth, Wall Protection and Chimney Decisions

  • Active since 1995, Hearth.com is THE place on the internet for free information and advice about wood stoves, pellet stoves and other energy saving equipment.

    We strive to provide opinions, articles, discussions and history related to Hearth Products and in a more general sense, energy issues.

    We promote the EFFICIENT, RESPONSIBLE, CLEAN and SAFE use of all fuels, whether renewable or fossil.
Status
Not open for further replies.

hoverwheel

Burning Hunk
Oct 18, 2013
184
USA
I've bought an Englander 30NC (Home Depot) and am preparing to (self) install it.

I plan to build the hearth of steel 2x4 material, framed to a height of ~ 12", maybe a little higher. Skinned with 2 layers of durock and then floor tile on thinset.

The wall protection will be about the same, stood off the wall 2" and I plan to use that expanded metal mesh/lathe to seal the airspace from either critters or the random flotsam and jetsam such as you find under the sofa after a year or two. I plan on a 2" "grille" at the wall base (where it meets the hearth) and then the top edge.

The chimney... unsure from the stove to the wall thimble, but then double wall class A through the wall into a class A chimney stack. That goes up the exterior to the ridge line. The chimney happens to fall almost at the ridge, once it gets up there. That will be at *least* a 25' rise from the bottom of the chimney to the top. Possibly closer to 30' The house is 2 1/2 stories (third floor has those old tyme slanted walls - this the gable end).

Some questions...

Reading the manual and internet resources, I gather a 6" chimney system will be adequate. *Must* I go to 8"? *Should* I?

When I reach the roof line, can I kick out a foot or two with 45* elbows or do I need to cut through the gable overhang?

Any particular manufacturer I should prefer or avoid?

I'm highly motivated to get this right - I can't seem to find much material on this exact chimney solution. I'm particularly interested in exactly how the chimney base attaches to outside wall. Do I strip the siding first, for instance? I'm quite sure I need to hit the studs, but with what? 3" ??? screws? Lag bolts?

Any other pitfalls?

(yes, this will be permitted, btw)

If there is a thread that covers these points, please link. I've been reading endlessly on this and still have these (and a few other) questions.
 
Well no you would not go to 8". Yes you can offset out past the gable but i would use cant use 45s. Use 30s or 15s. As far as attaching it you should cut the siding where the tee support goes and hit studs with your screws. The instructions will tell you what you need to do most are very thorough and pretty clear.
 
One thing is that you want to use six inch pipe. Do not use eight inch. The stove is optimized for six inch.
 
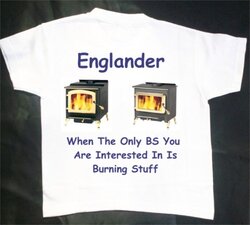
And here's yer shirt.

englander t shirt.jpg
 
Why do you need wall protection...are you wanting to reduce the rear clearance to combustibles? If you do decide to build it that way (and, assuming the manufacturer of the appliance says it's permissible), then there's no reason to space the shield 2" out from the wall. All you need is a 1" air gap between the shield and the combustible wall. Rick
 
As I read the manual, I need 12" clearance to protected or unprotected wall surface, so possibly could get away with just the hearth. I recall now the air gap is 1". Thanks. Also thanks for the 6" flue pointer. (the stove will be kitty corner in the living room, which is about 12'x14')

I have no issue with overengineering, though. A contractor once told me a house built to code is a house that meets the minimum acceptable standard. (in full disclosure he could have just been justifying a bigger estimate)

All that said, I kind of like the look of tile. I'm inclined to add the wall protection just for styling, probably rising to just above the height of the stove itself.

I'll add some sketches in a bit.
 
The manufacturer's owner/installation manual will define precisely what the minimum required clearances to combustibles are for the appliance in all installation configurations, including of course a corner. If those clearances are met, there is no wall protection required. You can decorate the wall pretty much any way you please, so you can tile the wall without all the hassle & extra expense of building a heat shield. As I said, the manufacturer's documentation is your "bible" here. Seems to me that stove comes with a rear heat shield installed, so the clearances should be fairly easy to work with. Rick
 
The plans evolved a little bit -

The base is a 6'x6' platform (with the obvious corner sliced off) framed with wood 2"x12", 16"OC, skinned with 3/4" plywood. I'll top this with 2 layers of 1/2" durock next gen, then a layer of common brick (because I have plenty laying around) and that will be topped with tile. I think this gives me the R value required.

The weight of this will be up there, esp with the stove on it. There's a support column underneath already. I'd like to leave this floating, as in not nailed/lagged to the house structure. Even without the masonry installed it does not move around. Is it mandatory to tie it into the house framing? The finish trim (some sort of baseboard or quarter round) will also tend to clamp it in place.

The whole structure will give several inches more than the minimum clearance required when the stove is positioned and will stand around 16" elevated. It should give a distinct "place setting" and discourage people from walking up and leaning on it. The height advantage should make it easier to load.

The main question I have remaining is highlighted above - do I have to nail it down?
 
Should be no need to nail it down. I would be interested in your R value assessment - what does the stove require and what have you calculated that you have? I could look it up and do the math, but better that you do it and know it's right than "thinking" it is correct.

As for building the flue around or through the gable, read the manual for the chimney. I think you will find that offsets are not permitted when the flue is outside the house, therefore you would need to cut through the roofline. Again, completely depends on what the instructions say, just like the clearances for the stove.
 
off sets are absolutely allowed out side the house i have never come across a manufacturer that said otherwise.
 
30NC manual specifies a floor protection R-value of 1.50. Your plywood buys you nothing, as it's the combustible to be protected, the Next gen's worth 0.39 per, the common brick 0.45, and a ¼" tile 0.02

What you've got planned adds up to 1.25 (2 x 0.39 + 0.45 + 0.02)

You need another 0.25
 
off sets are absolutely allowed out side the house i have never come across a manufacturer that said otherwise.

Yup, they just can't be 45°s in Class A chimney. 15°s & 30°s are fine, as I understand it. Rick
 
Here is an example of it not being permitted outside the house for Selkirk Supervent USA found here: http://www.selkirkcorp.com/WorkArea/showcontent.aspx?id=7472

One pair of (two) 15o or 30o
Elbows may be used in an interior
installation to provide an offset in order to avoid cutting of joists and
to clear other obstructions. Each Elbow support will support 15 feet
of chimney and the maximum length of chimney allowed between
elbows is 6 feet.
Forty-five-degrees (45°) Elbows may be used only with oil or gas
appliances. See Chart 1 - Offset Chimney Installation on page 15 in
these instructions for details

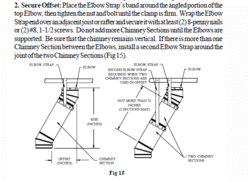
If you look at figure 9 in the link I've posted, you need to install elbow support straps above the top of the final elbow. That just won't work on an outside install.

As I said, read the instructions. Frankly, I've never seen a set of instructions that don't specify interior when they discuss elbows.
 
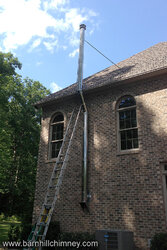
We've seen plenty of installations like this:

extchim.jpg
 
It is a fact that Selkirk states:

"You must cut through the soffit (overhang). Use a Roof Flashing above and a Finishing Plate below where you have cut through the roof. Never offset an exterior Chimney - there is not enough support for the weight above the elbow."

People do it a lot though.
 
I think they look better when they go through the soffit, anyway. Rick
 
DuraVent DuraTech chimney pipe can have a soffit offset using 30 or 15 deg elbows outdoors. A locking kit is required as well as adequate support.
 
Last edited:
I'm on my phone so I'll summarize...

I thought I read 1.2R in my manual. Will double check and add something if needed. The plywood is simply for strength.

The chimney will pass the soffit on a gable end close to the ridge, so the height above soffit will be short.

There is a house in the neighborhood with a class A chimney that looks like a tube chase at Chuck e cheese (lots of bends) but if I have to notch the soffit I will.

Thanks everyone for the feedback. This is something to get right the first time.
 
I prefer the notch in the soffit too, just trying to provide options.
 
I also prefer to notch the soffit for looks i have not used selkirk in years but i see you cant off set theirs but i know you can with duravent and ventis. you just need to support it correctly i am not sure why selkirk doesn't think they can make a bracket to support it But if you are using selkirk obviously you cant do it
 
My recollection was wrong. 1.5 R value. I can either add a third layer of durock or lay the brick on edge instead of on flat. According to the Sweep's Library that yields 0.8.

The nominal size is I think 2.25"x 3.75" x 8". For purposes of that R-Value list, does placing the brick on edge meet the "4" or does it mean 4.0" of brick period?

On the durock layers - Should I screw down each layer or use long screws and screw down the 2 or 3 layers at once?
 
Concerning DuraTech elbows and outside installs, I don't see it as possible in their instructions. They aren't as specific in prohibiting it, but the instructions for mounting and securing elbows requires they be supported from above.

elbows.gif

Not sure how you can do that while avoiding an overhang. Given they and other manufacturers provide technical drawings for each type of install, if they intended an elbow offset around an outside overhang, they would show it IMHO. It can work, but isn't something I'd expect a pro installer to do, given the UL 103HT cert on the chimney requires following the instructions exactly. Very DIY / make it up as you go along.

Outside chimneys are Tee supported, and the offsets will cause side loading on joints intended for vertical support. Over time, this would be a fail point in the system. Inside units combine overhead and ceiling support, and aren't exposed to the chance of side loading over the length of the unit (wind, collision etc).

OP, you are on the right track with the hearth pad. Check the R values like you mention.
 
Dura techs support bracket can easily be attached to the bottom of the soffit and support the offset according to the instructions
 
It is not in the instructions but if you look at the part it is just 2 peices of angle iron which can be attached to the bottom of the soffit extending out to support the chimney It works very well supports the chimney correctly and does not violate anything in the instructions and there for complies with code. Like i said before i would prefer to notch the soffit but that is not always what the customer wants and offsets can be done within the guidelines of many chimney instructions.

Sorry its the ventis kit that comes with angle iron but i would do the same for the duratech you would just have to get some angle to add to it
 
Status
Not open for further replies.