Hearth wall set backs

  • Active since 1995, Hearth.com is THE place on the internet for free information and advice about wood stoves, pellet stoves and other energy saving equipment.

    We strive to provide opinions, articles, discussions and history related to Hearth Products and in a more general sense, energy issues.

    We promote the EFFICIENT, RESPONSIBLE, CLEAN and SAFE use of all fuels, whether renewable or fossil.
Status
Not open for further replies.

mariposawrick

New Member
Dec 27, 2014
27
Mariposa, California
Hi all. I am new to building a hearth. I have followed this website and read in the forums to get as far as I have in my planning.Thanks for all the good info. Now I am ready to build.

I am putting a hearth into a corner over a floor of 2x8 joists. The floor is built on top of a short stud wall on the sill of the poured concrete foundation for this single story building. I have several questions.

First, regarding setbacks of stove from walls, is the setback a measurement of setback from the closest combustible part of the wall or the final wall surface? I have sheetrocked wood stud walls. I plan to place metal studs over the sheetrock and fill the voids with 3 inch thick rockwool batts, then cover this with 1/2 inch cement board, then a mortar bed and slate or other stone facing. This generally follows the good example given in the articles about a finished hearth. I plan to leave air gaps at the bottom of each wall over a 2 foot span closest to the stove sides/corners. My plan is, hopefully, to be able to count the 5 inches of fire resistant material over the sheetrock wall surface and leave only 3 additional inches between the final slate surface and the metal of the stove sides/corners to achieve the 8 inch minimum setback.

Next, I plan to build the hearth floor in similar fashion, but deeper. I will be using wood joists to bear the weight on the floor of thick cobblestones and the stove. The floor will be shielded by rockwool, cement board, mortar as well as the gap under the stove due to legs and the firebricks and ash in the firebox. This isn't reaslly a question, just informational.

Third, an actual question. In order to provide better support for the floor joists to bear all this new load I plan to add a 4x8 beam diagonally under the joists across the approximate midpoint of the hearth and stove mass. It will not have any posts along its length, but will be supported by the concrete foundation walls. Does this sound like an adequate structural amendment to my building for this corner hearth?

Thanks for your opinions and suggestions.
 
The clearance is measured to the nearest combustible which as described would be the sheetrock behind the metal studded wall with cement board. As described there is no need for the rockwool. It's actually better to let air freely convect behind the wall shield. That's why it is open at the bottom and top.

There probably is no need for extra floor reinforcement. What stove will be installed?
 
Thank you. To clarify the open space at the bottom of the wall, I plan to leave a gap of about 2 feet long by 1 inch opposite the closest points of the stove to the wall. Is this sufficient? I can lengthen the gap if it is recommended. The rear corners of the stove will be at 8 inches, every other surface of the stove will be farther away given the corner placement of the stove. There will be a good 22 inches plus behind the stove in the corner location. Since i will not have to use rockwool for the walls it sounds like I can place the metal studs on the flat, leaving 1-1/2 inches of air space, and increase the distance between the stove corner and finished wall space to make the 8 inches. Is that right? As an alternative, what if I add rockwool opposite the closest points of the stove and leave the air gap in front and back of the stove? The stove is an old (1970's) Sundance Lisa Marie, single wall construction, no baffles or heat shields. The floor will be reinforced on the recommendations of the construction industry given the span of the floor joists in the large open room, 15 x 25, and the mass of the stove and hearth.
 
The gap at bottom and top should be for the entire protected area, especially behind the stove. Yes you can place the studs on flat. Or to make it simpler you can snap off long 3" lengths of the 1/2" Durock to create strips. Double-up these strips to create 1" thick vertical firring strips attached to the studs in the wall, then mount the cement board directly on these firring strip spacers. By this method the old stove can be installed 12" from the sheet rock wall.
 
I have heard of using multiple thicknesses of Durock as firring. But I think you misstated the end result as 12 inches. If I put 1/2 inch Durock over 1 inch of firring strips I get 1 inch of airspace and 1-1/2 inches overall set-back from the sheetrock, don't I. To get 12 inches of set-back wouldn't I need to place the stove 10-1/2 inches from the Durock? As for the set-back behind the stove the distance will increase from whatever it is at the rear corners to the deepest corner of the walls, approximately 22 inches is what I am projecting at that deepest corner. I will plan to leave the air gap all along the bottom back into the corner. Or, I can square off the wall corner making it parallel to the stove by building out a false wall with metal studs and Durock (no idea how I changed the font) leaving an air gap at the bottom of the new wall and keep more than the minimum 8 inch set-back while increasing the airspace. Does that make sense?
 
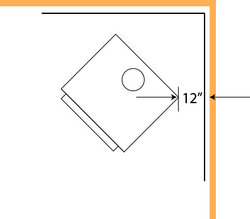
The clearance is measured to the nearest combustible. The closest one can bring an untested stove to any combustible surface that has an NFPA 211 wall shield is 12".

12 in clear.jpg
 
Last edited:
This question has to do with the recommendation that I do not need Roxul between the metal wall studs as added insulation but to leave the open air gap to maximize airflow up through the gap and out at the top. Does the flow of heat up through the air gap keep the heat in the room without the need for the added insulation? It seems some will radiate out through the sheetrock and exterior wall sheathing. The wall insulation is no more than R-13 fiberglass. I have the Roxul needed to insulate the walls if it will not impede the protection given by the airflow, but it seems it may be an even trade of heat protection by insulation and heat radiation into the room versus convected heat flow from the airgap.

Hearth base is laid out, framed, Roxul laid in,Hardieboard cement board screwed down. The stove placement has been measured and drawn on the floor. The 12 inch set-back from sheetrock at the rear corners of the stove works perfectly. I have installed the 4x8 beam diagonally across the floor joists in the basement to assist supporting the now-reduced weight of hearth and stove. Maybe overkill, but it gives a sense of security that walls will not be cracking from added weight for which the floor was not originally designed. Hearth top material will now be slate on mortar. The original idea of cobblestones was rethought; too much weight, not to mention a pain to arrange and level the odd shaped stones. I may go to thin-set mortar since I do not have such heavy stones to lay or varying thicknesses to compensate for in depth of mortar. The next step is to get a final measurement for the height of the hearth floor with stones in place so I can set up the wall height and place studs to achieve the air gap at the bottom.

I am also measuring for the flue pipe from stove to ceiling and into the attic space to the roof for chimney. The adjustable double-wall stove pipe aids in that. The final fixed distance from ceiling to roof will be determined by the size of the support box between ceiling joists and the roof support fixture. M y metal roof has 36 inch wide panels over sheathing on 24 inch-on-center rafters. One lies directly over the area where the chimney will be placed, so only one panel will need to be unscrewed to cut the hole for installation of roof flashing and relaid. Any tips? Dura-Vent makes the chimney I plan to use.

Thanks and Happy holidays to all.
 
You will be quite surprised at how well the wall shield with just an airspace works. The key is to allow free convection of air behind it. Yes, some of that heat will convect into the room.

What type of metal roof? Corrugated or standing seam? Got a picture?

Is the hearth built on wood studs? If so it doesn't sound like there is the NFPA requirements for hearth protection for an unlisted stove.
 
Thanks, I guess I have Roxul for some other application.

The hearth is 2x4 wood studs (3-1/2 inches). I was going to use metal but at the time I was going to use the heavier cobblestones. Stud framework is filled with Roxul (3 inches), covered with 1/2 inch Hardieboard. It will have a mortar bed for stone setting (probably a full inch, not thin-set, to maximize depth), then 1-1/2-2 inch thick slate. I am planning to incorporate 4 cobbles for the feet under the stove legs to avoid cracking the slate. The cobblestones are 5 inches thick, 3-3-1/2 inches above the height of the slate. The stove has 6 inch tall legs. This will put the bottom of the stove 12-1/2 inches above the studs, 16 inches above the wood flooring. Does that sound right?

The roof is a standing seam roof, panels 36 inches wide by 14 feet with a raised rib every 10 inches. Panels are screwed into the sheathing, 4 or 5 screws across, every 2 feet, going down the length. Rafters are 24 inches OC. It is on a building I am not at for a couple of weeks, so no photo yet.
 
Can't say whether the hearth protection will be adequate. Filling the joist cavities roxul does nothing to protect the studs from the heat. As described the hearth is ember protection only which is insufficient. It would be better to use a couple layers of Durock NexGen for cement board which has a higher R value than Hardieboard (unless this is Hardieboard 500). Slate is only r=.1/in.

ICC Excel's chimney flashing is very good for metal roofs.
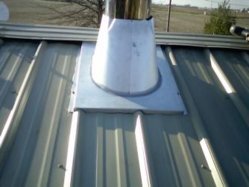
Here's the ICC Excel flashing on a metal roof. This is before the storm collar was put on.
115471-7729139e0b119b6acd3e71793c1590aa.jpg
http://www.icc-rsf.com/main.php?t=chem_produits&i=95&l=en
 
Thanks for the tips. I will obtain some Durock NexGen and double it up. I could also add another frame layer of metal studs, flat, or, if sufficient to bear the weight, on edge for depth, and cement board on top of that to gain an additional 2 to 4 inches of protection above the wood studs. Let me know what you think. It will be getting rather tall at that point.

The ICC Excel flashing photo is interesting.I would have expected the flashing to be mounted under the roof panel, caulked, with the storm collar over to provide the final seal. I will look for a local supplier for that to compare to Dura-Vent (made here in California close to the Bay Area).
 
Now that I look at the flashing again I see that the upper edge is under the ridge cap and the lower edge is fitted over the standing ribs. That would be preferable to lifting the panel to fit the flashing under. My chimney will pass not quite so close to the ridge when it breaches the roof, about 2 feet down the slope, I think.
 
Two layers of durock on top of the hardieboard + the slate should bring you up to a safe value without adding the metal studs.

There's no need to remove the metal roofing. The top of the flashing goes under the metal, the bottom above the metal so that water will always run over the flashing base. The Excel flashing is raised at the base so that it can be notched to fit the ribs in the metal. The installation instructions are on the page that I provided the link for. I've not done a metal roof install but i believe the Excel flashing will work with DuraTech chimney.
 
Status
Not open for further replies.