Help me solve this clearance issue

  • Active since 1995, Hearth.com is THE place on the internet for free information and advice about wood stoves, pellet stoves and other energy saving equipment.

    We strive to provide opinions, articles, discussions and history related to Hearth Products and in a more general sense, energy issues.

    We promote the EFFICIENT, RESPONSIBLE, CLEAN and SAFE use of all fuels, whether renewable or fossil.
Status
Not open for further replies.

russb

Member
Jan 7, 2014
114
NJ
Here's what I know; I need 18" from my single wall stove pipe to combustibles.

I have 18+ to the ceiling, and more than 20" to the rear wall (which is the brick chimney anyway).

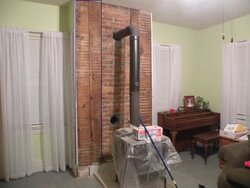
Where the stove passes through the chimney into my liner is where the problem lies (I think). I only have 9" to the side of some cabinets that were built into the side of the chimney (see pic 1). Now, the wood is flush with the chimney (see pic 2), but I think that doesn't matter. Correct me if I'm wrong on that.

So, if indeed I am violating that clearance requirement, help me come up with some fast, creative, yet attractive solutions. My first thought was to replace the side board of the cabinet with Durock for starters. Would that put me in good standing with the clearance requirements?

A note; we haven't decided what the final product should look like. It probably involves me building the entire wall up with brick and making a brick hearth to go with it, but that's not happening for a few years. This 175 year old place has some more pressing issues to deal with before that.

The stove, being shy in these pics, is a Regency F2400. I'm waiting on some parts from the dealer (baffle bricks and two new air tubes) so I'm trying to get the install sorted in the meantime.

Edit: according to https://www.hearth.com/econtent/index.php/articles/passing_a_chimney
I only need 12" of solid masonry surrounding this? I still do not have it, though.
DSCN3302.JPG DSCN3305.JPG
 
Last edited by a moderator:
If that chimney is solid masonry from where the single wall pipe goes into the crock, I believe (this is off the cuff so it needs to be looked up in NFPA 211) but it would need 12 inches of solid masonry from the clay crock that pipe is slid into, until combustibles....

Since this is in the closet, is it possible to cut out the interior woodwork of the closet in this area to maintain clearances and replace with brick / mortar? It'd cut down on closet space, but would be confined behind the closet doors.

Again, that's just off the cuff.
 
I can't understand your problem from the pics. I don't see the cabinet, it looks like a big brick wall.
But, if you have a cabinet that is 9 inches from the single wall pipe, you would be better off putting a metal heat shield on the side of the cabinet, than using Duroc.
Cut a piece of metal to cover the cabinet, and fasten it with nails or screws so that it is an inch away from the cabinet. That one inch air space is where you achieve your insulation.
Copper would look really good, use copper nails with copper shield.
 
Chimney is solid masonry. But, I'm not sure I'll like the way your suggestion would look, if I understand what you're saying (it's entirely possible I don't). Also, one side has ductwork running inside it, though I guess that would be noncombustible anyway.

I guess replacing the wood with Durock wouldn't work, because I'd want to paint it, and paint is definitely combustible.

A couple options would be to remove the cabinets entirely (possible, but more painful than I was hoping), or to get a pass-through and build the wall with drywall (it was plaster and lathe until a couple hours ago), but those tend to be pricey form what I can tell, and I only need one side of it.
 
I can't understand your problem from the pics. I don't see the cabinet, it looks like a big brick wall.
But, if you have a cabinet that is 9 inches from the single wall pipe, you would be better off putting a metal heat shield on the side of the cabinet, than using Duroc.
Cut a piece of metal to cover the cabinet, and fasten it with nails or screws so that it is an inch away from the cabinet. That one inch air space is where you achieve your insulation.
Copper would look really good, use copper nails with copper shield.


Haha, yeah it does look almost like it's all brick. But it's not, the lines on the outside are from where the plaster was squeezing through the gaps in the lath. I need to think about your idea a bit more, I'm intrigued.
 
Attached a pic with the side of the cabinet to the left of the chimney outlined; there's an identical one on the right. So, the outlined areas is actually wood with lines left on it from the plaster that was over it. This entire wall, including the chimney, was plaster and lathe until I tore it down.
 

Attachments

  • wood-outlined.JPG
    wood-outlined.JPG
    184.3 KB · Views: 163
insulated sleeve that the pipe passes thru and then double wall connecter
 
A double-wall connector makes this a non-issue. With 6" clearances it looks like the best solution
 
A double-wall connector makes this a non-issue. With 6" clearances it looks like the best solution

Very good. Thanks for the suggestion. In that case, ideas for the short-term and/or long term beautification of this setup are appreciated.
 
Very good. Thanks for the suggestion. In that case, ideas for the short-term and/or long term beautification of this setup are appreciated.
Tear down the plaster and lath, reframe both sides, attach cement board flush with brick, cover with stone veneer and same for hearth.
 
Plaster and lather are already gone., the wooden side to the cabinet is what's flush with the brick at the moment. I could replace the wood sides with cement board and continue with your plan, though. Thanks for the suggestion.
 
I had similar thoughts but wondered what veneer would fit best with the house. If stone is not appropriate, brick or tile veneers are other options. This could be side edge trimmed in moulding that matches the window casing to bring the look together.
 
Good idea. Brick is definitely more the look we want. Heck my wife likes the beat up brick showing right now. Too bad there's a big hole toward the bottom.
 
I say if she likes the brick put a clean out door in the bottom hole finish off the cabinet sides and be done with it. Does the liner extend down to the bottom hole for a clean out?
 
Now that's thinking. Unfortunately, I wasn't thinking when I shortened the liner (the bottom hole is where I connected to the liner last year) to raise the entrance into the chimney, AND THREW AWAY THE REMNANT part of my liner. Two days ago it went to the dump. That would have been ingenious. I suppose when I finish this off I could add a cleanout door and get some flexible liner to extend down to the door. If I made the door big enough I could jam the 5 ft. section of liner up through the door to meet the current T. I need to consider this.
 
Do you not have a cap on the existing tee?
 
It is currently capped, but it comes off. So I'd take the cap off, connect the liner, put in another T, and cap that one (at the bottom), I guess.
 
yeah that is typically how we do them
 
Last edited:
No, I meant the whole run. One doesn't mix single and double-wall connector in the same connection.
 
Aha, that's why it's so hard to find the right adapter :)

Thanks for setting me straight.
 
Oh yeah, just out of curiosity, why not mix single and double wall?
 
The mfg doesn't make parts to do this as there is little advantage.
 
Status
Not open for further replies.