HELP!! OLD DEFIANT 2 - TOP EXHAUST???

  • Active since 1995, Hearth.com is THE place on the internet for free information and advice about wood stoves, pellet stoves and other energy saving equipment.

    We strive to provide opinions, articles, discussions and history related to Hearth Products and in a more general sense, energy issues.

    We promote the EFFICIENT, RESPONSIBLE, CLEAN and SAFE use of all fuels, whether renewable or fossil.
Status
Not open for further replies.

Redcedarme

New Member
Sep 9, 2010
4
Finger Lakes, NY
Hello everyone,

I love this forum it's been very useful in my (partial) installation of a Defiant 2.

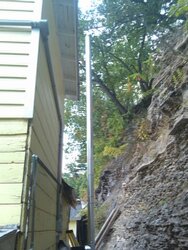
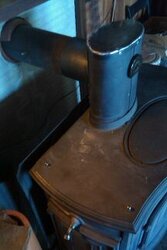
I've had a little trouble with my flue and it's height in relation to the stove's top exhaust. Every breakdown I've found for this and other Defiants of that era show a rear exhaust, which if I had, I wouldn't be writing. The darned thing is a few inches too high to line up with my existing flue!!

I know they make a short leg kit, but I would like to keep my distances as far as possible...

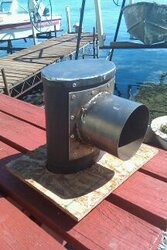
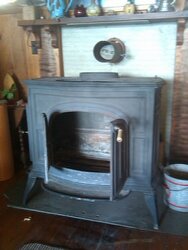
What the heck is this thing?

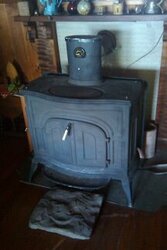
It was purchased new in 12/80 (he showed me the receipt) And it has the 2 piece fire back and baffle with a sheet metal thermo cover...

Have a look see...
 

Attachments

  • IMAG0329.jpg
    IMAG0329.jpg
    38.8 KB · Views: 423
Welcome. You will find the manual helpful. It is posted in two parts here:
https://www.hearth.com/econtent/index.php/wiki/Vermont_Castings_Older_Stove_Models/

This is a powerful heater and it requires a good hearth. The metal floor protection should have insulation board underneath it and extend 18" in front of the stove. The mantel shield looks wimpy. It will need a greater offset from the wood and it will need to extend beyond the width of the stove. Don't underestimate the heat that this stove can put out.
 
The rear exhaust doesnt look like its going to help you. If it was me, I would see exactly how much lower the stove had to be and sawzal the legs and buy/manufacturer a bottom heat shield. They used to make, back in the day and I think it was distributed by VC an 8" oval to round 90 degree offset. Im trying to remember 25 years ago. If you use a metal blade, VC legs cut like butter.
 
BeGreen said:
Welcome. You will find the manual helpful. It is posted in two parts here:
https://www.hearth.com/econtent/index.php/wiki/Vermont_Castings_Older_Stove_Models/

This is a powerful heater and it requires a good hearth. The metal floor protection should have insulation board underneath it and extend 18" in front of the stove. The mantel shield looks wimpy. It will need a greater offset from the wood and it will need to extend beyond the width of the stove. Don't underestimate the heat that this stove can put out.

What appears to be metal is actually a 3" thick piece of granite. I also have 6 pieces of slate stone that are cut to fit in front of that granite hearth. We just had moved them to get the defiant stove in place and went "hmmm ... too tall"

Behind the stove is something you can't buy anymore. Asbestos glued and pressed between 2 sheets of corrugated steel (galvanized)approx 3/8" thick. The same is under the mantel, the actual wood mantel is removable to show a metal frame work underneath. Though I agree, pretty wimpy.

I'm debating on going straight up through my (brand new '07) roof, which in that part of the cottage is only 6 vertical feet to shingles... or having a 8" oval to 6" round stainless elbow made by the local Mennonite metal shop. I understand that these won't draw well with that kind of restriction??

Also, you all should know... Behind said asbestos sheet is a 48" wide by 48" tall solid slab of concrete 6" thick, poured between the wall studs with the thimble placed in the middle. On the exterior, we have 2 more feet of horizontal 6" then a "T" and 16 feet of vertical rise 6" stove pipe. Yes very old school and beyond a code guys imagination. The old stove this is replacing was a Wagner & Fales Ida Bell made in Troy NY in 1863. My grandfather, a builder, installed this whole setup in 1939. And that old stove did she ever draw!!! The seams and doors leaked and sucked but it was a gasketless iron horse about half the size of this defiant.

Again, this is a cottage with zero insulation, sliding, drafty windows, approx 1400 Sq Ft. It's on Seneca lake and we stay there in the cold weather only a dozen or so times. We really struggled to stay warm there a few nights and my paranoia kept me up until that thing was near cold. (woodstove/ housefire survivior, 1997)

So the point is: I want to make this work, have something I can control even if only used in updraft mode, and most importantly, be safe!!!

I have the rear and bottom heat shields that came with it as well... I just really hate to have to lower this thing any closer to that floor....

Thanks...

Let me know what you think now...

Rob
 
I would definitely use the bottom heat shield no matter what.

As to the flue, I'm worried about whether this thing is going to draft correctly. That stove requires a very strong draft, and the two 90 degree turns take about 10 feet off the effective height of the chimney! So if the chimney is 15 feet high from where that goes in, the effective height is only 5 feet.

This stove needs a minimum effective chimney height of 14 or 15 feet.

You might want to consider a straight up metal chimney.

Also, make sure you have enough hearth extension in front of the side and front doors - at least 18"
 
these things are beasts, mine is a defiant II with rear exit going direct into the wall thimble and it has little pucks under the legs to raise it up to perfect height for the flue exit. It is a monstrous stove that puts out ungodly amounts of heat in my tiny house and doesn't burn terribly efficiently, even if you do short & hot fires. There's a secondary burn system built in (the top handle on the left side actuates that along with the secondary air port behind the side door) but it doesn't work for me, either mine's internally malfunctioned or I have inadequate chimney draft to make it work (most likely both). I'd say go straight through your roof if you can, your draft should be so much better and you'll get more usable heat in the house with having more stovepipe inside. Not that you'll need it with that thing!
 
Didnt know thru the roof was an option. That being the case, I need to agree with my good friend Mr Issod. Doesnt matter if the roof is 3 years old. My installers would rather flash a 3 year old roof than a 30 year old roof. The answer to your mystery is found by gazing upwards, eyes towards the heavens, sawzal in hand and a beer in the holder on your step ladder. Ascend ye verily and pass thru thy roof as our spirit will some day pass on the way to meet our creator in that house not built with hands.
 
Hi Folks...

Took me a couple more weeks and a lot of running around to get this finished up. I wanted to get your input on the final touches.

The first pic: Added 5 feet to the chimney.
Second pic: The 8" oval to 6" round adapter elbow fashioned by the local Mennonite metal shop.
Third & Fourth pics: the finished product installed.

I am burning 2 year seasoned, dry hickory. I use a bit of mixed kindling to get her going. In about a half hour it's ready for 3 large chunks of hickory. I let that get to the 550 range, flip the dampener up and walk away. An hour later, it hangs at 450 a long time and I don't open the door again until it drops to 250, maybe a total of 5 hours later from the time I first put the hickory in. It's mostly coals by then. When I open the side door (after dropping the dampener) more than a 6 inches or so, the draft nearly dies and smokes me out. So I quick throw more in and repeat the process.

Last Saturday here it went to 40F at night, and I started fire at about 4pm. Reloaded it at 9 and again at 1am. When I got up at 8am it was still 250. Inside the house stayed around 78 all night.

All these temps were taken at the top front of the custom elbow, just where you see it it the pictures.

Thanks in advance for your input.
 

Attachments

  • IMAG0372.jpg
    IMAG0372.jpg
    65.2 KB · Views: 231
  • 100MEDIA_IMAG0351.jpg
    100MEDIA_IMAG0351.jpg
    19.3 KB · Views: 245
  • 100MEDIA_IMAG0354.jpg
    100MEDIA_IMAG0354.jpg
    11.4 KB · Views: 222
  • 100MEDIA_IMAG0352.jpg
    100MEDIA_IMAG0352.jpg
    12.1 KB · Views: 226
Well, the old Defiant worked reasonably well last fall and this past spring in the un-insulated cabin. Till April 30th, that is. If you look at the pic in the last post you'll see how close we are to a 35' tall shale cliff. This cliff decided to deliver via gravity approx 16 cubic yards of itself on top of that nice shiny new chimney. It wrecked everything. It was enough to take 4 guys 3 Saturdays to shovel out.

Now I'm back to square 1 and contemplating taking a sawzall to my roof. I cannot seem to locate a kit online that is complete with the Class A triple wall, flashings, etc,etc. I have plenty of black pipe. There are not any ceilings in the cabin, just rafters and the roof decking. The roof is a 6/12 pitch. I've been Googling for hours now and can't seem to find what I need.

Any help is appreciated.
 

Attachments

  • 227245_162576467136223_100001516138273_378724_3170639_n.jpg
    227245_162576467136223_100001516138273_378724_3170639_n.jpg
    106.8 KB · Views: 129
That's a bummer. Download the installation manual for DuraTech. It is well illustrated and shows the parts needed for your system. From the description it sounds like you will be installing an 8" pipe, cathedral ceiling support box. Figure 19 in the instruction manual. Feel free to ask any questions if something doesn't seem clear or make sense.

http://www.duravent.com/docs/product/L150_Apr2011.pdf

I have had good luck working with Sean at dynamite buys. They are patient and will be sure you get all the right parts at a good price.

http://www.dynamitebuys.com/store/cart.php?m=product_list&c=52
 
Status
Not open for further replies.