Help??? Re-bricking what I think is a Grandma Bear.

  • Active since 1995, Hearth.com is THE place on the internet for free information and advice about wood stoves, pellet stoves and other energy saving equipment.

    We strive to provide opinions, articles, discussions and history related to Hearth Products and in a more general sense, energy issues.

    We promote the EFFICIENT, RESPONSIBLE, CLEAN and SAFE use of all fuels, whether renewable or fossil.
Status
Not open for further replies.

LHS905

New Member
Aug 3, 2014
5
Colorado
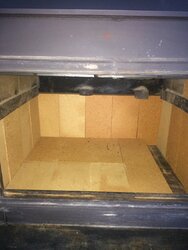
The thread title says it all I guess. I have what I think is a Grandma Bear and the bricks I pulled out weren't configured as the manual (That I found on this site--Thanks!) describes. The brick retainers are set at a height that precludes putting them in as the manual describes as well. The inside dimensions of the stove with the bricks out is 20" deep X 23" wide.

This stove came with the house when we bought it in 2006 and have been very pleased. Thankful that I found this site--lots of good information.

Any insight would be appreciated.

LHS
 
I believe those dimensions are for an older stove. (pre 1980) Does it have angle iron down the outside corners that become legs at bottom?

The manual for that stove does not have firebrick installation in manual.

You may be looking at the manual for the later model III that has rounded bent corners instead of angle iron outside corners. (that firebox is 25 deep X 23 1/2 wide)

IF the retainers are the correct height, the bricks fit under the retainers at top and sit on stove bottom. 5 bricks should be installed across stove back first. Then 4 on each side, then the bottom laid in across the stove. (start at rear) These hold the bottom of bricks tight to sides.

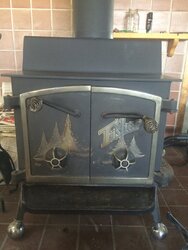
A picture would verify what stove model you have.
 
Thanks Coaly, I looked at a bunch of this site and honestly am still unsure of of what model I have. GM doors, but no vsible tag anywhere. I believe that it is a newer stove as you described (rounded corners), but the dimensions seem to be off. It does have a barometric damper that I've learned about from this site as well. I have laid the bricks in, but will have to cut some to finish the edges because of the off dimensions.

I will post some photos when I get home this evening.

LHS
 
Here are a couple of photos. The stove, and the brick. I also did not see a model of stove that has an upper course of brick that mine has. I only replaced the one that was broken.

Any ideas?

Brick.JPG Stove.JPG
 
Hm, every barometric stove I've seen so far had the old style box with angle iron corners. Thought maybe they only made them before the body change in 1980. Yours is probably a transition stove right around that time. Old box dimensions built in the new style for 1980. Both were available in 1979 as the change was taking place.
1979 III Manual with both styles available;
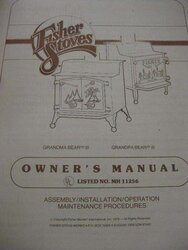
1979  III Manual.jpg

Not common with a barometric box, that's for sure.

Here's the back of a Grandma III from Colorado. The tag was attached to the rear shield incorporated into the round corners from 1980 up.
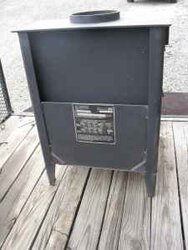
GM III CO. CL rear.jpg


Yours would be a II, the upper brick course was also added in that revision. Not all had them, and they don't show any signs of discoloration or warping without the second course.

The bricks in the old style box you gave dimensions for required cutting. You start with full bricks across back, then start with full bricks down sides installing rear towards the front. You will have a space in the front to fill in with cut bricks, but I'm not sure about your cut sizes. Grandpa takes a 2 9/16 filler piece, but the brick layout pages for Grandma is in the shop. I can look it up tomorrow, but yours may vary since we don't know if your new style box is made to the exact dimensions of the older prints. I can only let you know what brick size was called for with the old box with welded corners. (the model II) Once you know the cut size for the sides, the bottom gets the same size filler piece across front as well. (bottom bricks lay lengthwise across stove - full bricks on left, partial cut brick on right as needed)
You want to vacuum the stove well as you go, or they won't lay flat and fit good. They cut easily scoring with a masonry blade in a circular saw dry. Then snap clean. They are softer than a regular building brick. Don't be too critical of space between them. It will fill in with ash soon enough as you found out removing old bricks.
Be aware your first fire is going to use a lot of BTU steaming off the moisture in the new brick. So the stove won't seem to put out much heat until evaporated entirely.
 
Would thin washers under the right door hinges raise that door to line up with the left door?
The right handle can be aligned to close at the same angle as the left, by bending the inner rod of handle on a sharper 90* angle. The latch rod pulls the door tight on latch wedge at top. Heat the inside of latch rod before bending or it will go back during use.
Wish I had the entire manual for you, that's all I've got of it.
 
Well, alot of information there. I'm in Colorado so I presume it was made here. I was wondering about cutting the brick, I was going to ask a friend of mine that has a tile saw. I was also wondering about straightening up that right handle. How hot does it have to be? Oxy/acetylene or propane? I'll try the washers on the door alignment.

Thanks again.

LHS
 
They cut easier than a cement block or brick, and far easier than tile. A diamond tile saw is overkill, but cuts easy too. Not much different than cement board, if you've ever cut that.

If propane is all you have, you should be able to get it hot enough if you have someone hold the torch to the bend and try to get it to glow dull red. If you have oxy/acetylene, go with that. Much quicker. I bend it with an adjustable wrench - but don't put the wrench on it until ready to bend so the wrench doesn't act like a heat sink cooling the rod. Careful, the rod bends too far very easily. It comes from over tightening the handle and constant heating with the pressure on it.

Keep the hinge pins and draft cap threads greased with hi-temp grease. It looks good, even looks like original paint ! That door will polish up nice with Maas metal polish. That leaves a residue to prevent tarnish too. Won't take much to make that stove like new again.
 
Bricks finally in. Needed to cut the bricks 2 1/2" to fill the space on the side. 3/4" pieces to fill in at the front.

Now to fix the handle rod. Thanks agan Coaly for your help.

LHS
 
Status
Not open for further replies.