Help replacing pilot signature command pilot assembly on majestic 400dvb

  • Active since 1995, Hearth.com is THE place on the internet for free information and advice about wood stoves, pellet stoves and other energy saving equipment.

    We strive to provide opinions, articles, discussions and history related to Hearth Products and in a more general sense, energy issues.

    We promote the EFFICIENT, RESPONSIBLE, CLEAN and SAFE use of all fuels, whether renewable or fossil.

ezatnova

New Member
Jan 22, 2018
6
West Chester, PA
My 6 year old natural gas Majestic 400DVBNSC7 recently began shutting off the main burner and attempting to relight itself three times. It fails each of the three times after burning for 3-7 minutes. Zero issues igniting or keeping the pilot light going. Tested the thermopile millivolts and it does seem low (80-130 after pilot cooked the thermopile for 3+ minutes). I did really scrub the thermopile good with scuff pad, sand paper, etc, and no improvement at all.

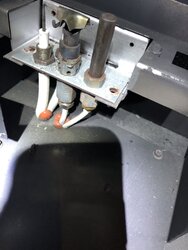
Figure it's time to replace the thermopile. But, I also figure that since the flame detector part (90 degree bent little piece, opposite the thermopile) also has some wear on it, I'd just replace the whole pilot assembly. How hard could that be...right?!

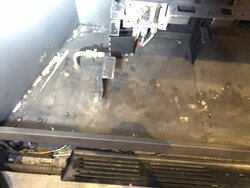
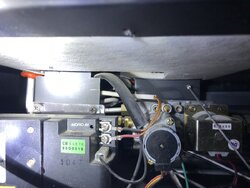
So I took out all of the easy stuff (logs, wool, grate) and vacuumed it out real good. Then, tracing the wires from the pilot assembly down below the "bottom" piece, it looked to me like I'd need to open up the panel sort of thing that is on the bottom to access the area where the wires go a lot more easily. Keep in mind that the wires are fire-stop siliconed in there too, so that would be easier to deal with this way too, I thought.

In order to get to the panel I wanted to unscrew, I had to unhook the burner. After unhooking the burner, I had access to the bottom panel and started undoing all the sheet metal screws that seemed to be holding it down.

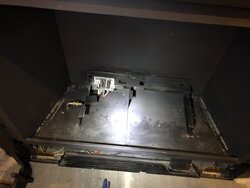
After removing a bunch, I realized this panel was not lifting up. There is a sort of fuzzy insulation of sorts on the underneath of it, and it seems "glued" or "sealed"...as in, it didn't seem to like it when I was pulling up on it (or pushing up from underneath) and started to sort of have a tearing sound, so I stopped.

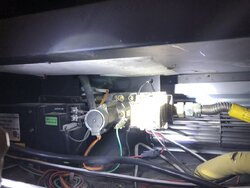
On top of this issue, after I stared at it some more, I realized that the gas line elbow with the brass fitting on the end of it would be completely in the way and not allow me to pull this panel up, even if I did keep going and tear the insulation layer up.

Can someone please help me with what I'm doing wrong here? If it is somehow going to be infinitely easier to replace just the thermopile, I'm willing to go that route (i.e. can I just unscrew the "head" of the old thermopile and put a new one on, and leave all the wiring alone). Otherwise, like I first mentioned, I'd like to replace the whole pilot assembly.

Attaching some pictures of what I'm dealing with.

Thanks!
 

Attachments

  • IMG_1028.jpg
    IMG_1028.jpg
    125.9 KB · Views: 332
  • IMG_1027.jpg
    IMG_1027.jpg
    111.2 KB · Views: 342
  • IMG_1024.jpg
    IMG_1024.jpg
    91.5 KB · Views: 322
  • IMG_1026.jpg
    IMG_1026.jpg
    153.7 KB · Views: 333
  • IMG_1025.jpg
    IMG_1025.jpg
    130.2 KB · Views: 308
I would replace the thermopile first & try to light the unit. If it stays running, problem solved.
If you STILL have issues, which I doubt, you could also try to scrub the flame rectifier sensor
& make sure it's grounded well...
 
I would replace the thermopile first & try to light the unit. If it stays running, problem solved.
If you STILL have issues, which I doubt, you could also try to scrub the flame rectifier sensor
& make sure it's grounded well...

Thank you. If I were just to try and replace the thermopile alone, can you help explain how I go about doing that? Seems like I would still need access to route the wire through, which would be easier if I could work in the space under the bottom area. I suppose, worst case, I could rip out the fire silicone and hope I can pull the old thermopile wires out, and try to get lucky feeding the new ones down in a way that I can get them and pull them forward to hook up to the connections.
 
Disconnect the red & black color coded wires from the terminal block by loosening the screws.
Looks like the pilot assembly is unsecured to the fire box. That's good because you will have to
GENTLY lift the entire assembly slightly to remove the thermopile (TP), although you may need to
install one screw to hold the assembly in position in order to perform the next step.
Loosen the 7/16" retainer nut on the TP with an open-end wrench, let it drop.
Remove BOTH blobs of RTV silicone from the holes & from the wires/tubing that passes thru them, so that you CAN lift the assembly...
Pull the TP wires up thru the floor of the fire box, & remove the TP.
Feed the NEW TP wires thru the hole & connect them.
Slide the NEW TP up into the assembly & hand tighten the retainer.
Gently re-position the assembly, & before you re-silicone the holes, re-install the glass & light the pilot.
Light the burner. If it stays on, you've solved the problem.
Turn the burner & pilot off, remove the glass & let everything cool down.
Re-secure the pilot assembly & tight the TP retainer.
Re-silicone the holes to seal them. This is IMPORTANT. Carbon Monoxide can leak out if you don't seal them completely.
Re-install everything else & you should be good to go.
Don't hesitate to ask if you have a question about ANYTHING.
 
Thank you very much. That was sort of what I had in mind, but you laid it out even better.

I haven’t tried to loosen the TP yet, but do you know if the 7/16” retainer is that top gray colored one? It looks like one there is a long “nut” (also gray) below that silver retainer plate, and then there’s a brass nut down at the bottom near the wire. That one looks like it might connect the TP to the actual wires? Just trying not to break anything.

Now for the million dollar question. I still feel like I’d rather replace the whole pilot assembly while I’ve got this sucker all apart and cleaned up. Is that even feasible for a non professional? Am I going to be wrecking something and/or would I have to completely dismantle all the electronic bits and gas connections etc underneath? I just don’t see how it’s physicslly possible to get to the flame detection wire and pilot gas line without opening it up for a lot more access, and I’ll defer to my original note where I mention it didn’t seem to be going well, trying to open up that bottom panel, both because the insulation part seemed to be tearing as I wasn’t lifting up, and then realizing that the main gas line elbow that was screwed into the burner would also prohibit me from really lifting up that plate.

Thanks again!
 
The TP retainer is brass & on the right. It is NOT connected to the wires. The wires go INTO the TP.

The answer to your MDQ is to do it if you want. I will say this, you will probably bleed. There are about 6 gazillion sharp edges on the sheet metal & working in or under the fire box will be tight. So bleeding is just about unavoidable. If you tear the gasket seal, you probably won't find a replacement, but tape gasket or MORE RTV can be used to re-seal it. The retainer on the small gas line for the pilot is a BEAR to seat even when it's out in the open for most gas valves, to be prepared to struggle & swear. Then you will need to check every gas line connection for leaks & even if you have a $300 "sniffer," finding a leak can be a real PITA.

Wow, thanks for th thorough and honest info. Sounds like I will quit while I’m not too far behind and just try and replace the TP!

Back on the TP, I’ll probably be able to see once I mess around with it more, but are the “top” and “longer bottom” gray nut shaped pieces on the TP not actually nuts? Sure looks to me like it is sandwiched to that silver plate by the two gray nuts.

Thanks again for all the help!
 
The steel hexagons above & below are part of the bracket. The TP slides into & thru them.
The lower one has an internal thread to receive the external thread on the brass retainer.
Once the brass retainer is unthreaded, the TP should slide out...
 
The steel hexagons above & below are part of the bracket. The TP slides into & thru them.
The lower one has an internal thread to receive the external thread on the brass retainer.
Once the brass retainer is unthreaded, the TP should slide out...

Awesome. Thanks again! Just for fun and completeness, I’ll report back if things work out or end poorly.