Help with Supervent install

  • Active since 1995, Hearth.com is THE place on the internet for free information and advice about wood stoves, pellet stoves and other energy saving equipment.

    We strive to provide opinions, articles, discussions and history related to Hearth Products and in a more general sense, energy issues.

    We promote the EFFICIENT, RESPONSIBLE, CLEAN and SAFE use of all fuels, whether renewable or fossil.
Status
Not open for further replies.
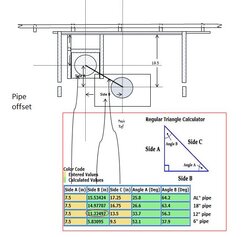
I have used the charts to figure that I can use a 12" piece of pipe between the 45s, move the cathedral box 3/4" closer to peak line and hit the stove outlet center line dead center (theoretically). Been doing some hypoten-using :confused:.

Unfortunately DSP does not offer a 30. I ordered some 45 DSPs for cheap off Amazon. Just ordered the rest of my pipe from Lowes.:)

offset.JPG
 
Last edited by a moderator:
We end up using a few different brands depending on the offset needed. Often the 7" offset that America-vent (super-vent) gives is too much, so DVL is the answer with only 5" of offset. 30 degree elbows are not common with connector pipe. 45's are very common though.
 
Also, the super-vent adaptor needs trimmed when using other brands of connector pipe. Otherwise the male end of the adaptor will protrude into the elbow far enough to restrict the flow.
 
Hey guys, I've been working on this in my spare time and making pretty good progress. I've ran into a snag.

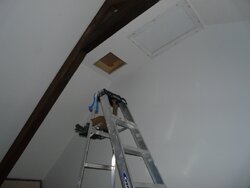
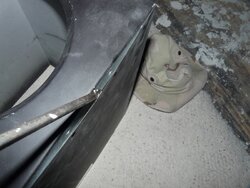
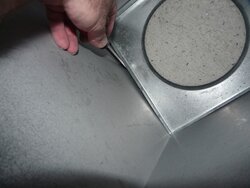
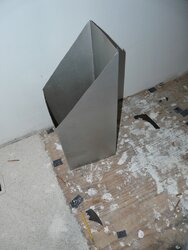
I have the wall and ceiling finished and this weekend I opened up the frame (cut away the sheet rock) for the cathedral ceiling support. I built the 25"x55" ceiling frame on the ground then hoisted it up and nailed it in. I did a test fit on the support opening before I installed the ceiling. But just my luck, when I tried to slide the support through the finished opening, it was tighter than the test fit so I was encouraging it with the butt of my hand and some of the pinch welds that hold the bottom plate came loose.

Need suggestions on how to fix.
1) Return and replace (Lowes)
2) Repair with rivets (if so what kind?)
3) find a sheet metal shop with a pinch welder.
4) Something else?

For the record, Selkirk instructions implies a 12" opening for the cathedral support. If you use 12", it doesn't fit. I measured the dimensions of the support at 12 1/8" and made the opening 12 3/16. The framing chart is mute for a cathedral support so logically it falls under "all other". This is not the case and the cathedral that I have should be framed to 12 1/4. 12 3/16 makes a wiggle-in fit.

My fix was tapping the framing out with a big hammer, used a hand plane and wood chisel to get to where it slips in easily. Luckily I didn't damage the sheet rock finish banging on it.

Pics of problem and progress.
 

Attachments

  • P1020584 (800x600).jpg
    P1020584 (800x600).jpg
    29.3 KB · Views: 168
  • P1020581 (800x600).jpg
    P1020581 (800x600).jpg
    65.8 KB · Views: 161
  • P1020582 (800x600).jpg
    P1020582 (800x600).jpg
    54 KB · Views: 160
I'm a little surprised the welds would break even with a bit of persuasion. Not sure I would rivet it, even though that would be easy and probably last forever, as any mods to factory chimney parts might not go over so well in an inspection (which insurance companies are demanding more often than not these:days). I think I'm being a bit paranoid but if it were me I'd return it.
 
I was a little surprised also. Those welds hold the weight of the chimney. I thought about the inspection aspect of it. That's one reason I wanted some opinions from the experts. Not sure anyone around here knows how to inspect a chimney.
 
I would probably repair it with 1/8" pop rivets. Drill an 1/8" hole, pop the rivet in. That will hold it forever.
 
I'm a bit of a hypocrite - I have used pop rivets to repair a chimney cap on my old install. The guy that did my inspection on current setup was pretty meticulous though. But as mentioned I'm pretty paranoid - more so than most.
The small possibility of your inspector having a burr up his a$$ and laser vision probably isn't worth making a special trip back to Lowes. Unless you have to go there to buy rivets ;lol...
 
Rivets or even some sheet metal screws will do just fine. At that height, no one will ever see it! As you can see there is nothing to a support box, just repair it and move on.
I always frame my opening for 6" chimney 12 1/4", any less and it's just too tight.
 
I always frame my opening for 6" chimney 12 1/4", any less and it's just too tight.

I think we mentioned before that the installation manuals are not too clear on some things. Either one of two things happened here... the manual is wrong or the box is out of spec. If hadn't had the box in hand at the time of framing, I would have made it 12" and now would be using a belt sander and wood chisel.

I appreciate you all helping on this. The mechanic in me wanted to shove some rivets in there and move along, but there's a lot of stuff about this I don't know so i had to ask. It would probably take 2 weeks to do an exchange because i had to special order.

Thanks again!
 
Given that the spot welds were stressed to the point of letting loose I would pop-rivet the other side too for peace of mind.
 
Makes me wonder - I've done multiple super vent installs with the cathedral boxes - couldn't pull any of those boxes apart with a truck (almost mangled one pulling it out of a tight install but welds held tight). I wonder if something's changed on the manufacture / quality control side of things. Probably over thinking things once again...:confused:
 
I can't see the rivets from my recliner :cool:

Steel pop rivets all the way around and I'm moving on. Time to temp in the stove and figure on the hearth.
 
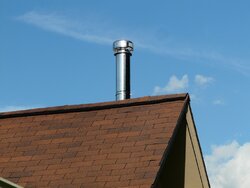
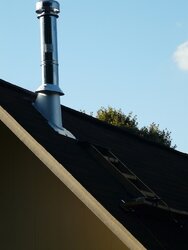
I have a couple weeks off work and hope to get finished with the install. Picking up the stove from HD tomorrow. Getting set up for the 45* roof penetration. I've trolled around and found a lot things that i shouldn't do with the roof flashing and learned that i need to seal the seams of the pipe and use no sealant on the flashing except at the collar. I'm by no means a roofer but my plan is to use roof brackets and 2x to support a home made 4' ladder up to the work area and hope for the best.

One question... I have the cathedral support box installed with one piece of chimney and the insulation from Selkirk in the box around the pipe. It was 90* here today and i shot the support box with my temp gun. It was 101*. Is this normal? Insulation doesn't seem to be working. Or will the pipe vent the heat out when the install is done? Once i get the insulation shield in (I'm building an extension from the square support up to the decking) would insulating the outside of the support and extension have any benefit or do any harm?

Edit: I forgot to block the pipe so the air from the loft was coming down the pipe. Duh.
 
Last edited:
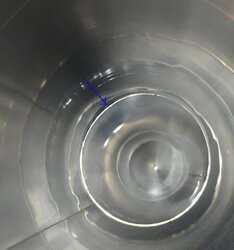
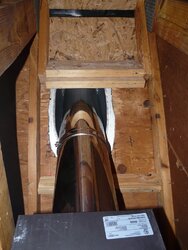
Moving along on the install. I believe the chimney is ready to seal the storm collar but need you guy's opinion on a couple things.

1) Looking at the picture shot looking up inside the pipe, is that gap acceptable? The pipe is locked together with band in place.

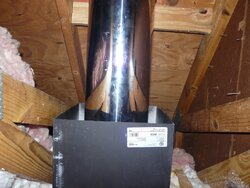
2) Taking earlier advise, I built an insulation shield that will enclose the entire length of the pipe inside the attic. Just want to verify/ validate that this is correct for this installation. Planning to attach it to the top of the support box with screws and to the framing running across the top with L brackets and screws.

3) Any show stoppers or opinions on progress thus far. You can't tell from the pics, but the 2" clearances are there.

Thanks in advance!
 

Attachments

  • stove pipe inside .JPG
    stove pipe inside .JPG
    32.9 KB · Views: 166
  • P1020590 (768x1024).jpg
    P1020590 (768x1024).jpg
    117.3 KB · Views: 180
  • P1020591 (1024x768).jpg
    P1020591 (1024x768).jpg
    126.5 KB · Views: 159
  • P1020595 (768x1024).jpg
    P1020595 (768x1024).jpg
    97.5 KB · Views: 183
  • P1020599 (1024x768).jpg
    P1020599 (1024x768).jpg
    83.3 KB · Views: 178
  • P1020600 (768x1024).jpg
    P1020600 (768x1024).jpg
    53.1 KB · Views: 161
  • Like
Reactions: Woody harrelson
Bump?
 
can't answer any of your questions, but the install is looking great. nice job
 
Normally the pipe is not chased entirely thru the attic but there is no harm in doing this. Looks like you are good to go from what the pictures show. The gap in the pipe is not uncommon.
 
Normally the pipe is not chased entirely thru the attic but there is no harm in doing this.

I had a lot of conflict when trying to decide if this is correct but I think this is the best way for this particular situation. At one point I had myself convinced that i need a rafter radiation shield, but later decided those are for framed enclosures. Duravent sells a support that would have done the job.

the install is looking great. nice job

Thanks, I muddled my way through it.
 
Looking at the roof - not sure you need it - the height could be ok or maybe borderline - but I'd be thinking about a chimney brace. Nice work on the install....
 
Gap in pipe looks fine, the install looks clean, you may get a gig though for not having an insulation shield going over the support box. As far as needing a brace for the outside pipe, I personally think your fine without one, if your in an area that would see tropical storm or hurricane force winds I would add one just for piece of mind.
 
Looking at the roof - not sure you need it - the height could be ok or maybe borderline - but I'd be thinking about a chimney brace. Nice work on the install....

if your in an area that would see tropical storm or hurricane force winds I would add one just for piece of mind.

Distance from upper slope to top of cap is about 45" so I'm good there. I live in tornado ally and we get hurricane remnants every now and then. 50-60 mph wind gusts are on average a semi-annual thing. Keeping this in mind, I used copious amounts of sealant on the flashing seams and storm collar. Once the sealant dried, it feels stable when pushed at top but the flashing does flex just a little. Not sure what a 60 mph push would do. Time will tell. I did think about a roof guy for piece of mind but have nowhere to install it.

you may get a gig though for not having an insulation shield going over the support box.

I fabbed the shield shown in the picture. Just haven't got around to installing it yet.
 
Looks like your on your way to some good burning soon, now you just need the cold to come in
 
Hey guys, I'm still at it. Got the hearth pad done and set the stove. I took all the DSP connector pipe out of the boxes and it's not to my liking. Maybe there's something about it I don't understand. I'm leaving the stove with a 36", then an telescopic length (38-68), then a 45, then an adjustable length (12-18), and another 45 into the chimney connector. I have read all of the directions several times.

No joint is really tight and the 45s are loose fitting. Not feeling too confident that I'll have good draft. Some of the outer pipes are malformed to the point where it appears that the screws won't pull. Any suggestions on how to make this successful ?

I have some Rutland 500 Black RTV and it appears that I'm going to need it.

And if anyone is wondering why this is taking me so long, I took a 7' spill when my ladder rolled out from under my feet. Put me out of commission for a few weeks.
 
Last edited:
All that matters is a good connection of the inner pipe liner. The outside can be loose, it's just a heat shield.
 
Status
Not open for further replies.