HELP with very basic installation

  • Active since 1995, Hearth.com is THE place on the internet for free information and advice about wood stoves, pellet stoves and other energy saving equipment.

    We strive to provide opinions, articles, discussions and history related to Hearth Products and in a more general sense, energy issues.

    We promote the EFFICIENT, RESPONSIBLE, CLEAN and SAFE use of all fuels, whether renewable or fossil.
Status
Not open for further replies.

BARRACUDABILLY

New Member
Oct 27, 2015
6
Spartanburg SC
I need some help with what I feel is a very basic installation that has me all confused.

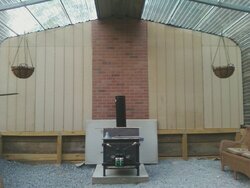
I have the old FISHER wood stove that came out of my Pop's shop and wanted to install in my new greenhouse. I poured a pad and made sure I have 20 inches clear(18 required 20 better?) I have a 36" wide industrial metal roof panel 16 ga. at the roof (flat). The greenhouse is a used metal carport frame built up on a 4x4 wood frame, I have a 12 foot clear height floor to ceiling and approx 8 foot of single wall pipe to the underside of the metal panel. (see pic)

My thought and intent was to come off the stove into a 90 deg ell and with a single wall 8" pipe
straight up thru the roof, just like Pop did for years. simple , I thought.

I am having a hard time finding a 8" pipe boot (flashing) and a 8" cap. all I can find is 6" stuff.
The local hearth and fireplace stores I have called say what I want to do is not recommended?
why? Pop did it this way for years, no double wall pipe stuff or penetrations. then every single one I called start wanting to sell me a pellet stove, NO, I want to make Pops old stove work. Also I live in the upstate of South Carolina our winters are mild we on average have some days in the high 30's nights low 20's at worst.

Thank you in advance for any help and education and web sites to order what I need to make heat from Pops old stove. I made an attempt to attach the photo of the greenhouse.

BB
 

Attachments

  • brick wall.jpg
    brick wall.jpg
    133.5 KB · Views: 405
I am having a hard time finding a 8" pipe boot (flashing) and a 8" cap.
Well you need chimney pipe through the roof not single wall. You will probably have to order 8" class a chimney stuff most shops dont carry it because it is not used much anymore. And i am also curious where you are saying you need 18" if you are talking about from the pipe you are correct but that stove needs 36"
 
bholler, Thank you for your help, I am getting more and more advice on not running the single wall up like Pop had.

I have 20 inches clear from the back of the pipe to the wall, I have not checked if I have 36 inches clear to the stove BUT I will check tonight and make any adjustments BEFORE I cut the roof.

Thanks again
BB
 
  • Like
Reactions: bholler
I have seen on several other threads not to reduce down from a 8 inch to a 6 inch. Can someone explain why? will it cut down on the burn rate or is it not safe to do so?

I went by 2 "stove and fireplace" stores yesterday both said they can order the parts I need (250-400 bucks!) but both asked me why I do not just reduce down to a 6 inch and use the standard products avalivable. is a 8 inch pipe a old thing? Do all the newer stoves use a 6" ?

I am still confused, the wife wants to fire up the wood stove and propane is expensive. I don't need a lot of heat to keep the plants alive in the south (a small 15,000 BTU propane heater did it last year) but I also need to be able to sleep and know the fire is burning and is safe. We live on a 20 ac farm and have plenty of free wood.

Please beat me up, someone school me on why I should not take this 8 inch pipe back and buy the 6" off the shelf and fire this old stove up?

Oh and one other question, bholler, you said I needed 36" clear around the stove? I have 32" clear to the concrete backer board behind the stove (see origninal pic in post) and right at 22" from the back of the pipe to the fake brick wall. do I need to extend my concrete pad out another foot to 18"? now is the time to do it BEFORE I cut the roof.

Thank all of you again for reading and posting I need the help.

BB
 
The concern with choking down the stove to 6" is insufficient draft. That will lead to smoke spillage when the stove doors are opened and possible back-drafting or back puffing. @coaly knows a lot about this stove and how it performs. He can give better advice about reducing chimney size.

Single-wall stove pipe needs 18" clearance, double-wall stove pipe needs 6". Unlisted stoves need 36" clearance from combustibles but in this case it may not be relevant if the brick behind it is a solid wall to the exterior and not just a veneer. If it is just a brick veneer, but with full-sized bricks then the stove clearance is reduced by 33% to 24". No clearance reduction is allowed for thin brick veneer.
 
Yes, most all newer stoves require 6 inch for the way they operate. An 8 inch flue is only capable of more flow, it doesn't create more flow.

The reason your stove has an 8 inch outlet is for open door burning with screen in place. This is called Fireplace Mode, and the larger flue is to prevent smoke roll in with open doors. The pipe damper then becomes your only control to slow the fire. Codes do not allow reducing down from stove outlet size to prevent a smaller opening, normally sized for firebox size. This stove physically works fine with 6 inch, even with open door burning with screen in place. (Unless you have a poor drafting chimney to start with) The larger Papa Bear is a single door stove with 6 inch outlet. So your firebox is technically fine with 6 inch. If codes are an issue, it technically requires 8. Reducing to 6 is more efficient since you don't need to leave as much heat up to keep flue temp above 250* all the way to the top. With 8 inch, you are heating almost double the square inch area all the way up, so you're loosing that much efficiency. That is the reason for insulated chimney pipe, and not stove pipe all the way up. outdoor air cools single wall pipe much too fast, and water vapor from combustion condenses allowing smoke particles to stick. This is creosote which will form rapidly if flue temp is not above 250* all the way to the top.

The manual gives floor protection size as well as clearance to the rear and sides.
https://www.hearth.com/images/uploads/Fisher_Manual.pdf

Is there 1 inch air space behind the backer board? If raised on bricks for airflow under and behind it, this becomes a heat shield and clearance can be reduced from 36" by 66%. The key is the air space with no fasteners with stand offs or ceramic insulators directly in the center line of stove behind it.
Cement board gets just as hot on the back as the front. It transmits heat very well, hence the air space to keep combustible behind it cool with air flow from under it, and up the back.
 
Thank you Coaly, this owners manual will help me a lot. First off I have the thank the good lord for not letting my Pop's house burn down for the 25-30 years we used this stove in his house, and he was a 25 year full time fireman, he should have known better. He broke every single rule I am finding on how to install and use this stove besides no pine and he had me to cut, split, stack ONLY OAK. This also explaines why he cleaned his chimney so often, before the first fire and it felt like every month.

I am a mechanical designer so I tend to over think and over kill everything, so thank you for putting up with me.

This stove is going to be used to heat a small greenhouse 17x15 - 255 square feet.

Here is my plans to make this installation right.

I am going to extend my concrete pad so I have the 36 inches clear the rear of the stove, plus more concrete more heat sink.
I will still keep the backer board for extra safety plus I need the heat sink.
I like the brick Idea with no thru penetrations, I was not sure how I was going to support the backer.

I have found a local store that says they have what I need to run 8" stove pipe to the roof and then into a support box? and chimney pipe up thru the roof, sounds like this is the safest way to go?

Now my overthinking question.

I have no plans on using this stove in the fireplace mode it is just for heating when the temp is going to drop below 35
so would a 6 inch pipe be more efficient for me to use? hotter temps at the top of the stack?
I am wanting a slow warm burn to go all night and ths is a large stove in a small room.

The code issue does come into play personally with me but this is all county built way out into the sticks no inspections no real code enforcement but right behind this greenhouse is my work shop with 2 restored Plymouth Barracudas that I have a lot of time and effort restoring that I want to protect. (my hobby the greenhouse is the wife's hobby)

Thank you again for you help and advice.

BB
 
  • Like
Reactions: Mule skinner
Yes, you want a 6 inch flue. You'll see many of these stoves for sale with reducers right at the stove. It's not a safety issue reducing. It's actually much safer since it will stay cleaner.

The support box is a metal box that mounts between ceiling joists in a flat ceiling, or rafters in a cathedral roof. The bottom is normally 2 inches below finished ceiling, and installed level since the bottom of box has a short starter section of chimney mounted in it. The chimney sections are a twist lock. There are two types of metal prefab chimney. A triple wall with insulation wrap around inner flue, a center shield, and outer casing. Or a "pack" chimney that has inner flue wall with a dense heavy insulation packed between inner and outer wall. They are smaller outside dimension, but much heavier.

Usually the case is many people have an 8 inch or larger flue with a more efficient 6 inch stove. The exhaust gasses expand entering the larger area and cool, allowing condensing and creosote. Newer stoves require 6 due to not only having a primary air intake like yours, they have a stainless inlet tube like a propane bar-b-que burner mounted above the fire. They need to get quite hot first, then close the primary air so the only way atmospheric pressure can get in is through the little holes in the secondary tube. This burns smoke at the top with very little flame from the actual wood burning. Moisture content in wood becomes critical with moisture meters since any moisture in the wood cools the area at secondary burner and the secondary ignition is lost. So any newer stove will require 6 since the rising gasses are what cause the low pressure area in stove to allow atmospheric pressure to push into stove. Same in your case, entering the air inlets. That's what makes it work. So the chimney is the engine that runs the stove. It's more important than the stove itself. Most any stove will work with a good chimney. No stove will work correctly with a poor chimney.

Here's a thread with a reduced Grandma with a video showing even installing a baffle plate is fine when reduced with proper chimney;
https://www.hearth.com/talk/threads/cant-seem-to-figure-out.119184/ video on page 2.
The baffle was factory to reduce smoke on later double door models and easy to fit to most older Fishers.
 
  • Like
Reactions: Mule skinner
I need help too! Our fisher doesn't seem to fit any pipe! The crimped end won't fit inside, and the straight end won't fit over the opening. What do I do?!
 
Welcome to the forum;
What stove model do you have? Top, rear or side vent?
Older stoves with flat top doors had 6 inch OD pipe. Newer stoves will have 6 inch I D which is pipe made to fit over the connector pipe.
Use the search feature at top right and search "over crimp" posts made by me in this Forum. You will get 10 to 15 threads explaining different ways to connect if you don't have a hand crimper tool.
 
I first want to thatk everyone that helped me out, and I needed a lot of help.
if you have kept up with this thread I was asking how to penetrate a single metal roof in a greenhouse
and was going between a 8 inch pipe and reducing down to a 6 inch pipe. I went 8 inch all the way.

We had our first fire in the old home place wood stove this past friday night, nice and warm.

Here are some pictures of what I did with advice from some of you and the local fireplace / hearth store.

I used a transition plate that had a nice thick SS flange plate, I then hung the plate with 12 inch long carrage bolts.
double wall pipe thru the roof.

INSIDESTACK.jpg

I used a old piece of roofing to make my cone and weather band down on the ground and doubled the roof tin
right under the stack. Lesson learned, the screws under the flashing had to all be removed and re attached on the roof
the screw was poking about 1/2 inch below the top piece of tin, no big deal but it was a lesson. I had to re-seal the black tar chiminey goop.
STACKCAP.jpg


I feel it all came togather wery well my cost was approx 450-475 for all the single wall and double wall stuff.
new fire brick and paint another 120, the wife is happy and that makes me happy.

Temperature at the clear panels was no different near the pipe than the ones away (shot with an infrad gun)
FIRST FIRE.jpg


our very first fire in our new -re-built stove. F.Y.I. Saturday it made cowboy (perked) coffee, bacon, hog jowles, liver mush, and pork chops just like granny Clampet only better because I am getting to eat and drink off of it. mmmmm GOOD!

Thank you again to all that helped me.
BARRACUDABILLY
 
Still need 3 screws at each pipe joint.
How many feet of single wall pipe? Is there a damper in it?

Here's a Fisher favorite;
Cornmeal Mush
Mix 2 cups Cornmeal, 2 teaspoons salt, and 2 cups cold water together.
Mix into 2 cups boiling water.
Stir over LOW heat until thick.
It should remind you of welding with a "blop" in the center that spits molten cornmeal on your arm when just right.
Pour into 9 X 5 rectangular bread pan and let cool. Refrigerate.
Slice thin and fry on buttered or oiled pan until browned.
Serve with jelly, jam or syrup.
 
I have put 3 screws at each joint, even bought the ones for stove pipe. (picture was taken before screws added.)
Approx 7 1/2 feet of single wall, that is a 3 foot section of double wall. (10 inches below 2 foot 2 inches above)

Now the damper. I bought one but did not install it. I still have it but should I install it?
Coaly can you please educate me on how it is used and how most people clean the pipe with the damper?

I do not want to have to take the stack apart and remove the damper to clean the pipe.
This is the reason I did not install the damper. I guess I could clean from top down to the damper and then back up
from the bottom side thru the tee?

Right now I am coming off the back of the stove with a tee, a cap on the bottom, and straight up to the roof.
To clean all I have to do is remove the cap's and brush it out, straight down easy and I like and need easy.
I plan on doing this often, like before the first burn and at least once a month, this might be over kill but that is how
I remember pop doing it.

Anywho do I need to install the damper? this big 8 inch pipe is really sucking hard. I went with the 8 inch because the wife
thought burning in the fireplace mode would be cool and it is, but it burns up the wood real fast would a
damper help choke down on such a hard pulling stack?

Also I am having to just crack my draft caps and the stove is still running at 300-350 degrees at the outlet,
at 1 round out it runs at 400-450 and will burn its load down to ash in about 2 hours, way too fast for me.

Thank you again for the help and advice.
BB
 
When you posted that you went with 8 inch all the way, I was thinking, the next post is "I'm going through too much wood"!

It would have worked fine with 6 inch open or closed.

The damper is installed in the first section of pipe where there is no accumulation to clean. Just brush down to it. Creosote will only form where you have much lower flue gas temperatures. (below 250* near the top) It is primarily for open door burning and when you have too much draft for slowing the chimney. (If you use a chimney whip instead of brush, you can even clean past dampers from the bottom up - check out "Soot Eater")

When open door burning with screen in place, close damper until smoke starts to roll in at top. Open slightly to prevent smoke inside. This is your setting to slow draft and fire as much as you can. It becomes your only control with doors open.

It's also handy if you're loading and a piece of wood gets stuck in the door opening. When the doors are open fighting a stubborn piece, you can close it partially slowing the fire until you get the doors shut.

In your case with the large outlet straight up, you should install a Smoke Shelf Baffle in the stove. Check out the baffle thread for details. They were factory installed on later models, and that thread is my idea of how to fit them into the single door stoves that were never supplied with them.
The baffle directs heat to the front top section more than the rear top section causing far less wasted heat up chimney. The damper would naturally be open more with baffle installed.

Damper operation is as follows in your case;
Always open damper when opening doors.
Start the fire with damper open.
Spin draft caps open a few turns each.
As the kindling roars up stack, close damper until the roar stops. This slows the heat loss up stack to preheat larger wood in stove to get it to catch.
You don't want to slow fire by closing air inlets at this point due to preventing oxygen from fire. This allows it to have as much oxygen as it can while slowing draft. As it comes up to temp, add larger wood and leave damper open. Close air intakes to about 1 turn or set burn rate as needed.

You will always have much more loss up the larger 8 inch flue than a 6. It is almost twice the square inch area and requires that much more heat to create draft and keep above the 250* condensing point all the way to the top. These stoves were designed back when most chimneys were existing fireplaces with even larger flues. So they required the larger outlet to leave that much up for even larger chimneys. That equates to less heat radiated from the stove, and more wood used.

Even with baffle installed, a 6 inch flue works good with the baffle adjusted correctly. Here's a thread with video of the stove reduced to 6 during open door burn with baffle installed;
https://www.hearth.com/talk/threads/cant-seem-to-figure-out.119184/page-2#post-1617042

Check pipe surface temperature with your IR just below double wall section section. You want temperature hot enough to stay above 250* to the top. This is surface temperature, not internal flue gas temp which is 30 to 50% higher. Approximately 350* surface temp in your case with the larger flue? Now you can see why I suggested the smaller diameter flue that requires less heat to keep it hot to the top. The more single wall pipe, the more loss you have before entering chimney. You can see using your IR, the temperature drop as it goes up. The smaller diameter flue also moves the smoke particles faster with less dwell time in the chimney to stick to cooler surfaces.
 
Status
Not open for further replies.