Heritage step-by-step build and install

  • Active since 1995, Hearth.com is THE place on the internet for free information and advice about wood stoves, pellet stoves and other energy saving equipment.

    We strive to provide opinions, articles, discussions and history related to Hearth Products and in a more general sense, energy issues.

    We promote the EFFICIENT, RESPONSIBLE, CLEAN and SAFE use of all fuels, whether renewable or fossil.
Status
Not open for further replies.

rwilson

New Member
Sep 18, 2008
59
Northwest Ohio
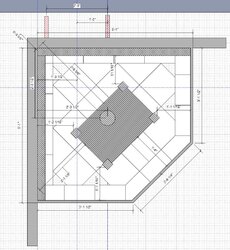
After many, many hours of thinking, planning, and the occasional headache... my project has finally started. For the next few weeks I will be completing my build and install of my new wood stove. I'm a computer programmer by day, but enjoy carpentry (especially furniture making), and thought installing a new stove would be an exciting project to undertake. To start, I'll show you some of the plans I drafted up on the computer. I have some other plans in my head and on some scrap paper, but wanted to make these on the computer to make sure I follow all the minimum requirements and have the computer double-check my measurements and computations.

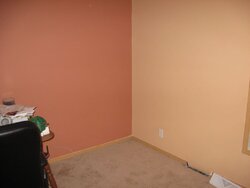
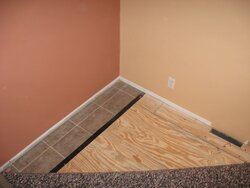
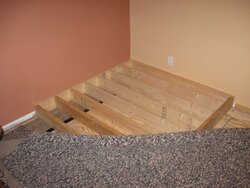
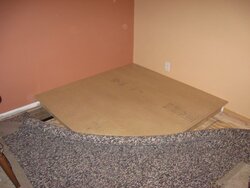
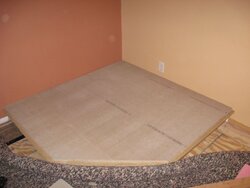
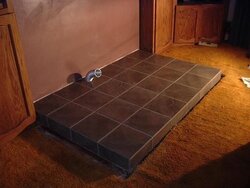
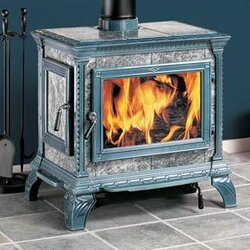
A little background. The stove is a Hearthstone Heritage Soapstone stove. It's going in the corner in our family room. I'm building a raised hearth and partially stoned back wall with mantel (I may wait on this until a later date as my clearances are already greater then needed to the combustible drywall).

So, here are the plans. I'll post some pictures this evening or tomorrow of the actual space. I'm going to try and document as much as possible to help those who would like to undertake a task like this. Hope you all enjoy!
 

Attachments

  • Dimensions.jpg
    Dimensions.jpg
    234.7 KB · Views: 1,041
Looks good already. It's great that you'll be documenting the process. I look forward to reading about the progress.

(PS: I put Heritage into the title for future ease of reference.)
 
This will be a fun and worthwhile project that you and your family will enjoy for years. Plus, it should provide added value to your home. I've rediscovered the joy of watching the fire burning in my new stove (you couldn't view the fire in the old stove that was in this house when I bought it); in fact, watching the fire beats most of the so called "entertainment" on the boob tube these days. (I wonder if the fact that new TVs don't have cathode ray tubes means that old slag phrase will be changed?) Enjoy and be safe when moving the heavy stove and working on the roof.
 
i just built my hearth for my hearthstone mansfield. i planned it so all 4 legs sit dead center on a full tile. i don't have the stove on the hearth yet, but i think this little detail will make a big difference. it may be something you want to consider while still in the planning stage. i'll try to get pics of the hearth up this weekend.....
 
Here's a picture of the corner before I got my hands on it! First, I pryed the base board off and began to fold the carpet back. Once the carpet was pulled back far enough, I ripped up the tack strips so the riser base would sit flush on the subfloor. There is a bathroom behind that wall, that's why the laminate flooring is there (helps stop any potential leaks from getting to the subfloor).
 

Attachments

  • OrignalCorner.jpg
    OrignalCorner.jpg
    33.1 KB · Views: 822
  • Subfloor.jpg
    Subfloor.jpg
    72.2 KB · Views: 853
Once I had the subfloor exposed, I placed the riser frame on the subfloor and secured it to the wall by screwing some 2" deck screws through the riser into the wall studs. I also toe-nailed some screws into the subfloor for added stability. I didn't put to many screws in here as all of the weight on this riser will hold it in place. I was more concerned about it moving during the build.

Once the riser frame was in place, I placed my first layer on the frame. I used 5/8" particle board for it's fantastic rigidity. This layer is strictly for stabilizing the next layer of micore because it is a softer material.

The particle board overhangs the riser frame by 2 1/2". In the end, I will finish this all off with solid oak and create a 2 1/4" overhang that is 5 1/2" from the floor (height of the riser frame).
 

Attachments

  • RiserFrame.jpg
    RiserFrame.jpg
    109.9 KB · Views: 850
  • ParticleBoard.jpg
    ParticleBoard.jpg
    98 KB · Views: 862
The next layer was necessary for my stove given it's high required R-Value of the floor protection of at least 1.2. With Durock only having an R-Value of .2 per 1/2", it didn't make sense to have so many layers of Durock. So, I used Micore 300 board instead. It has an R-Value of 1.1 per 1/2". I used 3/4" for added protected to create an R-Value of 1.65 (I've already exceeded my R-Value!). I will place Durock (1/2") on top of this Micore.

Living in Northwest Ohio, I wasn't able to easily find Micore. The nearest location was Macedonia (near Cleveland) nearly 2 1/2 hours away. My father (who lives near Cleveland) was kind enough to bring the board out here today so I could complete my build and get ready for the install. The Micore board was very easy to work with and cut very easily with a utility knife. It's a softer material, but great for the price and R-Value.
 

Attachments

  • Micore.jpg
    Micore.jpg
    70.8 KB · Views: 852
  • Micore300.jpg
    Micore300.jpg
    99.9 KB · Views: 843
I wish I could have used micore. I was unable to source it so instead made my raised hearth out of steel studs which I worry about collapsing since the studs aren't as stout as wooden ones. The only thing I would have done differently with your hearth, and maybe you did, would be to place blocking directly beneath the feet location of the stove. The point load of the stove legs will be fairly concentrated and could easily hit 150 psi.

Did you route the outside air duct to the crawlspace or?
 
We have a full basement, so I just decoupled the duct and capped it. As far as placing studs where the legs will fit, the framing is 8" OC with 2x6 lumber. The load capacity should easily handle the concentrated weight of the stove.
 
Correct, the 8" OC is seriously over-engineered. No problem with weight on that. You could park a Hummer on it. :coolsmile:

Folks worry too much about this sometimes. If a stove has a 3x3 foot hearth pad and it weighs 600 lbs, the weight is 150 lbs per each leg. That weight is distributed over 9 sq inches or 16+ lbs/sq in., and spread out over 9 sq ft. It's not much to deal with.
 
Last edited:
The stove does not have a 3x3 foot. It is a teensy weensy spot about the size of a quarter. Did you bring in outside air for the stove to burn? You know, directly connected to the rear of the stove? Like this?
 

Attachments

  • stovehearth.jpg
    stovehearth.jpg
    27.9 KB · Views: 744
Sorry, the photo is deceiving. Are there levelers or pads under those big feet?
 

Attachments

  • product_main_photo_3.jpg
    product_main_photo_3.jpg
    22.3 KB · Views: 705
Between the two sides of the foot that you can see there is a triangular piece which is part of the casting and which sits horizontally beneath the visible leg. The enamel of the outside of those legs does not touch the floor, maybe to prevent chipping. Within this little triangle is a bolt hole that is used to bolt the stove to the pallet or to the hearth in a mobile home installation. Even at 150 psi, most materials can withstand it. I just wish that I had put a simple block in there for extra feel goodness. Instead, I centered a framing member (steel studs)beneath the stove legs.
 
Ah thanks. All in all, I'm sure you'll be fine. We don't hear about many hearth tiles cracking. Surprising because we hear just about everything else. The cement board distributes the weight pretty well, especially if doubled up.
 
Sorry I haven't updated lately, but I've been so busy with work on the install, I haven't had any time to update this thread and post some more pictures. I'll try and get some pictures posted tonight or tomorrow night.

My install is almost complete. The tile has been layed and the stove is in place. I worked on the chimney last evening and it is almost complete as well. I just have a little more work on the chimney and stove pipe, and then just the finishing touches (trim) on the hearth and resealing of the carpet. Everything looks fantastic and I'm excited to have my first burn very soon!

I'll try and get some pictures up soon!

Thanks
 
Stove is up and operational (man I need to get some pictures posted). Started a fire this morning (after break-in fires the last 2 evenings) and it started well. I'm not quite sure if I have too much or too little draft though. If I open up the ash tray, the fire really gets roaring. As soon as I close it, it almost completely dies down. The air-intake lever is completely open. I thought maybe I had too much draft, so I closed the damper on the stove pipe and it helped quite a bit. It's still not a real roaring fire though, which I would expect to have with the air-intake all the way open. My wife is home tending the fire now, and she says it burning, but not at a high-rate. The magnetic thermometer on the top center stone is only reading about 250F.

What do I need to do here? How to I get the fire hotter without opening up the ash tray? I'm a fire newbie, so I need some help!

Thanks!
 
Straight through-the-roof chimney. 4 1/2' double-wall stove pipe hooked up to a 9' chimney. The top of the chimney is ~2 1/2' above the roof peak.
 
The stronger the draft the more air that will be sucked in the air intake. I'd open the chimney draft all the way. Your 9" chimney is wider than the stove pipe and that will decrease draft. How long is the chimney? I bet the lower temps this weekend will solve your draft problems once you open up the chimney damper. You might try to get the chimney as hot as possible by building small hot fires with smaller splits and then adding more small splits to build the fire after it gets going.

If your draft problems continue, you should consider dropping a flex liner through your chimney of the proper diameter for your stove.
 
Your chimney sounds great, well about the same as mine which I think is great. The first thing I would ask you to do is read the chimneysweeponline's guide to lighting a soapstone stove. I would be willing to bet that your kindling load is too small and your splits are too large. Another possibility is that your wood is too wet but your slow to heat comment is very typical of first time soapstoners.

Figure that you'll need to have all of your very dry splits cut to the 3-5 inch range. And for heaven's sake open up that damper, save it for when you want to extend the burntime at 550. I usually give my stove a boost by cracking the side loading door. Shut it a step at a time until the fire has gained momentum.

Here's a typical fully loaded heritage with at least 7 pieces of softwood.
 

Attachments

  • lick em 007.jpg
    lick em 007.jpg
    32.4 KB · Views: 509
Highbeam, thanks for the advice and the link!

Here's how I "started it up" this weekend...

I used a FireStarter square with about 6-8 small pieces of kindling on top of the square. Lit the square and waited for about 3-5 minutes with the ash door closed, the front door closed, the pipe damper open, the air-intake open, and the side door cracked open. After a minute or so, that kindling is really going with tall flames and all smoke going right up the flue. I then place 2-3 very small splits (about 2"-3") on top of the kindling and continue to keep the side door cracked open. After 5-10 minutes, that really gets going and is burning very fast. I then place a medium sized log (or 2) on top of the small splits and continue to keep the size door cracked open. No smoke comes out of the side door (it doesn't even smell), so I just leave it open for a while (maybe another 10-15 minutes) and let the fire really get roaring. So, after all this it's been about 30 minutes or so and the magnetic thermometer on the top stone reads about 225-250. I then add another log or two, shut the side door and keep the air-intake wide open. The fire continues to roar and the stove climbs temp at a decent pace. Since it's not too cold here yet (upper 30's at night/morning), I'm only letting the stove get to about 350-400 degrees. I then close the air-intake all the way, and then open it up just a crack to keep the firing going. After a few minutes the logs really aren't shooting any flames, just burning and creating large hot coals. I just let it sit that way and when the box gets low throw another log or two in. The stove cools down a bit to 250-300, but I can keep it there for hours on end.

I'm sure once it gets really cold, I'll have to figure out how to keep it at 400-500 for hours on end, but for now it's perfect. I'm THRILLED with how easy it is to operate this stove (once you know what your doing), and how it puts off such a slow, even heat. The kids bedrooms are right next to the family room with the stove, and they are staying perfectly warm throughout the night. The family room will be about 76-78, their rooms are about 75, and our bedroom on the other side of the house is about 70. It's just how I'd like it!

So, thanks again for all of the advice! Let me know if you see anything wrong with the way I'm doing things. I plan on checking on the chimney next weekend to determine if I have creosote forming to fast since it's a brand new installation.

Thanks again!
 
That's great Rwilson, the only things I do a bit differently are to:

Assemble the entire fire with starter block, 9 sticks of kindling, 2-3 small splits, and then maybe a larger one on top if there's room. I light the whole thing off at once and it comes down enough in the first half hour to reload with regular wood. I figure that I may as well be preheating the bigger wood and my draft is good enough that the larger logs don't hurt me.

The other thing I do slightly differently is to turn the stove down in a few steps. From full to half throttle after the first half hour and then down depending on heat needed after that. I slam the throttle shut at night and the stove burns clean for a long time at 450 that way. I have developed confidence that the stove won't run up past 450 if the throttle is shut but will run up past 550 if the throttle is even at 25%. With a 600 degree overfire temp I am not happy with 575.

I'm so glad the stove is working out for you. My first year burning the heritage I used red cedar and cottonwood and still only ended up with about a pint of brown creosote after a year. The limit I've heard is 1/4" of creosote buildup before sweeping. This time of year I usually load with three logs but will go for four or more in the winter.
 
Yeah, I still have a LOT to learn about how my stove will react to different situations. Can the stove temp rise with the air-intake shut all the way down? I understand air is still getting into the stove, but just not sure if the temp will rise under that situation...

As far as creosote, I'm going to inspect my chimney this coming weekend to play it safe and determine how my wood is burning. I was thinking about just inspecting the chimney from the top and seeing how much creosote (if any) has built up. Should I inspect the stove pipe as well?

I'm not very knowledable about how each species burns. I'm burning wood from my parents 17-acre woods. We do all of the cutting and splitting ourselves. This is my first year really helping out, but my step-father says he usually just cuts up the "dead" trees and uses them for fuel as they are already "seasoned." They may only sit for a few months, but have been dead for 1-year or longer. When splitting them, they seem to be quite dry and they are burning well (from what I know). So far, I've only burned wild cherry and elm. They both burn well with the elm putting out a little more heat.
 
Status
Not open for further replies.