
Heritage step-by-step build and install
- Thread starter rwilson
- Start date
-
Active since 1995, Hearth.com is THE place on the internet for free information and advice about wood stoves, pellet stoves and other energy saving equipment.
We strive to provide opinions, articles, discussions and history related to Hearth Products and in a more general sense, energy issues.
We promote the EFFICIENT, RESPONSIBLE, CLEAN and SAFE use of all fuels, whether renewable or fossil.
You are using an out of date browser. It may not display this or other websites correctly.
You should upgrade or use an alternative browser.
You should upgrade or use an alternative browser.
- Status
- Not open for further replies.
 :cheese:
Highbeam
Minister of Fire
The stove can continue to warm up even with the damper shut tight. This usually happens when you have a fresh load of wood into a hot stove but it can also happen when you forget to close it down and the fire gets some momentum. I usually get the second condition at 525-575. Both cases are pretty short lived though and things will settle down to 450 before too long. I think this scenario has a lot to do with the draft of your chimney mostly and then the wide open secondary air system giving all the air that the stove needs.
Can you explain (or point me in the right direction) the whole secondary burn scenario? I noticed this last night when I shut the stove down and flames appeared to only be coming out of the tubes for 45 minutes or so. It was quite spectactular to see. What is actually happening during this? Does the stove usually heat-up during this? Does the wood burn slower during this? How do I obtain this again, because it seems like a "good" thing
Sorry to be ignorant on this...
Sorry to be ignorant on this...
Highbeam
Minister of Fire
This is the secondary combustion that allows our non-cat stoves to burn cleanly. It is the goal of each fire to get and maintain the ghost fire above the actual fire for clean burn, efficient burn, and long burn. I couldn't do it justice by trying to explain it so I'll take the wussy way out and ask you to do a search. The ghost flame show is very cool on the heritage and many visitors are just as wowed by the ghost flames as they are by the soapstone. One guy thought I had added a gas injection manifold to the stove since the flames appear to be a petroleum fire. Figure that in the old days all that fuel that is providing the ghost flames would have gone right up the chimney.
Highbeam (or anyone else),
Did you notice "cracking / expanding" sounds from your Heritage when burning? I've noticed it this morning and figure it is completely normal. They aren't big cracking noises or anything, just sounds like metal expanding and contracting.
Did you notice "cracking / expanding" sounds from your Heritage when burning? I've noticed it this morning and figure it is completely normal. They aren't big cracking noises or anything, just sounds like metal expanding and contracting.
Highbeam
Minister of Fire
Oh yeah, these things tick and pop just like any stove. The pipe makes ticks and pops too. All happen mostly during warm up.
Highbeam
Minister of Fire
Oh yeah, these things tick and pop just like any stove. The pipe makes ticks and pops too. Happen mostly during warm up.
edthedawg
Minister of Fire
My Heritage ran well for the whole night last night, and fired right up from coals this morning. It was about 29F out, and 60-65 indoors. I was impatient trying to get it settled in this morning, but Woodstove Wife to the rescue and all was well. It popped and tinked a lot last night as I was getting it settled in. Seems normal.
I put about 3 logs on last night when the stove top was at 300 and turned the air-intake down to about 10-15% open. The secondary burn was really rolling for a little while, and the stove stayed around 300. The flames then finally went out leaving the wood just glowing. I left the stove that way and went to bed. The baby started crying around 5:00 so I got up and checked on her. It was 30 degress outside and 75 near the stove and kids rooms (about 70 in our room). The logs were mostly burned up with a nice bed of glowing coals remaining. The stove top was about 200 degress. I put another log on to try and keep the temp around 75 in that room. I went back to bed and woke up again at 7:15. The stove top was still at 200 and the room was still at 75.
Hopefully I'm not burning too slow. I get the fire really roaring 1-2 times a day, but the rest of the time it just glows red. I can't keep the window clean either...
P.S. - Pictures should be up TONIGHT. My laptop hard drive died on me yesterday, so I've mainly be working on restoring my system. I inspected the chimney top yesterday and took some pictures of it as well that I'll post. There is defintely some "junk" in there, but I think it's doing pretty good! Hopefully the pictures can help you guys determine if I'm burning clean enough and good enough wood")
Pictures are coming, pictures are coming...
Hopefully I'm not burning too slow. I get the fire really roaring 1-2 times a day, but the rest of the time it just glows red. I can't keep the window clean either...
P.S. - Pictures should be up TONIGHT. My laptop hard drive died on me yesterday, so I've mainly be working on restoring my system. I inspected the chimney top yesterday and took some pictures of it as well that I'll post. There is defintely some "junk" in there, but I think it's doing pretty good! Hopefully the pictures can help you guys determine if I'm burning clean enough and good enough wood
Pictures are coming, pictures are coming...
Highbeam
Minister of Fire
The stove sounds like it is working very well for you. The stove temps seem low to me though. I can't really even get a good rolling secondary until after 300 on a good day and the stove doesn't really make a lot of heat until 400 and up. Perhaps your thermometer is reading low overall. 200 is pretty cold. Can you hold your hand on it? I wonder if there is a way to test for calibration.
Looking forward to the pictures.
Looking forward to the pictures.
rudysmallfry
Minister of Fire
I also have a Heritage. The only thing that comes to mind regarding the draft/temperature issue is the chimney height. I think the minimum is 13' for the Heritage. I'm well above that height and still occasionally have draft issues. You're way ahead of me in terms of the initial pipe out of the stove going straight up. Mine's a right angle to the wall that I had to make up in chimney height. Just throwing it out there. I wanted my stove in a corner too, but elected for a wall where the chimney would be closer to the apex of the roof. It made for much easier cleaning. I wish I could have done your setup.
Highbeam,
I wonder if my thermometer is off. If so, when I had it up to 400, it may have REALLY been hot! At 200 I can touch the stove top and not get instantly burnt, but it's still hot. When it reads 325+, I really can't touch it unless I want to get burnt a little. I was thinking of installing a probe thermometer. Any suggestions on a good probe and where to get it?
Rudy,
I seem to have wonderful draft as I get nice tall flames just minutes after starting up the kindling. I can also have the side-door open and get absolutely no smoke come out of the firebox. When the fire is producing smoke, it looks like a vacuum is sucking it up the chimney. As far as the height requirement, I'm not sure if that includes the stove pipe as well. If so, my entire venting system is 14' (5' stove pipe + 9' chimney). I can't imagine having a requirement of a 13' and it just being the chimney sections only (but what do I know?!).
Highbeam
Minister of Fire
Perhaps dunk the thermometer in boiling water to check against that temperatuer or put it in the oven at a normal 350 to make sure the rutland rolls up to 350. Make some cookies while you're at it. I suppose everyone's pain threshold is different but I can touch mine pretty easily at 325, even sweeping off the dust from the stove top with my hand. Maybe my thermometer is reading high? Ours seem to be different though since I know that at 200 my stove is not hot to touch.
Chimney measurement is from the stove's collar. The interior pipe is included. Some other brands even measure the chimney length from the firebox floor.
Many folks seem to love the condar probe thermo. However, a probe thermo is not what you want to measure heat output and overfire temps. A probe is great in addition to a stove top meter though. Be sure that the stove top meter is setting on the soap. Many online places for the probe.
When I came home from work today my wife had dinner in the oven at 325. I put the thermo in the oven and in about 2 minutes it was reading about 340-350. We then turned it up to 400 and waited about 5 minutes. The thermo read 400 exactly. So, I think my thermo is good...
My stove is definitely hot to the touch even at 200. I could probably put my hand on the stove for 1/2 a second.
My stove is definitely hot to the touch even at 200. I could probably put my hand on the stove for 1/2 a second.
Highbeam
Minister of Fire
Well... my laptop hard-drive crashed and then my PC decided to crash as well! So, I've been restoring in my free time, but I finally have time to upload some pictures and continue this thread for it's original purpose.
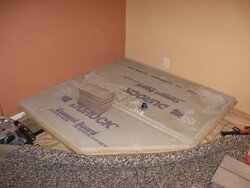
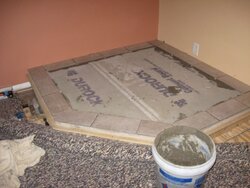
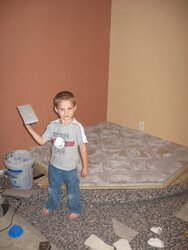
After the micore board was done, I added some Durock for extra rigidity, a little extra insulation, and basically a tile-backer. I used 1/2" Durock and screwed some concrete screws through all the layers into the frame.
After the micore board was done, I added some Durock for extra rigidity, a little extra insulation, and basically a tile-backer. I used 1/2" Durock and screwed some concrete screws through all the layers into the frame.
Attachments
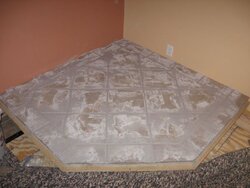
Laying the tile...
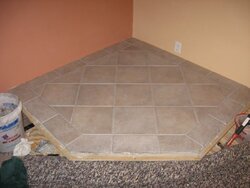
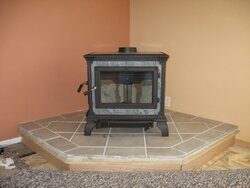
I started with the border and then layed the tile from the front to the back. I did it this way so any "mistakes" would be in the back, behind the stove. I've never layed a tile before, but I found it fairly easy to do. The border is 6"x12" and the full tiles are 12" x 12". There were lots of cuts to be made, and this job took a long time (about 4 1/2 hours). The spacing is 1/4".
I started with the border and then layed the tile from the front to the back. I did it this way so any "mistakes" would be in the back, behind the stove. I've never layed a tile before, but I found it fairly easy to do. The border is 6"x12" and the full tiles are 12" x 12". There were lots of cuts to be made, and this job took a long time (about 4 1/2 hours). The spacing is 1/4".
Attachments

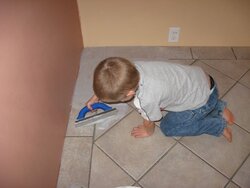
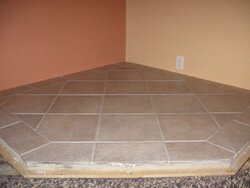
Time for grout! My 5-year old helped out and he picked up on the technique very quickly. He did a great job! The grout was supposed to be "silver" which should have blended perfect with the tile. The color ended up being lighter, which looks okay, but wasn't exactly what I had planned.
Attachments
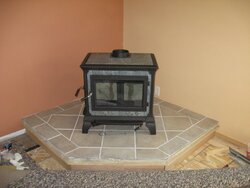
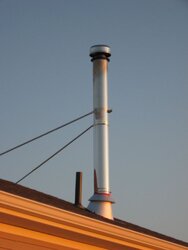
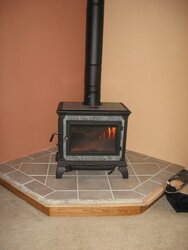
It took a few days until I could work on it again, but in a couple of evenings I had the chimney installed. It's a straight, through-the-roof chimney, but I did have to reframe a little as it went right through a rafter. I included a picture of the chimney from the outside. This picture was taken during the first burn. It looks much better with the carpet finished and the bottom trim complete. The trim is made of 3/4" solid oak. Only thing left is the top trim (when there's time
Attachments
Highbeam
Minister of Fire
That must be the damper section right on top of the stove, fantastic, so did you screw anything into the stove collar?
The damper is installed in the stove pipe adapter, right out of the collar. Each section of pipe has 3 1/2" black sheet metal screws that secure it to the next section of pipe. There are 3 screws in the stove pipe adapter that screw right into the collar.
edthedawg
Minister of Fire
Are the vertical stove pipe sections assembled w/ the lower one inside the upper one at each joint? Tough to tell from the photo but shouldn't that be reversed for creosote flow?
Great installation - you're going to love the Heritage once you get used to it
Great installation - you're going to love the Heritage once you get used to it
- Status
- Not open for further replies.
Similar threads
- Replies
- 63
- Views
- 2K
- Replies
- 5
- Views
- 412
- Replies
- 10
- Views
- 1K
- Replies
- 19
- Views
- 612