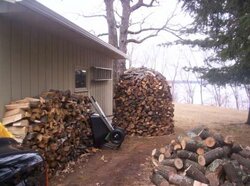
Holz Hausen (Haufen?) Pics

  • Active since 1995, Hearth.com is THE place on the internet for free information and advice about wood stoves, pellet stoves and other energy saving equipment.

    We strive to provide opinions, articles, discussions and history related to Hearth Products and in a more general sense, energy issues.

    We promote the EFFICIENT, RESPONSIBLE, CLEAN and SAFE use of all fuels, whether renewable or fossil.
Status
Not open for further replies.

Mo Heat

Mod Emeritus
Nov 18, 2005
848
St. Louis, Missouri
German holz hausen (wood houses) or holz haufen (wood heap) method of stacking wood.
Location: Near Poland and Lithuania.
Size: Big one! Looks like about a 10 foot diameter.
Source: Public domain photo from Internet.

Add a photo of your own holz hausen or holz haufen to this thread (if you feel like it).
 

Attachments

  • holz hausen 01.jpg
    holz hausen 01.jpg
    23.3 KB · Views: 15,474
When are you going to build yours MO? I think you got the itch!
 
Todd said:
When are you going to build yours MO? I think you got the itch!

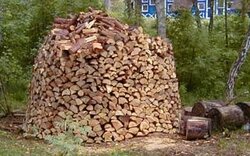
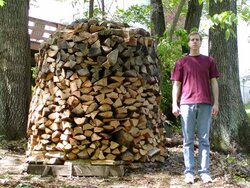
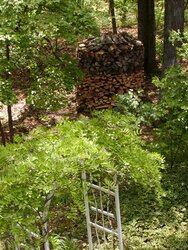
I had the itch and finally scratched it. I've included a pic of my first holz hausen (or holz haufen).

Todd, I appreciate you sharing your pics and technique. They got me interested enough to build one. As a side note of moderate interest, when Mother Mo Heat first laid her eyes on the completed structure, she actually gasped and said, "It looks just like a little house!" Seemed like a big coincidence after earlier discussions of whether the correct term was holz hausen or holz haufen. Maybe both are correct.

Some comments regarding my holz hausen. :)

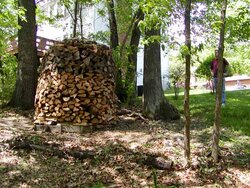
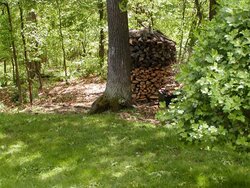
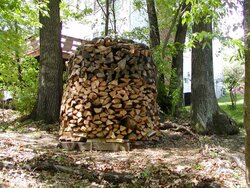
It's built on a hillside so it's taller on the lower side and overall, a bit shorter than Todd's.
It's about 7 feet wide and 6.5 feet tall. I needed a step ladder for the top, none-the-less.
My center post (a cheap 1 x 2) was warped, so my stack got a little squirrely in places (asymmetrical circle).
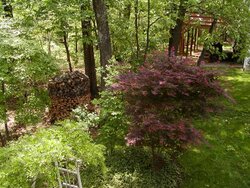
I didn't account for my wood well, so I can only guess it contains about 2 cords.
The bottom half is fresh cut wood, the top half is year-old wood.
It took longer to build, and required more artistry in stacking, than I anticipated.
The foundation is of limbs laid cross ways with others laid around the perimeter (no splits touch the ground).
Note the landscape timber on the lower hillside with three stakes for stability.
My next holz hausen should be a bit easier to build. I learned a lot.
Building the top half went much faster than building the foundation of random limbs and the bottom half.
I may make the next one a bit wider and taller. I think lesser angles will be easier to stack.
I won't use full splits as stringers next time like I did on one of the bottom courses. Smaller stringers are less distracting.
Six inch half rounds make great shingles for the top.
I feel like I've created a work of Yard Art. :)
It looks ogranic. As though it grew out there. More pleasing to the eye than the wood rows it replaced.
So far, everyone that's seen it, loves it. Mrs. Mo Heat thinks it looks like a giant pine cone.
 

Attachments

  • P4300013,-holz.jpg
    P4300013,-holz.jpg
    57.9 KB · Views: 11,159
  • P4300016,-holz.jpg
    P4300016,-holz.jpg
    63.3 KB · Views: 11,164
  • P4300006,-holz.jpg
    P4300006,-holz.jpg
    59.3 KB · Views: 13,668
  • Like
Reactions: Jon1270
Here's a couple more photos...

The guy is my brother-in-law. For reference, he's 6'2" tall. 6'3" with his shoes on.
 

Attachments

  • P4300014,-holz.jpg
    P4300014,-holz.jpg
    67.6 KB · Views: 10,035
  • P4300010,-holz.jpg
    P4300010,-holz.jpg
    54.8 KB · Views: 11,502
  • P4300007,-holz.jpg
    P4300007,-holz.jpg
    63.5 KB · Views: 10,243
And a couple more...
 

Attachments

  • P4300011,-holz.jpg
    P4300011,-holz.jpg
    55.5 KB · Views: 9,656
  • P4300008,-holz.jpg
    P4300008,-holz.jpg
    61.9 KB · Views: 9,939
  • P4300015,-holz.jpg
    P4300015,-holz.jpg
    62.6 KB · Views: 9,651
Thanks to Marcus for the original post... Here's the thread that started it all:

https://www.hearth.com/econtent/index.php/forums/viewthread/1630/

I thought it would be nice to have a consolidated holz hau[sf]en (Unix regular expression substitution :) thread that included Todd's photos (buried in the link above -- I got tired of searching for them), so here are Todd's photos...
 

Attachments

  • 100_0330.JPG
    100_0330.JPG
    25.9 KB · Views: 10,559
  • 100_0329.JPG
    100_0329.JPG
    22.5 KB · Views: 10,916
elkimmeg said:
Mo does that location get any useful sun exposure?

I was hoping no one would ask that... ;)

The answer is no, but it's the same story for the whole back yard and my wood seems to dry okay out there. I've thought about that a bit and theorize that, for many reasons I'll leave unwritten, it may not make as much difference as you'd likely think. I'm also abandoning covering my wood until next winter is nearly upon me. And since I bring in about two weeks of wood into my basement, I may just skip covering it altogether and see how that works. Covering is a pain and Mrs. Mo Heat hates the way some of my solutions looked. If there are problems, I'll report back (I'll need somewhere to whine about it :). If no problems, I'll try to remember to report back also.

The web site that lists average moisture content for wood doesn't even consider sun exposure, although I'm sure it has some effect. But consider that lumber left in any location, even inside the lumber barn, eventually reaches a steady state of moisture, depending on all the factors most of us are familiar with. I'm counting on that chart to see me through next winter. And maybe the Missouri summer heat. If you've ever been to Missouri (pronounced: miz' - er - y :) in the summer, you'd realize the ambient air temperatures here will probably make everything right.

BTW: Isn't it time you built yourself a holz hausen? I bet your wife would love it if your woodpile is within eye-shot of the house.
 
Here is a bit of advice when you know there is going to be a soaking rain cover it. Leave the cover off all the rest of the time till mid to late Sept. Me I have teied and true methoids of stacking I have used this method in the past. My problem is I keep getting more and more wood. Any wood I get now is two or 3 seasons out
Current inventory enough cut split and stacked 6 cords for next season. 6 more cords roughly 2 years old, split still need some processing and stacking. 3 cords in log lenght, partically cut to rounds, that need splitting and stacking. At least 3 more cords log lenght to pick up and I will probably add a cord or two more.

Then I give away a cord or two to help this guy out that can only process rounds up to 10/12" Anything more he cannot handle it. pl I rebuilt his stove. He was going to be the reciever of the free stove donor program, but pride, and looking needy, and publicity He wanted no part. So I did the next best thing rebuild his stove
1987 Defiant Encore. Believe this, he never used the cat never dampered down, till I would load his stove each day as he recovered from medical opperations. The cat was still in decent condition and usable.
 
Mo,
Nice looking pile! I think I want to try this.

Did you make just one ring of splits and fill the center with horizontals? I was wondering if in an 7-8 foot diameter stack you could make a ring within a ring? Did you take any pictures while it was still in progress?

-Dan
 
Turner-n-Burner said:
Mo,
Nice looking pile! I think I want to try this.

Did you make just one ring of splits and fill the center with horizontals? I was wondering if in an 7-8 foot diameter stack you could make a ring within a ring? Did you take any pictures while it was still in progress?

-Dan

Thanks T-n-B. I recommend giving it a try. It was a bit of work, but I like the finished product, and I think my neighbors will too. I'm going to start another one just for the aesthetics and the economy of real estate. It will be a conversation item during the next neighborhood progressive deck party. And it will allow plausible deniability that I am a wood burner. I'll just tell them it's yard art. ;)

Mine has only the outer ring of splits. The center was filled with splits stacked on end, but by the time I got to the top, it was a free-for-all, any way I could get them in there and balance the roof splits on top. You probably could make a ring within a ring configuration. Yard art allows artistic license. :) There was some speculation that the vertical position of the middle pieces allowed better air flow, but I'm not sure how beneficial it actually is. I think we're all experimenting at this stage and probably will be forever more.

Check out these links for more ideas:

http://www.gransfors.com/htm_eng/yxboken/bok04.htm

http://www.thechimneysweep.ca/6seasoningwood.html

http://www.motherearthnews.com/nature_and_environment/1986_november_december/holzhaufen

I took no pics in progress. All my cameras are down for the count. Had to barrow the b-n-l's camera to get the above pics and to keep Brother Bart at bay.
 
hey mo

am i mistaken. did i read somewhere that a holz haufen dries quicker than a normal stack.
3 months? i can't find it.
 
fbelec said:
hey mo

am i mistaken. did i read somewhere that a holz haufen dries quicker than a normal stack.
3 months? i can't find it.

The first post of Marcus' original thread includes an implied reference from this supplied link:

https://www.hearth.com/econtent/index.php/forums/viewthread/1630/

I'll quote it below:

Now after only three months in a Holz Hausen, my free firewood is burning nicely.

I might add that none of us can yet corroborate this somewhat extreme claim.
 
oke doke

did you paint your center pole?
i know wood shrinks but the amount they are talking sounds extreme
 
Mo Heat said:
fbelec said:
hey mo

am i mistaken. did i read somewhere that a holz haufen dries quicker than a normal stack.
3 months? i can't find it.

The first post of Marcus' original thread includes an implied reference from this supplied link:

https://www.hearth.com/econtent/index.php/forums/viewthread/1630/

I'll quote it below:

Now after only three months in a Holz Hausen, my free firewood is burning nicely.

I might add that none of us can yet corroborate this somewhat extreme claim.

The darn thing probably works like a compost pile. Organic material giving off heat and evaporating out the top drying the wood pretty quick.

And cooking the squirrels living in the middle of it.
 
BrotherBart said:
Mo Heat said:
fbelec said:
hey mo

am i mistaken. did i read somewhere that a holz haufen dries quicker than a normal stack.
3 months? i can't find it.

The first post of Marcus' original thread includes an implied reference from this supplied link:

https://www.hearth.com/econtent/index.php/forums/viewthread/1630/

I'll quote it below:

Now after only three months in a Holz Hausen, my free firewood is burning nicely.

I might add that none of us can yet corroborate this somewhat extreme claim.

The darn thing probably works like a compost pile. Organic material giving off heat and evaporating out the top drying the wood pretty quick.

And cooking the squirrels living in the middle of it.


you got to eat when your working hard to keep the energy up :smirk:
 
fbelec said:
did you paint your center pole?

I used a wax pencil to mark the top 18 inches in 6 inch graduations so I can see how much my holz hausen shrinks and settles.

Since half the wood I used in the outer ring and the inside is already dry, I'm only expecting half the predicted settling, or even less since the predicted settling seems extreme (20% of height).

Of interest is the fact that wood tends to shrink mostly laterally, and not much at all longitudinally. Probably a third of the wood in the middle of my holz hausen is stacked at least partially on end (vertically). It seems like this would reduce the visible settling somewhat since my middle shingles (next to the measuring pole) sit (at least partially) atop partially vertical splits.
 
Nice job Mo,
3 months does seem a little exteme, but I built my second Holz Haufen about 4 weeks ago with fresh cut Oak and my cheap little moisture meter was pegged at 35%. Today they are averaging 15%. I figure my meter is not the most accurate, but I can see a difference over time. So maybe 3 months might be the case? It seems to be drying pretty well and I don't have full sun on them.
 
Todd said:
... about 4 weeks ago with fresh cut Oak and my cheap little moisture meter was pegged at 35%. Today they are averaging 15%.

Dang, Todd. Your moisture readings are not just impressive, they're sort of scary! ;)

I was thinking about the holz hausen design while sipping a frosty brew yesterday and admiring my holz hausen from the deck when I had what I felt was a minor epiphany ( *hick* :) regarding why the holz hausen might dry wood faster than a row of stacked wood.

No matter which way the wind blows, and it is usually blowing from some direction or another around here, it will be entering into the holz hausen at a 90* angle to some point on the perimeter, which could slightly pressurize the space inside, forcing air out in all directions, over all the splits. On the sides, the wind will be creating a venture effect, further inducing air movement through the pile. And on the side opposite the wind, there will be continuous turbulence and low pressure that should further aid exiting air from the pile. In theory, this should deliver significantly more air movement than the more common row structure, where the wind rarely blows thru the row at a 90* angle (ideal), usually blows thru at a lesser angle (less than ideal), and sometimes blows along its length, where it is effectively wasted with regard to drying the non-exposed splits.

That's my working theory until someone proves me wrong. ;)
 
Your theory sounds good to me Mo. Don't trust my meter readings. It's only a cheap $20 meter. The real test will be this fall in the stove. Or maybe sooner in my back yard fire pit?
 
Todd said:
Your theory sounds good to me Mo. Don't trust my meter readings. It's only a cheap $20 meter. The real test will be this fall in the stove. Or maybe sooner in my back yard fire pit?

I'm with you Todd. Yesterday I whacked a sixty foot red oak, hauled it, split and stacked it. That tree was as wet inside as any red oak I have ever taken down. My twenty buck moisture meter went off the scale too. Today I stick the stuff and it reads 21-22 percent and I guarantee you that stuff wouldn't burn if it was dipped in gasoline.

When I bought the meter I tested against my carpenter neighbor's mega-bucks meter and they were close. But I am not believing what it is telling me about this wood.
 
todd and brotherbart despite the meter reading how about the feel of the wood? does it feel any lighter in wieght?
over the weekend i got hold of 3 oak trees taken down by a friend in his yard. these rounds were just cut. so i tried to split some with the maul and it bounced off, it was so wet inside. i had to throw my back, arms, legs, knees and head into the maul to split them. i can't believe a few weeks with a fan blowing on them or certain type of pile would dry these babys.
 
fbelec said:
todd and brotherbart despite the meter reading how about the feel of the wood? does it feel any lighter in wieght?
over the weekend i got hold of 3 oak trees taken down by a friend in his yard. these rounds were just cut. so i tried to split some with the maul and it bounced off, it was so wet inside. i had to throw my back, arms, legs, knees and head into the maul to split them. i can't believe a few weeks with a fan blowing on them or certain type of pile would dry these babys.

I did something this morning with the meter that I have intended to do for a while. I took one of those red oak splits and stuck it with the meter. Reading came back 22%. I then took a drill and drilled two holes in the split the width of the meter tines and about an inch deep. Slightly smaller diameter than the tines. Stuck the meter tines into the holes and viola, back to 35%, the max on the meter. The wood is just too hard for the tines to sink far enough in and surface drying causes an inaccurate reading without getting farther into the splits. I am going to see if, over time, the difference between surface and interior moisture stays constant. If it does then I can just adjust readings based on the constant difference factor. Also I am going to test just reusing the drilled holes in the current test splits vs. fresh drilled ones each time. If the pre-drilled split tracks with a freshly drilled one over time then all I need to do is periodically test the pre-drilled one and save the hassle of drilling holes each time I test.

The option is to pay five hundred bucks for a meter that lets you hammer it so the tines sink in. Not an attactive option to this cheapskate woodburner.
 
Status
Not open for further replies.