
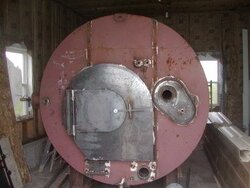
Here is a picture of my home brewed boiler. I have not fire it yet, but I have filled it with water to check for leaks. The tank will hold 3000 gal of water. I'm busy with the wood right now, I have cut 13 pulp cords all stacked in the wood shed drying for winter. I still have to move it into its final location and insulate it. If this post works, I will post more pictures of building the beast. If the picture does not come out, please let me know what I have to do. I read the post picture sticky and I downloaded Picassa, uploaded all the pictures, stuck a link in the post and it would not get by the log in. Maybe someone could help me with that as well.
Homebrewed Boiler
- Thread starter allan
- Start date
-
Active since 1995, Hearth.com is THE place on the internet for free information and advice about wood stoves, pellet stoves and other energy saving equipment.
We strive to provide opinions, articles, discussions and history related to Hearth Products and in a more general sense, energy issues.
We promote the EFFICIENT, RESPONSIBLE, CLEAN and SAFE use of all fuels, whether renewable or fossil.
You are using an out of date browser. It may not display this or other websites correctly.
You should upgrade or use an alternative browser.
You should upgrade or use an alternative browser.
- Status
- Not open for further replies.
TCaldwell
Minister of Fire
Here are the rest of the pictures. It took a lot of grinding and about 30 hours to weld, but I think it came out pretty well. I need to move it to the final location and insulate the tank and connect to a chimney. The tank is 3/8 steel so it is very heavy. I want to thank everyone on this site who answered so many questions. This site has been very helpful.
Enjoy") .
.
I removed pictures as careful consideration.......
Enjoy
.I removed pictures as careful consideration.......
Dune
Minister of Fire
brad068
Feeling the Heat
Garnification said:Nice job eup. I bet the neighbors are still scratching their heads!
Yes, they keep wondering when I'm going to run pipe to their houses. I think it will take actual operation to convince many that it will work and not burn tons of wood.
Thanks
Jim K in PA
Minister of Fire
Fantastic EUP. I admire your skills and ambition. A couple of questions:
What is the diameter of the loading door? It looks small in the pics, but that may be due to the scale of the main tank.
What are you using for a fan?
Did you incorporate more HX piping in your design than the GARN, or about the same?
What size supply and return piping?
Did you add a length of pipe at the return port to prevent short circuiting of flow?
Keep the pics and reports coming.
Jim K in PA said:Fantastic EUP. I admire your skills and ambition. A couple of questions:
What is the diameter of the loading door? It looks small in the pics, but that may be due to the scale of the main tank.
What are you using for a fan?
Did you incorporate more HX piping in your design than the GARN, or about the same?
What size supply and return piping?
Did you add a length of pipe at the return port to prevent short circuiting of flow?
Keep the pics and reports coming.
Thanks Jim
Wet1 said:Excellent workIs the design based off pictures or did you have access to a Garn to reverse engineer it? Did you build this with scraps or are you using new raw materials?
I built this with all new materials except the tank. I propably went overboard because of my background, I did not use structual steel pipe.
heaterman
Minister of Fire
Hmmmmmmmm. Wonder why so many intelligent people copy Garn?
I hope to get up you way this summer and would love to inspect your handiwork. I'll send you an e-mail if the opportunity arises.
I hope to get up you way this summer and would love to inspect your handiwork. I'll send you an e-mail if the opportunity arises.
brad068
Feeling the Heat
you-per, How are you plumbing your supply/return. I would kinda like heaterman to discuss this to. They are now hooking them with return on bottom supply on top. But keep them separated top bottom and front to back or use some stand off pipes inside so they don't short circuit.
I got to change my supply return around but I'm going to make a "x" piping with valves to change back and forth from solar to wood fuel and just see what the difference is.
I sure did enjoy them pics for however short of time they were with us.
Oh, did you place a baffle in the air collar to divert the incoming combustion air up and around the door?
dogwood
Minister of Fire
Garn said:you-per, How are you plumbing your supply/return. I would kinda like heaterman to discuss this to. They are now hooking them with return on bottom supply on top. But keep them separated top bottom and front to back or use some stand off pipes inside so they don't short circuit.
I got to change my supply return around but I'm going to make a "x" piping with valves to change back and forth from solar to wood fuel and just see what the difference is.
I sure did enjoy them pics for however short of time they were with us.
Oh, did you place a baffle in the air collar to divert the incoming combustion air up and around the door?
Garn
I'm planning on taking the supply water from the rear and towards the top of my boiler. The return will be on the side near the front of the boiler about midway height. I think that pulling water from the top will increase my supply temp and returning to the front about midway up will allow my water mix in the top part of the tank. The 10 feet between the front and the back of the stove and about 2 ft in height difference should allow the water temp to remain height at the rear and top of the tank. I'm trying to just work with the top half of the tank as that will be the hottest temp. Anyone see any issues with this setup?
I decided to remove some of the pictures because I was PM'd that Garn was not happy about them. I like the Garn design concept and respect their design and so out of courtesy, I removed them.
I did add the baffle in the front of the boiler per your suggestion. Thanks to everyone who helped me on this
!! I found a couple of sources for the epoxy coating inside the tank, one was a product by Sherwin Williams, Cor Cote HT (5 gallon min buy) and an other product from epoxysystem.com, product #641 (2 gallon min buy). The steel prep should be blasted to a near white finish prior to coating on both of the product. The epoxy from epoxy systems has 0 voc's so is much easier to handle then the Sherwin William's product. Cost is $120/gallon
dogwood said:Amazing accomplishment! How did you learn to do such fine work.
Mike
Mike
I did all the drawings and sent cad files to a steel supply house that I deal with at work and had them CNC plasma cut to my spec's. My neighbor was laid off this spring from a local fab shop and he welded most of the boiler with a mig welder using a 95 5 gas mixture for better penetration. I did all the cutting of the tank and ground all the parts and fit them up and held things in place while he welded. He has had lots of experience welding and fabbing so he made the job easy. I was really tired of the grinder when I was done. He charged me for 20 hours of welding and I bought all the consumables. I had all the parts that needed bending also bent to my specs at the steel supply house. The pipe was very expensive (A53 sched 40, I wanted to use 106 seemless, but did not see the benefit for the difference in cost. A53 is rated for steam lines) (pipe has come down a lot since December).
Thanks
- Status
- Not open for further replies.
Similar threads
- Replies
- 5
- Views
- 852
- Replies
- 3
- Views
- 488
- Replies
- 6
- Views
- 976
- Replies
- 16
- Views
- 2K