Hot Water Storage

  • Active since 1995, Hearth.com is THE place on the internet for free information and advice about wood stoves, pellet stoves and other energy saving equipment.

    We strive to provide opinions, articles, discussions and history related to Hearth Products and in a more general sense, energy issues.

    We promote the EFFICIENT, RESPONSIBLE, CLEAN and SAFE use of all fuels, whether renewable or fossil.
Status
Not open for further replies.
Good luck on that, slowzuki--I hope it works out.

After spending the better part of my weekend in "the tank," I can see the appeal in a steel version of same.

Are you going to use a heat exchanger or run at low pressure and pipe it direct? And if it's a heat exchanger, how are you going to get it into the tank?
 
I'm running a closed loop heat exchanger. The tank has an openable insulated top for the ever important cleaning that all milk equipment gets. I will have two coils, the main one and my domestic pre-heat.

The biggest problem is size, the tank isn't very tall but is 12 ft long. I hope to build a workbench on top of it to disguise its stealing of my shop space.
 
Burn-1 said:
FWIW here's a link to a photo description of how a guy from one of the local renewable energy initiatives in central NH built his own concrete tanks for use with his Tarm.

Tarm installation and water tank construction

There's a lot of copper in this system which also has a solar thermal component

That guy has a lot of time and money on his hands!
 
Interesting.

I'm waiting for either a very hot day or a rainy day to get back down into the basement to finish putting in the liner. It's about halfway hung. I've also been building a new sidearm heat exchanger for my DHW. The one I have now has 3/4-inch boiler water inlets and outlets (with a 3/4-inch core), and I want 1" outlets. It's easier to build a new one (using a 1.5-inch shell) than it would be to try to take the old one apart. If you've ever built one or tried to take one apart, you know what I mean. Most of the materials I had on hand. If you've priced copper fittings lately, especially the larger sizes, you know that's a good thing. A 1.5-inch copper tee, for example, goes for about $15 at Home Depot. You can buy fittings for much less on Ebay, but you have to buy them in (usually mixed) lots, and finding the right parts can be more trouble than it's worth.

I'm going to try to use the old sidearm heat exchanger for the greenhouse. I don't know if it has the capacity (1.25-inch shell with a 3/4-inch tube), but it won't cost me anything to find out.
 
First post, love the site spent many hours browsing through the many ideas people have come up with. Eric love the homemade holding tank and was curious how it turned out. I am really leaning tward doing a similar install and was hoping to gain some valuable information from your install. I curious oh how big your flat plate heat exchanger was. Ive been heating with wood since I was old enough to remember but I am brand new to the wood boilers. I bought a house with a fuel oil boiler and I'm leaning twards a add on with a heat storage tank. Thanks for all the great info.
 
This is my first post. I just bought an EKO 60 and have it hooked to a chimney, but no plumbing yet. I have to have that done professionally. I bought mine from CozyHeat as I live real close to them. I am struggling w/ the water storage concept (because of the cost), but was happy to read all of the alternative methods. For the large storage units, is the water treated to keep it from freezing? I really like the cistern idea and am wondering if one could build a cistern out of SIPS. I called a manufacturer and I can get a 4 X 8 structural panel for around $90. It would seem to me that one could use these panels for 2 sides and maybe a lid into a corner of a basement. The floor wouldn't need anything but the foam and the liner. I'm a little worried because Dave & Zenon both stated that that my house is a little large for a 40 and small for a 60. I'm thinking water storage may be very important in my case. Any input would be greatly appreciated. John
 
I'm still working on it, Moose. I can let you know in a couple of weeks. Other than that, everything seems to be working great. I have some concern about the structural integrity of the wall I built, so that's something I have to work out. I'm going to rest a couple of floor joists on it, which should provide enough weight to keep everything in place. Let's hope, anyway.

I think hot water storage is important, John, but I understand your hesitation to make the investment. Without it, you're going to have to find a place to dump heat during warmer weather. Once you use your boiler for awhile you'll understand why a tank is desirable. Too bad they don't make an EKO 50. I think it's a really great boiler--I'm really happy with mine so far. There's a few EKO owners on this site--nofossil is the one with probably the most knowledge and experience--so I'm hoping we can collectively get the most out of our investment.
 
I'm going back and forth on the heat exchanger idea for the tank. I just priced 1" soft copper and it's $5.50 per foot, plus (9%) tax, so that's more than a grand for 200 feet of hx that I would probably need. That's more than I want to spend right now, but maybe after fooling around with the flat plate hx/mixed tank approach I'll change my mind.

Currently (and this changes day to day) I'm back to the flat plate approach, but instead of basic dip tubes, I'm going to drill a bunch of 1/8-inch holes in two sections of pipe that are plugged on the end, and force the water through them on the top and bottom of the tank. I'm trying to spread out the flow across the length of the tank, and create as little circulation as possible in the process. It won't cost very much and it just might work. Again, everyone I've talked to, including the guy selling the soft copper, seems to think it will work.

Let me run this one by the math guys: I calculated the area of a one-inch section of pipe opening. Then I ran the same calculation for a 1/8-inch hole. Then I divided the area of the one-inch pipe opening by the area of the 1/8-inch hole, and came up with a number. On a four-foot section of pipe, that's 64 holes, or 32 on a side, spaced at 1.5-inch intervals. Am I correct in assuming that this will distribute water over the 4-foot span at the same rate that would flow from the end of a one-inch pipe opening?
 
Nope, you need much more area for small holes than with an equal area large hole. Think of piping, your one inch pipe flows more than 4 half inch pipes. I'm not sure I would get too fancy with the laminar storage etc until you've tried it out.

I've attached the Kerr HX designs for the 120k BTU/hr Jetstream
 

Attachments

  • Kerr Jetstream Users Manual.jpg
    Kerr Jetstream Users Manual.jpg
    101.2 KB · Views: 1,168
That's pretty cool, Ken. I like the hard copper option on the bottom. However, at more than $3.50 per, the 40 or so 90s needed for 80 feet of the thing put the price right into the range of soft copper, and with 80 opportunities for leaks to spring. But I like that simple design. I'm guessing you could just stand that thing up in the tank and pump through it both ways, no?

On the holes, I used pi-r-squared to calculate the area, giving me 64 1/8-inch holes to equal an inch. Pretty fancy for a journalist. Are you saying I need more? If so, do you have an equation handy?

I'm going to use CPVC for the in-tank piping, so doing it this way isn't a lot of extra work or expense. However, as always, Ken, I will give your advice serious consideration.

The boiler's performing really great, even without the tank. We get a nice clean burn (i.e., no smoke) during normal operation. Some smoke on cold startup that lasts about 10 minutes and just a few wisps when it's idling. Hard to believe you can get that much heat out of such a small pile of wood. Where are you at with your project?
 
I'm a bit behind as I'm building a room to put the boiler in first. Wedding's burned up all of last weekend, and this weekend will be dominated with installing windows in the building where the boiler goes. I'm thinking the boiler will first fire in Dec. The old woodstove is still doing duty for now.

You will need about 2-4 x the area of the single larger opening to get the same pressure drop. You may wish to bandsaw or dremel a couple of slots down the length then solder a cap on the end to solidify the newly free "legs". Or just drill more holes, or you could use the biggest increaser you can find and pop a screen on the end so the velocity is extremely slow coming out the end.
Ken
 
Thanks, Ken. That's what I needed to know.

Your wedding? If so, you can probably forget about getting the boiler fired up this season (yuk, yuk!). But congratulations if that's the case.

If you get a chance, please give us some background on your boiler (I think you said you have two or three of them). It looked pretty neat, the little I saw of it.
 
Haha, not my wedding, been married a couple of years now. I have a bunch of info on the boiler on wikipedia and on my webpage www.onthefarm.ca but the basics are this:

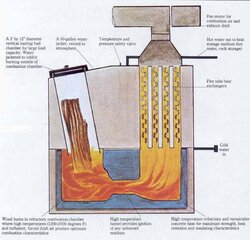
-Water cooled wood chamber, water cooled fire tube boiler.
-Forced and induced draft resulting in slightly positive combustion chamber in use, negative while loading (fd turns off)
-Wood loaded vertical through the top, 40 lb softwood, 60 lb hardwood per loading
-Wood falls down into a refractory combustion chamber where primary combustion and release of gases occurs.
-The combustion zone is blasted by a 100 m/s air jet from a preheated tube, almost always runs with an excess oxygen condition
-The burning continues into a insulated refractory tunnel with adequate length to have mixing of the excess air with any left over particles.
-Upon leaving the tunnel the gasses enter the fire tube heat exchanger and leave.

So advantages over "conventional" gasifiers, burns wetter wood easier but still needs to have the combustion chamber prewarmed by a hot fire. Easy to load, takes up to 40" wood, 36" is the practical limit though. Dry wood can be loaded unsplit once chamber is hot.

Disadvantages? High jet speed ejects fair amount of ash out the stack. Tunnel only lasts 5 years from extremely high temps despite SS fibre reinforcement although it only costs 50$ or so to replace. Pressurized stack needs to be well sealed including taped joints to prevent ash ejection. Water storage is a requirement because no idle controls are fitted. It will auto relight up to a few hours after cutting power due to stored temps but will smoke like a conventional boiler if no power is provided.

There is lots more but thats the gist of it.
 

Attachments

  • jetstream.jpg
    jetstream.jpg
    74 KB · Views: 1,279
I'm confused. From the diagram, I gather that it's not pressurized. However, your search for an in-tank hx tells me that it must be. So what does "vented to the atmosphere" mean?
 
In a refinery "vented to atmosphere" meant out into the open air and given the stuff we were cooking the Feds usually showed up real quick. Unlike water vapor that would come out that boiler jacket.

Watching you guys talk about this stuff is fascinating.
 
Well, initially the Jetstream was used in open loop systems with lots of chemicals. They then progressed to pressurized and eventually even a low pressure steam approval through the ASME pressure vessel design. I have one of the prototype open system one thats was pressurized and the sides are all bowed out. The approved models have 3/4" rod through the exchanger array to tie the wide flat sides together.

The early models were all welded wereas the newer ones got rid of 4 corner welds using rolling and stamping to make one single weld location.

Eric Johnson said:
I'm confused. From the diagram, I gather that it's not pressurized. However, your search for an in-tank hx tells me that it must be. So what does "vented to the atmosphere" mean?
 
enord said:
saw a guy do a tank with chipboard,2x10's, & vinyl pool liner. pumped a tarm gassifier into it. covered it with 3" foam. u might want to insulate cistern walls.

I've got 2 inches of foam board between the liner an the tank walls. And the blocks are full of vermiculite. The lid is going to be a 2" piece of foam board with epdm on the inside. Any heat leakage I get is just going to heat the basement. And if I don't get the heat exchanger right, that may be the only benefit I get from the tank.
 

Attachments

  • cistern6.jpg
    cistern6.jpg
    58 KB · Views: 966
A gas water heater is kind of a big shell-and-tube heat exchanger, when you think about it. You'd have to weld some connectors of some sort on the ends. If the pressurized side was the gas vent, then I don't think you would have to worry about corrosion, since the inside walls of the tank are already protected. You might want to leave the baffle in there, too.
 
Eric Johnson said:
Any heat leakage I get is just going to heat the basement. And if I don't get the heat exchanger right, that may be the only benefit I get from the tank.

That, and a real large hot tub :)
 
[quote author="Eric Johnson" date="1192052278"]I'm still working on it, Moose. I can let you know in a couple of weeks. Other than that, everything seems to be working great. I have some concern about the structural integrity of the wall I built, so that's something I have to work out. I'm going to rest a couple of floor joists on it, which should provide enough weight to keep everything in place. Let's hope, anyway.

Your tank will be hold alot of weight and make sure it is shored up GOOD. You can brace it against the other tank wall. also along the top you can run rod thru and tie it together.

I had to brace mine up more. I knew that there was alot of weight there but still it wanted to give. A round tank is alot easier to hold. Mine is made out of walkin freezer panels, steel inter and outer panels with 4in foam between. They are bolted together with rod running thru all the way around. I had them braced at the bottem. When I started to fill it I relized that I had to add more so I ran rod thru the top in 4 places and bolted them together. Then when I started to heat it the sides started to bow from top to bottem and I had to add a middle brace. I've got it done now but relize now the pressure that all that water holds. You should be ok if you brace against the other wall and when you put water in the other tank you will not have a problem.
leaddog
 
Status
Not open for further replies.