How Much to Wire Small Bathroom

  • Active since 1995, Hearth.com is THE place on the internet for free information and advice about wood stoves, pellet stoves and other energy saving equipment.

    We strive to provide opinions, articles, discussions and history related to Hearth Products and in a more general sense, energy issues.

    We promote the EFFICIENT, RESPONSIBLE, CLEAN and SAFE use of all fuels, whether renewable or fossil.
Status
Not open for further replies.
Thanks, Frank.

I meant to ask before but forgot; are bathroom circuits supposed to be on arc fault breakers if they are dedicated and have GFCI protection at the switch box in the bathroom? I keep reading conflicting views on this.
Have to check NEC, then local code. Each government agency can be different from the next. For example county code may not require arc fault but the city within the county may require arc fault......

This is why I love living in the middle of no where. No permits required for work, other than the zoning permit. Really relaxed where I live.

Yeah, I am going to have to go to the building permits department and act like the confused home owner thinking of doing a project. Otherwise they will ask for a permit. And then they want drawings, manuals, fees and on and on. I did this for the pellet stove and don't want to do it again.
 
Vinny nice job figuring out the guy was a hack overloading neutrals could have been a fire. Also multi wire is useless cause everything has to be arc fault breakers and they don't work with 3 wire and sharing a neutral.

Bathrooms don't have to be on arc faults, yet.
 
  • Like
Reactions: vinny11950
+1 on the great job fixing the issues.

Re: arc fault, FWIW, when I wired my addition only 2 bedrooms were required to be arc fault. I had 10 circuits on standard breakers, the arc fault (Eaton) at the time were something like $70 each vs $7 for the same 15 amp. The inspector told me the high cost was a factor in the code decision at the time (limiting the requirement to bedroom circuits as it could otherwise add $1,000 or more to a job). I hope the price has come down in recent years.

they have come way down from there. at the depot or lowes eaton is 37 dollars. the companies out there have come out with arc fault and gfi combo breakers for 42 to 45 dollars.
 
Bathrooms don't have to be on arc faults, yet.

that i know of now everything has to be arc fault in a home. they never used to arc fault a kitchen or bath because of the arc faults and gfi receptacles used to have battles on who can blow faster. now everything we do in a house has to have arc fault protection. when doing a bathroom or kitchen outlet it's cheaper to buy the arc fault gfi breaker than a arc fault breaker and a gfi receptacle
 
  • Like
Reactions: vinny11950
Here's another question I encountered while rewiring the GFCI outlet. I screwed the power source wires to the line in side of the GFCI, then the load wires to feed the other loads (lights). I forgot to attach the ground wire to the ground screw on the GFI. I only figured this out when I got a mild shock when touching the metal body of the GFI switch and the ground wire at the same time. The shock only read 50 volts on the tester when touching the metal body and the ground wire. Once I hooked up the ground wire to the GFI ground screw, no more mild shock.

Does this sound right? Why would the metal ears that are used to hang/screw the GFI switch become energized to 50 volts only?
 
Last edited:
that i know of now everything has to be arc fault in a home. they never used to arc fault a kitchen or bath because of the arc faults and gfi receptacles used to have battles on who can blow faster. now everything we do in a house has to have arc fault protection. when doing a bathroom or kitchen outlet it's cheaper to buy the arc fault gfi breaker than a arc fault breaker and a gfi receptacle

The code specifically list a bunch of areas that are required to have arc fault protection, and then call for protection on similar areas. It doesn't include basements, garages, or bathrooms on that list. I can't tell if it's by intention, or if the areas listed are the only areas to use the breakers. It's art 210-12 a.

I work with a wiring inspector quite a bit, I'll get his take on it.
 
that might be the circuit board in the gfi itself

Yeah, it was the GFCI outlet. Swapped another new one, and the issue went away. While on the HD return line, another customer was returning the same one too.
 
Well, still at it.

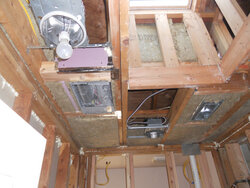
I am satisfied enough to start closing up the ceiling as most of the work in the attic is done.

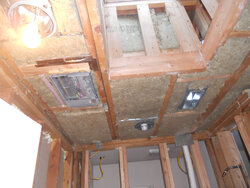
I put Roxul between the joists and then R30 Fiberglass, the pink stuff from Dow, over that, perpendicular to the joists.

bath35.jpgbath36.jpg

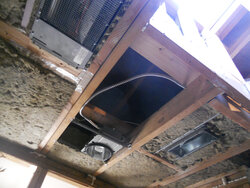
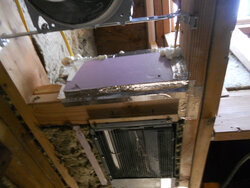
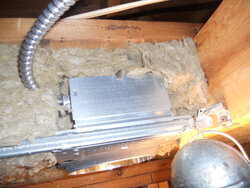
Built a nice foam box over the heater to seal it. Made sure to leave plenty of space between the heater and the foam, then Roxul will be in between the two. And the outside shell of the heater does not get hot at all.
bath37.jpg

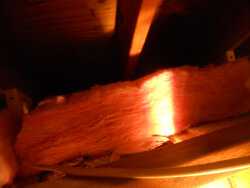
Here's a picture of the Pink insulation over the Roxul, from the attic view.
bath38.jpg

Didn't think of this until I was about to close the ceiling. The can light over the bathtub has a small metal junction box attached to the side where the wires connect. It has a flip cover for access. Now in the position this is in, in the low side of the attic, behind the skylight, getting to this box is going to be a PITA. It is doable, but it is pushing the limits of the NEC code of access to electrical connections. I could have changed it by detaching the box, running a longer wire and placing the junction box in a more accessible location, but it would have meant changing the can light design from manufacturer original (which is probably a no no) and taking the time out to get the materials and doing it. Didn't want to stop and delay any more so I left it as is. With better thought, I should have designed around it. Can't think of everything.

bath39.jpg

Here is the finished insulated ceiling, except for the skylight, which I need for attic access.
bath40.jpg
 
Last edited by a moderator:
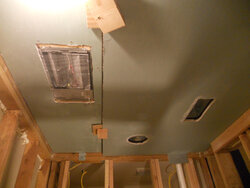
I then installed the ceiling sheet rock, 1/2 green board using a one man install trick learned on Youtube.

bath41.jpg

My Rotozip skills are bad as I was not able to cut around the fixtures perfectly. But it is good enough that when finished and with the trims, it will be nicely covered.

bath42.jpg

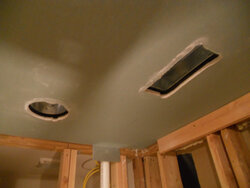
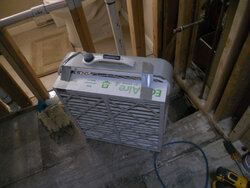
This Rotozip creates a storm of fine drywall dust. Cover up, close doors, tape gaps to contain it. I used my box fan filter contraption to catch some of the dust.

bath44.jpg

Once the sheet rock was screwed in, I filled the fixture gaps with spray foam. I will trim it when it dries.

I am done for this week. Glad I was finally able to close the ceiling and stop the torrent of cold air from flowing into the house. The pellet stove had trouble keeping the back of the house above 62. Put a plastic cover on the attic access to help some more.

Now to get ready for the snow.
 
Last edited by a moderator:
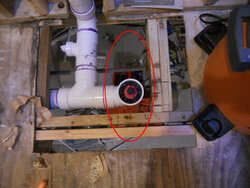
I was going to install the 3/4 dryply plywood floor but was not sure how to support the area that will go under the toilet.

bath46.jpg

The main plumbing runs inside this 21 inch wide bay. The missing plywood square is what rotted out from the original toilet leak. The red oval represents the toilet and you can see on the upper left side there is not much support. Figure the toilets will weigh about 75 lbs and then 300 lbs of person over than. I am afraid that side will constantly flex enough to detach the tile. There is no room to lay a cross beam, so I am thinking L shape metal support brackets at the top to catch the top edge of the 3/4 plywood and keep it from flexing.
 
Last edited by a moderator:
My Rotozip skills are bad as I was not able to cut around the fixtures perfectly.
Mine too but I saw a relevant tip I plan to try next time I do it: it helps to make sure you're using a drywall cutter and that the depth is set just right. The drywall cutter has has a section at the end with no cutting surfaces that is supposed to ride on the box. Stupidly, I had mine set too deep and the cutting portion of the the bit was eating through the boxes.
 
  • Like
Reactions: vinny11950
There is no room to lay a cross beam, so I am thinking L shape metal support brackets at the top to catch the top edge of the 3/4 plywood and keep it from flexing.
Could you double up on your deck material here if you have the vertical clearance from the plumbing with a 2nd piece glued/screwed to the top piece?
To clarify, the bottom piece of deck would fit between the existing joists and be attached the deck that lays on top the joists.
 
Could you double up on your deck material here if you have the vertical clearance from the plumbing with a 2nd piece glued/screwed to the top piece? There is not enough space for that.
To clarify, the bottom piece of deck would fit between the existing joists and be attached the deck that lays on top the joists. Well, I am filling the square hole with 1/2 plywood to replace what rotted out. Then I am laying the 3/4 inch dryply over the entire floor. If I can just grab the top edge with something to keep it flexing, it should work.
 
Don't sweat that junction box on the recessed light. You access it after by removing the three or four screws that hold the "bucket" portion of the light in place, and then sliding it out of the way. There's a second cover on the junction box facing the right direction for this. It's a PITA, but that's how recessed lights are done. That light is no different than ones installed between finished areas.
 
Don't sweat that junction box on the recessed light. You access it after by removing the three or four screws that hold the "bucket" portion of the light in place, and then sliding it out of the way. There's a second cover on the junction box facing the right direction for this. It's a PITA, but that's how recessed lights are done. That light is no different than ones installed between finished areas.

Thanks for the tip. Didn't notice it.
 
Don't sweat that junction box on the recessed light. You access it after by removing the three or four screws that hold the "bucket" portion of the light in place, and then sliding it out of the way. There's a second cover on the junction box facing the right direction for this. It's a PITA, but that's how recessed lights are done. That light is no different than ones installed between finished areas.
Always wondered how to access the junction boxes on those after sheet rock was installed.

Thanks for the info.
 
One question. What brand gfi receptacle was bad?
 
It's been going slower than expected (understatement). The snow storm shut me down for a week and this week I was just tired and couldn't do much.

The little I could do, I used to finish the attic insulation and tidying up the wires up there.

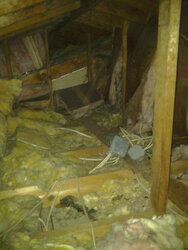
Before:

b1.jpg

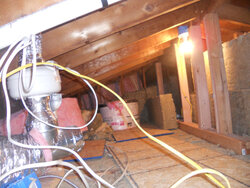
After:

bath48.jpg

Ran into this little guy on the skylight, thought of killing it but it wasn't doing much:

bath47.jpg
Turns out to be a brown stink bug. Hopefully one of the many spiders in the house will capture it and eat it.

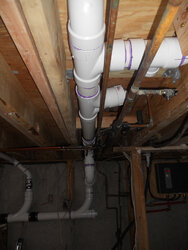
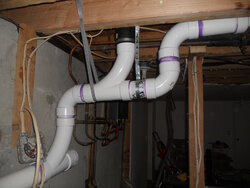
Here are some pictures from earlier when I replaced all the PVC sewer drain pipes servicing the kitchen and the 2 baths.

bath49.jpg

I fixed a negative slope, replaced sanitary tees on their backs for wye combos, and added a rodding tee for future maintenance.

bath50.jpg

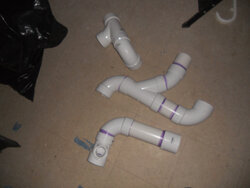
I screwed up my measurements a couple of times, and the heavy duty PVC cement I was using sets really fast and really hard so there was not much room for errors. This had me cutting out some runs and redoing them. Must have cost me around $50 in PVC fitting and a lot of bitching.

bath52.jpg

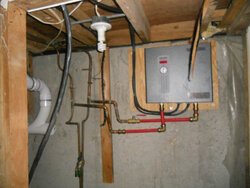
This is going to be the future project when the baths are done.

bath53.jpg

Redoing the water copper pipes. They are old, touching the concrete wall, have very little support and the plumber who installed the water heater didn't plumb in the clean out valves. I also have to clean up a lot of dead wires in the basement. As I open up the ceiling sheetrock, all these unused wires are being exposed.
 
Last edited by a moderator:
most of the 5 to 10 year old gfi receptacles i replace are leviton. most times the are brown from getting to hot. i don't put that brand in because i don't trust them and early failure. i use nothing but P+S pass and seymour. always good. all i had in my mind when i seen your before attic pic was welcome to my world. you are doing a great job doing what should have been done the first time.
 
most of the 5 to 10 year old gfi receptacles i replace are leviton. most times the are brown from getting to hot. i don't put that brand in because i don't trust them and early failure. i use nothing but P+S pass and seymour. always good. all i had in my mind when i seen your before attic pic was welcome to my world. you are doing a great job doing what should have been done the first time.
I used Leviton switches and receptacles @20 or so years ago when doing some home re-wiring, had no problems, everything still in great shape. But - when wiring my new place @5 years ago, I bought same the brand in bulk and these parts do not appear to be the same quality. The light switches (Decora style) have a cheap "sticky" feel to the action. Almost need to put your feet against the wall to unplug anything from the receptacles. I don't know if that's a sign of crappy quality, and for the most part we use surge protectors and power bars on the gadgets, so we don't have to wrestle with them anyway, but this still makes me wonder. I can say I've replaced a few dead GFI's from the newer stock, meanwhile all those old units are still working / testing ok. I think this company used to manufacter out of New York before expanding / going overseas, and lots of "formerly made in North America" stuff has seen QA suffer after moving offshore - not sure if that applies here. Maybe I'm over thinking things and way too paranoid, but I'm almost wondering if one day I'll stock up on a better brand and change all the switches and receptacles out.
 
^ I've noticed the same. Many electrical components (e.g. switches, outlets) are available in various grades and the cheapest ones are of very questionable quality.
 
Status
Not open for further replies.