
Anyone know how to get the clutch assembly off the drive shaft? How it is held on there? (My sprocket is kind of chewed up and I'm sure replacing it would make for a smoother-running chain).
How to Change Sprocket on Poulan/Craftsman 42cc 18" Chainsaw?
- Thread starter DanCorcoran
- Start date
-
Active since 1995, Hearth.com is THE place on the internet for free information and advice about wood stoves, pellet stoves and other energy saving equipment.
We strive to provide opinions, articles, discussions and history related to Hearth Products and in a more general sense, energy issues.
We promote the EFFICIENT, RESPONSIBLE, CLEAN and SAFE use of all fuels, whether renewable or fossil.
You are using an out of date browser. It may not display this or other websites correctly.
You should upgrade or use an alternative browser.
You should upgrade or use an alternative browser.
- Status
- Not open for further replies.
Gooserider
Mod Emeritus
1. You need to lock the crank - easiest way is to stuff a bit of rope or other recoverable, soft but firm material into the sparkplug hole so that it blocks the piston... You can get fancy expensive stuff to do this, but why bother...
2. Either get the special adapter, or put a couple of thin blade like things - such as some flat steel stock into the slots in the inner clutch, and unscrew it... NOTE, it is a LEFT HAND THREAD - i.e. it will unscrew by turning CLOCKWISE....
If it's like my Pull-on, the sprocket is a one piece unit that combines the clutch drum and the sprocket.
Gooserider
HittinSteel
Minister of Fire
As Goose said, do #1 and block the piston. I then use an old chain file. Gentle taps CLOCKWISE on the clutch will release it. Then simply unscrew.
Thanks guys, I'll give it a try. But is there any reason not to remove the cover on the other side and block the flywheel, instead of sticking something down the cylinder to keep the driveshaft stationary?
Gooserider
Mod Emeritus
DanCorcoran said:Thanks guys, I'll give it a try. But is there any reason not to remove the cover on the other side and block the flywheel, instead of sticking something down the cylinder to keep the driveshaft stationary?
Yes - it's harder to do, and the flywheel is somewhat fragile, those fins are just light duty stuff and are very easy to snap off or damage... OTOH, as long as you don't stuff so much rope in the plug hole that you are sticking out the piston ports, it is very unlikely that you would do any damage with the rope trick... (BTW, the rope trick is a tool you'll never lose, as the starter cord works really well for this, and it's always right there on the saw...)
Gooserider
Thanks, guys! I just got the clutch/sprocket off without damaging the engine. I had to make a tool to remove the clutch, but after two or three attempts at AAARRRRGGGGH! twisting, I was able to get it off. I used a block of wood in the fins of the flywheel to keep the crankshaft from turning (if I had read the previous post, I probably wouldn't have had the guts). Also, I don't understand how you would use an old chain file to remove the clutch.
If anyone is interested, I'll be glad to post a photo of the tool I made to remove the clutch.
If anyone is interested, I'll be glad to post a photo of the tool I made to remove the clutch.
Gooserider
Mod Emeritus
I am guessing that the idea with the chain file is to use it as a "bit" to fit into the clutch...
I think it might be helpful to have you post a picture of your tool, and possibly the way it fits into the clutch - it's the kind of thing that even if other folks don't copy it, can still inspire other solutions...
Gooserider
I think it might be helpful to have you post a picture of your tool, and possibly the way it fits into the clutch - it's the kind of thing that even if other folks don't copy it, can still inspire other solutions...
Gooserider
DiscoInferno
Minister of Fire
Since I just removed the clutch and sprocket on my 359, let me add for future readers that "gentle taps" may not always be sufficient. I was using a flathead screwdriver in one of the the notches provided on the clutch, and had to hit it quite hard and repeatedly with a hammer to get it to turn. Clean threads and no corrosion - it was just on extremely tight.
bogydave
Minister of Fire
I use an air impact, just bump it.
Left hand threads?
Should be an arrow.
Anti seize lubricant on any bolt you take out. Especially if a steel bolt into aluminum. (electrolysis over time will corrode)
Almost every bolt/screw on the chain saw is steel & the housing is aluminum. Makes future removal easier.
Left hand threads?
Should be an arrow.
Anti seize lubricant on any bolt you take out. Especially if a steel bolt into aluminum. (electrolysis over time will corrode)
Almost every bolt/screw on the chain saw is steel & the housing is aluminum. Makes future removal easier.
DiscoInferno
Minister of Fire
It is a reverse thread, you can only hit the slots in one direction, plus there's a big arrow by each slot. No aluminum in the clutch I think. The location pretty much guarantees some residue of bearing grease and bar oil on the threads. Once it finally broke free it spun on its own for a second or two. This is the first time I've removed it and it's 5 years old, hopefully in the future it will be easier.
HittinSteel
Minister of Fire
DiscoInferno said:Since I just removed the clutch and sprocket on my 359, let me add for future readers that "gentle taps" may not always be sufficient. I was using a flathead screwdriver in one of the the notches provided on the clutch, and had to hit it quite hard and repeatedly with a hammer to get it to turn. Clean threads and no corrosion - it was just on extremely tight.
I always like to use the word "gentle" when suggesting involving a hammer for doing repairs. Sometimes it certainly takes more force. I use the old file like you did the screwdriver.... as a drift.
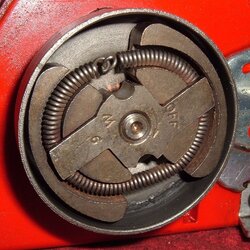
This clutch is on my Craftsman 42cc 18" saw (which is, I've been told, the same as the Poulan). The first photo is of the clutch itself, still on the saw. I was trying to make a tool which would grasp the clutch in the two semi-circular holes near the center.
Attachments
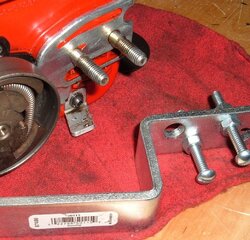
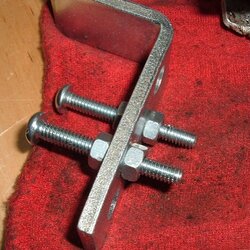
The next photo is of the tool, shown next to the clutch. The tool is made of two machine screws bolted onto a piece of steel. The steel is a bracket which I had bought at Lowes (one of two, to hold a 2x4 across the inside of a door, for security).
Attachments
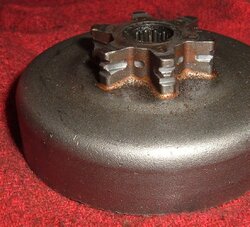
This last photo is the sprocket, which I was trying to remove to replace it (it is one piece with the clutch drum, the round piece to which it is welded). As you can see, the sprocket has been chewed up by the chain. The new drum/sprocket was $11 online at Sears, plus shipping. Also visible (if you click to enlarge the photo) are the needle bearings, which come as part of the drum/sprocket assembly as well.
Attachments
Gooserider
Mod Emeritus
Good setup on the tool, essentially the factory tool is the same sort of idea, except they design it as a socket with two projections that fit those semi-circular cutouts, or the slots you will find on some saws... The advantage of the socket is that if used with an impact wrench, it can often break the clutch loose w/o needing to stop the crank from turning, but that isn't a big deal...
Total agreement on putting Never-Seize on the threads, but it won't help a lot on the clutch-crankshaft connection, as that will ALWAYS be tight on any saw that's been run for more than a few minutes, especially if it's actually been used for cutting - they use a left-hand thread on that connection so that the crankshaft turning against the resistance of the chain will tend to tighten the threads; so in effect you have a continuously running impact wrench on those threads any time the saw is in the wood... Usually once you've broken that initial torque, the clutch will only be finger tight the rest of the way off. In many cases you can do better breaking it loose with an impact than you will with a steady tug, as that way you are reversing the effect of the engine impacts that tightened it up...
Gooserider
You're exactly right: as soon as it moved the slightest bit, it unscrewed easily the rest of the way. And it took a LOT of effort to get it to move. (I didn't order the new drum/sprocket until I had removed the old one, for fear I might ruin some major parts in the process and just have to get a new saw as a result).
bogydave
Minister of Fire
I replaced mine with Oregon parts.
A local dealer had them so the fix was quick.. I changed from the spur sprocket to the rim type
http://www.oregonchain.com/pro/lookups/selguide.aspx?BusId=OCS&SellReg=USA&LangId=ENG
A local dealer had them so the fix was quick.. I changed from the spur sprocket to the rim type
http://www.oregonchain.com/pro/lookups/selguide.aspx?BusId=OCS&SellReg=USA&LangId=ENG
That selector guide doesn't show any sprockets for my saw (because the sprocket is welded onto the clutch drum?)
- Status
- Not open for further replies.
Similar threads
- Replies
- 14
- Views
- 5K
- Replies
- 3
- Views
- 871
- Replies
- 2
- Views
- 759