OK,
Just finished up installing the OAK for my M55C-FS today.
For anyone contemplating installing one here is a low cost solution.
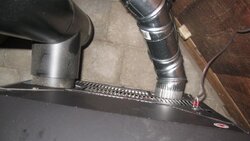
This Stove has a 3" Intake air connection on the bottom left of the rear panel (facing the rear)
This hearth previously held my Enviro EF-2 FS so the old 2" OAK hole(s) in the side wall were from before.
I went to to Home Depot and picked up 3 Galvanized 3" adjustable 90deg vent sections
1 60" Galvanized 3" Round snap together Vent section and a can of foam sealant.
I put 1 adjustable 90 on the stove to see where I needed the vent to lay out. I figured out that if I added a 2'nd
adjustable 90 I would be at the necessary height and shooting at the correct angle.
I took a measurement from the old 2" OAK hole and ended up exactly 5" to the right of that (inside).
From outside I used a 3" hole saw and opened up the outside siding/sheathing.
This exposed the inside (barn board) wall.
I used a long drill bit to punch center out of the inside wall hole.
Then using the same 3" hole saw from inside, I opened up the inside wall exactly where I wanted it.
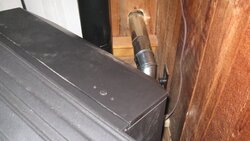
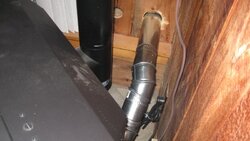
I ran the 3" straight pipe through the wall and lined it up with the 90's on the stove.
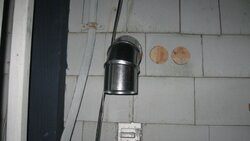
Using a pair of snips I cut the extra outside straight pipe back so I had a 2" stub exposed on the outside wall.
I then slid on the last 90 outside angled down to keep rain/snow out.
Being a wood turner I made up a couple of 2" plugs to fill the old 2" OAK outside holes.
There are 2 of the 2" holes because my first attempt years ago hit a stud.")
In spring I think I'll paint it black to match the exhaust vent
Have to come up with some kind of critter screen to cover the outside end.
Total cost....
$10.74 Adjustable 90 deg sections x3 at $3.58 each
$7.25 60" straight Vent pipe
$3.98 can of great stuff gap and crack foam sealant
----------------------------
$21.97 Total OAK install kit
Hope this helps someone out,
---Nailer---
Just finished up installing the OAK for my M55C-FS today.
For anyone contemplating installing one here is a low cost solution.
This Stove has a 3" Intake air connection on the bottom left of the rear panel (facing the rear)
This hearth previously held my Enviro EF-2 FS so the old 2" OAK hole(s) in the side wall were from before.
I went to to Home Depot and picked up 3 Galvanized 3" adjustable 90deg vent sections
1 60" Galvanized 3" Round snap together Vent section and a can of foam sealant.
I put 1 adjustable 90 on the stove to see where I needed the vent to lay out. I figured out that if I added a 2'nd
adjustable 90 I would be at the necessary height and shooting at the correct angle.
I took a measurement from the old 2" OAK hole and ended up exactly 5" to the right of that (inside).
From outside I used a 3" hole saw and opened up the outside siding/sheathing.
This exposed the inside (barn board) wall.
I used a long drill bit to punch center out of the inside wall hole.
Then using the same 3" hole saw from inside, I opened up the inside wall exactly where I wanted it.
I ran the 3" straight pipe through the wall and lined it up with the 90's on the stove.
Using a pair of snips I cut the extra outside straight pipe back so I had a 2" stub exposed on the outside wall.
I then slid on the last 90 outside angled down to keep rain/snow out.
Being a wood turner I made up a couple of 2" plugs to fill the old 2" OAK outside holes.
There are 2 of the 2" holes because my first attempt years ago hit a stud.
In spring I think I'll paint it black to match the exhaust vent
Have to come up with some kind of critter screen to cover the outside end.
Total cost....
$10.74 Adjustable 90 deg sections x3 at $3.58 each
$7.25 60" straight Vent pipe
$3.98 can of great stuff gap and crack foam sealant
----------------------------
$21.97 Total OAK install kit
Hope this helps someone out,
---Nailer---