How to seal a leaky shower floor drain?

  • Active since 1995, Hearth.com is THE place on the internet for free information and advice about wood stoves, pellet stoves and other energy saving equipment.

    We strive to provide opinions, articles, discussions and history related to Hearth Products and in a more general sense, energy issues.

    We promote the EFFICIENT, RESPONSIBLE, CLEAN and SAFE use of all fuels, whether renewable or fossil.
Status
Not open for further replies.

Mo Heat

Mod Emeritus
Nov 18, 2005
848
St. Louis, Missouri
Well, stuff continues to fail in my house at a break-neck pace.

A few days ago I noticed water dripping from the ceiling in the downstairs bathroom. Actually coming out of the A/C register. After thinking I fixed it by caulking a bad seam in the shower area, I let the Mrs. take one of those really long showers and "Oh my gosh", water was everywhere. Worse than before.

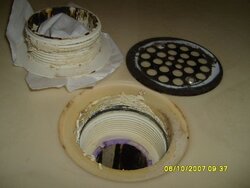
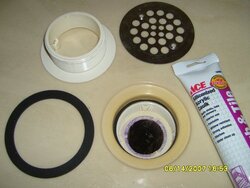
Current diagnosis: leaky shower floor drain.

I've got it apart. It screws off after getting the grate removed. There seems to be a rubber o-ring that takes care of the main business, and some plumber's putty that looks unnecessary in this drain due to the funnel shape of the fiberglass shower floor.

I'm thinking maybe the screw part just came loose after 20 years, allowing the o-ring seal to loosen and leak, and all I might need to do is tighten it again, but I'm a bit afraid to turn Mrs. Mo loose in there again for a repeat performance.

Questions:

Ever fix one of these yourself? (A "Yes" qualifies you to answer the remaining questions.)

Do you think tightening, or replacing the o-ring, will fix things?

Can you buy replacement o-rings for those drains at the hardware store?

Should I just put some silicone or some other type sealing on the o-ring, or in place of the o-ring, and retighten things?
 
Its a plastic drain with a metal snap in cover correct?
Replace it.... about 10 bucks at hopeless depot.
They do crack, rubber gaskets dry rot etc... (maybe drano causes this)
Roll some plumbers putty and put it on the new flange before pressing into the shower floor.
Gotta keep the Mrs. happy ;-)
 
GVA said:
Its a plastic drain with a metal snap in cover correct?
Replace it.... about 10 bucks at hopeless depot.

It's plastic, but the metal grate/cover actually "screws" into two "bosses" in the removable plastic piece, which in turn screws into the non-removable plastic piece that is PVC cemented to the actual drain pipe (see: photo below).
They do crack, rubber gaskets dry rot etc... (maybe drano causes this)
Roll some plumbers putty and put it on the new flange before pressing into the shower floor.
Gotta keep the Mrs. happy ;-)

After reviewing the photo, is your advice the same? That is, buy a new drain piece (the screw-in part, I'm assuming, that comes with a new rubber gasket, I'm further assuming) and reassemble?

It looks to me like the only thing that would actually benefit from being "new" is that rubber gasket/O-ring that I think you can see, in the photo, where the bottom of the shower floor's funnel/water-exit meets that rubber gasket, and where there rubber gasket meets the drain pipe immediately below it. That's why I was asking about replacing only the gasket.

Thanks for the reply BTW. This shower is still down for the count and "people" are getting a little more irritable each morning marching up and down the stairs. :shut:

After looking at that photo a few times, I'm thinking about getting a tetanus shot. :gulp:
 

Attachments

  • S7001297.JPG
    S7001297.JPG
    37.9 KB · Views: 12,627
Yeah I'd probably still replace the whole thing and re-cement a small chunk of pipe in there.
There's alot of putty in there where it shouldn't be and could take a while to clean, (gotta love previous owners) :shut:
If you want you could buy the drain assy and use the new gasket and see if it leaks. But if you have access to the bottom I's easier to replace the whole thing...
In case you were wondering they aren't in the plumbing section at HD they are over in the shower/tub displays.
 
Perhaps the most unfortunate part is that I DO NOT have access from the bottom of the drain. I only have access to the top. The photo shows all that I will ever see.

It looks like the pipe is cemented in there well, though. I doubt that the down pipe cement to the lower drain part is what is leaking. But since I think that, it probably will wind up being the real problem. :shut:

But it looks like it might be worth a try getting a new drain with the rubber washer/O-ring and seeing if that fixes it.

One question: What, if anything, might I put on the O-ring to "assist" it in making the best possible seal?

...and thanks for the heads-up on the drain location at Home Labyrinth.
 
that to me, Mo, doesnt look like an o-ring....looks more like a flat rubber gasket, which when the removeable threaded portion up top is screwed into the female portin, it sucks the lower pipe a smidge and creates (hopefully), a seal. The only place upon the reinstall Id put plumbers putty is under the flared portion of the male connector, NOT on the threads....clogging the threads up could likely cause an incomplete union and the gasket leaking.....its the gasket here thats doing most of the sealing. Id also look for a slow drain as well....see if the water isnt pooling on the shower floor and in the drain due to a partial clog, etc....might put undue water contact on that joint as well.

Oh, and like GVA says, make sure you roll a bead of plumbers putty under the flange...warm it up, roll it like play-doh, and form it around.
 
Excellent input HB.

The drain isn't slow. No standing water or even any minor pooling with unrestricted shower head flow.

There is lots of putty in there, with quite a bit on the threads, so that may have contributed to insufficient tightness of the union and thus pressure on that sealing gasket.

I also have a tendency to stand on the drain for good footing when propping one foot up on the ledge during my clean routine. I won't be doing that anymore since I probably ratcheted the drain basket loose over the last 7 years, a little at a time.

I might be able to just re-tighten things, but it seems like a good idea to change that rubber gasket, if I can find one. I think it's about 18 or 19 years old at this point.

I think my only remaining question before I buy the gasket, and re-assemble, is whether or not to put a little silicone on the gasket before installing, along with the plumber's putty under the basket flange (thanks for the warming and application tip BTW). Would silicone on that sealing gasket do any good, or just be a nightmare to remove should this repair attempt prove unsuccessful?
 
Since the underside isn't accessible normally (I'd assume you could cut a hole in the lower ceiling if desperate?) I see no harm in trying to replace the gasket and screw it back down. If lucky, you get more time out of it, if not you will be no worse off than you were before...

I'd clean the threads out as best you can, replace the gasket, possibly putting some plumbers paste on it, but probably not silicone, and the putty under the flange like BG suggested. Might be worth going to a plumbing supply house rather than Home Despot for the parts as they may be able to supply a better match, and possibly reccomend a better solution.

Gooserider
 
In my last project it was weird how the product info on the plumbers putty says don't use on marble and I think plastic because of stain potential.
 
Not BG's suggestion, this is my first post on this thread.

Hmm. I'm going to guess that this has leaked before. That batch of plumbers putty could be an indication of this. If it is going to leak, it's most likely at the flange on the underside where the edge of the gasket is showing. There should be a collar nut there that tightens the assembly to the shower pan. Sorry, but if this is the case, then the right fix is to open up the ceiling below and address it from that side. Given, the reluctance to do this, on to option #2.

But I need more info. Mo, is the shower slow to drain? If that shower pan gasket is leaking (not the top screen gasket), it could be because water is backing up in the pipe. If this is the case, the most likely problem is a clogged trap. Have you tried a snake to see if the shower trap is full of hair?

You could test for this. Pour a bucket of water down the pipe while it is disassembled. If it doesn't drain fast, run a snake to clean out the trap. If it does drain well, stuff a rag - with a string attached! - into the drainpipe, but below that middle gasket. Pour some more water from the bucket and see if it leaks. Then use that string to pull out the rag.

If the drain is clear, but that middle gasket leaks, then I wouldn't use plumbers putty. Instead, I'd clean everything very well, use a scouring pad and get it really clean inside there. Use a toothbrush on the pipe threads on both the male and female sides of the drain screen neck. Then dry off thoroughly and lay a bead of silicone over the edge of that middle gasket and then on the pipe threads of the upper drain screen collar and the rim where the uppermost gasket seats. Assemble while the silicone is fresh, let it set for a day and hope for the best.
 
Mo...HOLD THE PHONE!!!

Even though I'm an electrician by trade...I might as well be a plumber too after filling in some time working for a friend...who is a plumber.

First off...Here's the list of things you are going to need: A cheap pair of metal pliers, a phillips head screw driver, plumbers putty, and an SOS pad...either that or get some steel wool and SPIC & SPAN...bottom line...you gotta clean those surfaces up real good before you go any farther! Water has a funny way of going where it wants to...especially through un-prepared surfaces.

"Knead" a small ball of plumbers putty (slightly larger than a golf ball size worth) until it is fairly pliable. Roll it out "like a piece of rope" until it is about six inches long...then press it into place on the round indent on the shower pan drain opening.

Apply some teflon tape or pipe dope...your choice...to the threads of the drain insert...then screw it into place by hand as far as you can.

Insert the tail ends of the cheap pair of pliers down into the drain...stick the screwdriver into the opening of pliers handles and tighten it until you can't tighten it NO' MORE (IN OTHER WORDS"fairly tight" no two foot long wrench required...it's a two piece dasanko for a shower...not a 4" steamer fitting..lol). As you do this...the putty will "start to roll out" from between the drain insert and the shower pan...this is a good indication of how good a seal you will get.

Forget the silicone, forget the new O-ring, yada-yada...just haul in there get your hands dirty...and "Git-R-Done'..."!!!

The O-ring, for all intents and purposes is not there to provide a watertight seal...it is there to alighn the drain to the shower pan...and to provide a degree of stress and shock relief between the two parts.

Don't worry about the threads...just clean "the mating surfaces" real good...scratch off all that soap scum and give the putty something to stick to. Clean the insert real good too! Whatever you do...DO NOT USE ANY SILICONE! If you do this simple repair right...it should last you 10+ years...if you "mickey mouse it" with silicone...you will be lucky to get a year or two tops!

On a scale of 1-10....1-easy 10 tough...this job rates slightly more than a 2 at best...you got good "fairly new plastic" all the way around...that ain't no 100 year old clawfoot tub built into a wall.. :)

I always wondered "how these things worked"...after I put a dozen or so together...and got the verbal instruction from a good teacher...a real plumber...it all made sense.

...So take some advice...from someone that "learned the easy way". :)
 
I defer to Keyman's greater experience for reassembly. The last one I put together was in the 70's.

But I still would want to know why it leaked, badly, before reassembling.
 
BeGreen said:
I defer to Keyman's greater experience for reassembly. The last one I put together was in the 70's.

But I still would want to know why it leaked, badly, before reassembling.

BG...
....As to the "Why" I would say one of two things or both. First off...When It was originally installed it may not have been "tightened all the way home". Just like in "Disaster Anaylisis" there is a story, a chain of events that unfolds. Perhaps after the pressure test was completed and the plumber (or plumbers helper) was going around "tying in the drains"...while in the middle of tightening the drain...his attention gets' called away to something else...leaves the tools and 'helps' with something else...and forgets the drain is tightened down....he picks up the tools and walks away. It holds for years...until the second thing could have happened...the putty simply "dries out", cracks, and becomes brittle. The water slowly starts to trickle in between the two surfaces...and further erodes the integrity of the putty. If you really look close at the picture...you can see it happening. The soap in the water has left a film on the surface. Also of note...look at how "cracked" (what is left for putty) actually is. I'll "Bet a dime to a doughnut" when MO pulled that drain apart...that the putty broke off in tiny pieces and very little of it was sticking to the insert.

Bottom line...the putty was just 'gettin old'...time for some simple "maintainence" .

MO:
After looking at that photo a few times, I’m thinking about getting a tetanus shot.

Yeah those drains do get rather nasty over the years...but it's not like that drain is in a commercial kitchen...or a truck stop shower. I wouldn't be too worried about it. Generally, unless it has a small "micro colony" of green vegetation you might find growing on a larger scale in say...a swamp, there isn't too much to be worried about...lol ;)
 
I think I'm starting to "get it". At first, I thought the rubber gasket was doing all the work and that the plumbers putty really didn't even need to be in there. After reading keyman's instructions, it seems the reality may be 180 degrees. The putty actually can keep the water from ever reaching that gasket. At least, that's how all those words and pictures have branded the synapses in my brain.

I actually just got back from a plumbing parts supply house. Man, they sure aren't what I remember from my younger days when I'd wander into a bleak looking warehouse and some old gnarly, ex-plumber who was so old and whose knees were so bad he had to give up his trade. There were two young whipper snappers in a make-shift faucet showroom that looked puzzled when I showed 'em my parts. Not a good sign. Anyway, they had no parts or advice for me so I took my leave.

There are a couple more around here, but they are quite a drive. I think I'll run down to Home Depravity and pick up some of that plumbers putty stuff, if I can find it, roll up my sleeves, and start cleaning things up, shiny new, and Bristol fashion.

I'll report back after the procedure is complete and I've had a couple cold ones.
 
Wow where did everyone come from?
I know what Key is talking about with the tightening but...... That drain does not have the cross in it does it?
That there drain is designed to be tightened from underneath.
It can be done though, either after the grate is attached the plier handles can go through the holes. or put the screws in and use the screwdriver and wind it like a clock.
BUT This drain has been taken apart before and who knows what may have been done to it before.... (maybe cracked by a homeowner overtightening).

Key you can't say that the gasket doesn't do anything except relieve strain and shock and then say to put pipe dope and teflon tape on the threads, cause if the putty is doing it's job than the tape is not needed... correct? I hate to nitpick here but i'm bored......

It is all relative in the end everything works together, and yes it's there for a reason even if it may be worse case scenario.... Like a plugged trap..

And yes MO stay away from silicone..
 
GVA said:
Wow where did everyone come from?
I know what Key is talking about with the tightening but...... That drain does not have the cross in it does it?
That there drain is designed to be tightened from underneath.
It can be done though, either after the grate is attached the plier handles can go through the holes. or put the screws in and use the screwdriver and wind it like a clock.
BUT This drain has been taken apart before and who knows what may have been done to it before.... (maybe cracked by a homeowner overtightening).

Key you can't say that the gasket doesn't do anything except relieve strain and shock and then say to put pipe dope and teflon tape on the threads, cause if the putty is doing it's job than the tape is not needed... correct? I hate to nitpick here but i'm bored......

It is all relative in the end everything works together, and yes it's there for a reason even if it may be worse case scenario.... Like a plugged trap..

And yes MO stay away from silicone..

You're bored too GVA?? lol :) Yup...take away things to burn and look what happens...lol. I think this could almost remotely fit under "The things you can do when the lights are off and the TV is busted..."...lol

Well as far as the gasket..."if you think like a drop of water"...you always go with gravity...having said that the water rolls across the pan...down the "neck" of the insert and (hopefully) farther down the pipe. Eventually out of the house. The point is...in theory...no water should ever be anywhere close to being up against that round foam gasket...because if it were...it would have no way to "get into the pipe itself". :)

As far as pipe dope or teflon tape...think of it's true purpose for a second. Keeping the fitting gas & water tight is a close second to keeping the threads "lubricated".

Ever screw two plastic fittings together "dry"??? Pain in the a^s to get them apart after isn't it?

Try unscrewing a "dry" plug from a 'dandy' or an ECO in your DWV system...and see how much fun it really is... :)

As any well educated...or 'old school' plumber will tell ya...just keep this in mind:
"A plumber protects the health of the nation..."
 
keyman512us said:
Well as far as the gasket..."if you think like a drop of water"...you always go with gravity...having said that the water rolls across the pan...down the "neck" of the insert and (hopefully) farther down the pipe. Eventually out of the house. The point is...in theory...no water should ever be anywhere close to being up against that round foam gasket...because if it were...it would have no way to "get into the pipe itself".

I agree with you Key WRT assembly. What has me concerned is whether this is the root of the problem. In order for a massive leakage as Mo reported, I am concerned that either there was a blockage in the trap and water backed up and fully immersed the pan gasket. If yes, then your suggestion, plus cleaning the trap should put an end to it. Or (hopefully not) a joint downstream is poorly glued or not at all, in which case, there is still more to discover. Let's hope this is not the case and with the putty and a drain clean Mo can shower in peace and meditate on the movement of the earth.
 
BeGreen said:
keyman512us said:
Well as far as the gasket..."if you think like a drop of water"...you always go with gravity...having said that the water rolls across the pan...down the "neck" of the insert and (hopefully) farther down the pipe. Eventually out of the house. The point is...in theory...no water should ever be anywhere close to being up against that round foam gasket...because if it were...it would have no way to "get into the pipe itself".

I agree with you Key WRT assembly. What has me concerned is whether this is the root of the problem. In order for a massive leakage as Mo reported, I am concerned that either there was a blockage in the trap and water backed up and fully immersed the pan gasket. If yes, then your suggestion, plus cleaning the trap should put an end to it. Or (hopefully not) a joint downstream is poorly glued or not at all, in which case, there is still more to discover. Let's hope this is not the case and with the putty and a drain clean Mo can shower in peace and meditate on the movement of the earth.

Well that is a good point BG...A "process of elimanation test" could be performed though. Take a garden house, stuff it down the neck of that drain, wrap a damp rag around the hose nice and tight and let er' rip. If 'Niagra Falls' isn't observed coming through the ceiling, vents, or dripping down the walls...it would confirm where the problem trully is!

The added benefit...would help to ensure the trap & drain line is good and clean too! :)

"Dime to a doughnut though...my money is on the mating surfaces of the two piece drain." ;)
 
BG, There appears to be NO blockage of any type. That drain has never had any hint of such a problem. And the trap is holding water just fine. I can see it way down in there and it's been days since anything water has been run. It looks just like the day we stopped using it.

I'm convinced that I gradually unscrewed the top portion of the drain by standing on it fairly regularly (I won't be doing that anymore), beating up the plumber's putty, and ever so slowly unscrewing things until water started leaking out that little gasket area.

As far as how much water has been leaking, well, it's really not that bad, but I was pretty shocked to see any water in the lower bathroom on the counter top. It actually took me a while to figure out that it was DRIPPING SLOWLY from the A/C register screw. At first I thought someone might have spilled some water or something into one of the upstairs registers and it made it's way to that one somehow. But I eventually realized it was coming from the upstairs shower. Apparently it is dripping down onto the 6 inch diameter HVAC conduit (or whatever it's called--what the air blows through), running down hill to the register, and then dripping around the screw. The second day showed more water, but I'd estimate it was only a couple ounces at most. It was hard to tell how much since it was dripping and splashing. It probably looked like there was more there than there actually was. The fact that it never ran fast enough to escape the tensile (or whatever it's called that makes the water stick to the A/C conduit tube--what the air blows through) and so it has not yet got any of the drywall wet. That's the way I hope to keep it.

I'll get some plumber's putty tomorrow, clean things up, re-assemble and update you. I'm pretty sure this will fix things.
 
I know this is a far stretch, but have you ruled out condensation from the a/c register?
 
Hogwildz said:
I know this is a far stretch, but have you ruled out condensation from the a/c register?

I can say with confidence that condensation isn't an issue. The A/C wasn't on when the leak happened and I only discovered later that the A/C hasn't worked at all this year. We had a really mild spring and haven't needed it until last week. Hopefully, the A/C man will be here next Monday.

I feel like the 19 year old plumber's putty, and what looked like some missing plumber's putty, is the culprit. I'm headed up there right now to see if I can fix it.

One interesting side note. When I went to pick up some plumber's putty, I happened to read the label and noticed it said explicitly that it is not to be used on plastic of marble parts. My parts are definitely plastic, so I bought the other product that was recommended right there on the label. It's called Tub and Tile siliconized acrylic caulk.

I've cleaned everything up, even wet sanded an injection seal on the plastic sealing surface, and am going to put it all back together now. Here's photos of dirty and clean.
 

Attachments

  • S7001297.JPG
    S7001297.JPG
    37.9 KB · Views: 2,401
  • S7001321.JPG
    S7001321.JPG
    47.1 KB · Views: 3,910
Where that purple ring in the center of the drain bottom is....is that the end of the pvc pipe coming into the drain?
I had recently had a similar problem where as the type of drain the previous home owner used was a drain with a rubber gasket base. That type there is a rubber several ringed gasket that the pvc pipe slips up into at the base of the drain. The problem I found, was that the previous hack home owner had the pipe running into the drain out on an angle instead of straight up in. He caulked the hell out of it, and it must have recently let loose. I hacked the pipe off, removed that drain. Installed a drain with a solid glue in connection and that fised the problem for me.

In my last house, I had yet another shower drain leak. That was a similar drain, but they ran the black pipe up into the drain base. The pipe was about 1/4" smaller all the way around. They then packed the gap between the pvc pipe & the pvc drain with lead LMAO. Don't take a rocket scientist to figure out lead don't stay adhered to pvc.
I about had it with shower drains. Although I know of 2 now that were done the correct way, and not leaking.

Good luck with your fix Mo. Hope that does it for ya.

I'd have used silicone myself. But looks like you have the needed supplies.
Anymore I been using urethane caulk for alot of things. Stuff never hardens and sticks like crazy. Does take a few weeks to fully cure though.
Pumped a 1-1/4" hole in my basement wall with a solid stream of outside water pouring in with the urethane. Its stopped it dead,even in a stream of water. Some great caulk. Expensive, but worth it.
 
Hogwildz, I pulled the support (rubber gasket) loose between the drain basket and the stand pipe, and the stand pipe stayed in place. It looks to be nice and perpendicular (from top side, I've got drywall below). That's the end of the PVC pipe you see, and that purple stuff looks to be pvc cement. I made an assumption that it is well bonded, but good god, if you've seen that kind of crap, who knows? Still, I'm crossing my fingers and going forward. If things don't stop leaking, I'll drop those assumptions and start cutting gypsum.

Man I hate plumbing! It looks so simple, and then, crappola, something leaks. Toilets are my favorite. I've got 5 here with in-laws that manage to clog at least one of them each and every visit. Funny, I never had a clogged toilet my entire life as a single guy. In fact, I never owned a plunger until I married Mrs. Mo Heat. Lucky? Perhaps, but I've suggested her family should travel with a turbo plunger. I even went to the mat with one of her nieces for using a coat hanger on a nasty clog that permanently disfigured one of my porcelain goddesses. She was actually shocked that I didn't keep a coat hanger handy near the toilet for what she consider "the inevitable". Give me strength!

Funny you should mention urethane caulk. I bought 3 tubes of it for my severely leaking bedroom bay windows. Haven't had a good rain to test them yet, but I think I need another tube for some spots I missed. I'm glad to hear it's good stuff. I thought as much, but you never know. It is expensive. Between 4 and 5 dollars a tube depending on the brand. Still, I bought it for the touted long lived flexibility, so if it works, it'll be better than rotting away another window sill (see: photo). Man, that basement leak sounds gnarly. I hope that urethane caulk holds up in there.
 

Attachments

  • S7001022.JPG
    S7001022.JPG
    37.6 KB · Views: 1,559
  • S7001033.JPG
    S7001033.JPG
    65.9 KB · Views: 1,559
  • S7001118.JPG
    S7001118.JPG
    59 KB · Views: 1,506
Good catch Mo. Plumber's putty contains fish oils which may slowly dissolve plastics when in direct contact. I too would have used silicone, but the tub and bath caulk may be ok.

PS: I think the purple stuff in the PVC pipe is the primer which was used before the glue. Is all of your drain pipe PVC? Usually it's black ABS for the drains around here.
 
Status
Not open for further replies.